Jiraiya on the Toad by NomNom Figures - Kit Overview
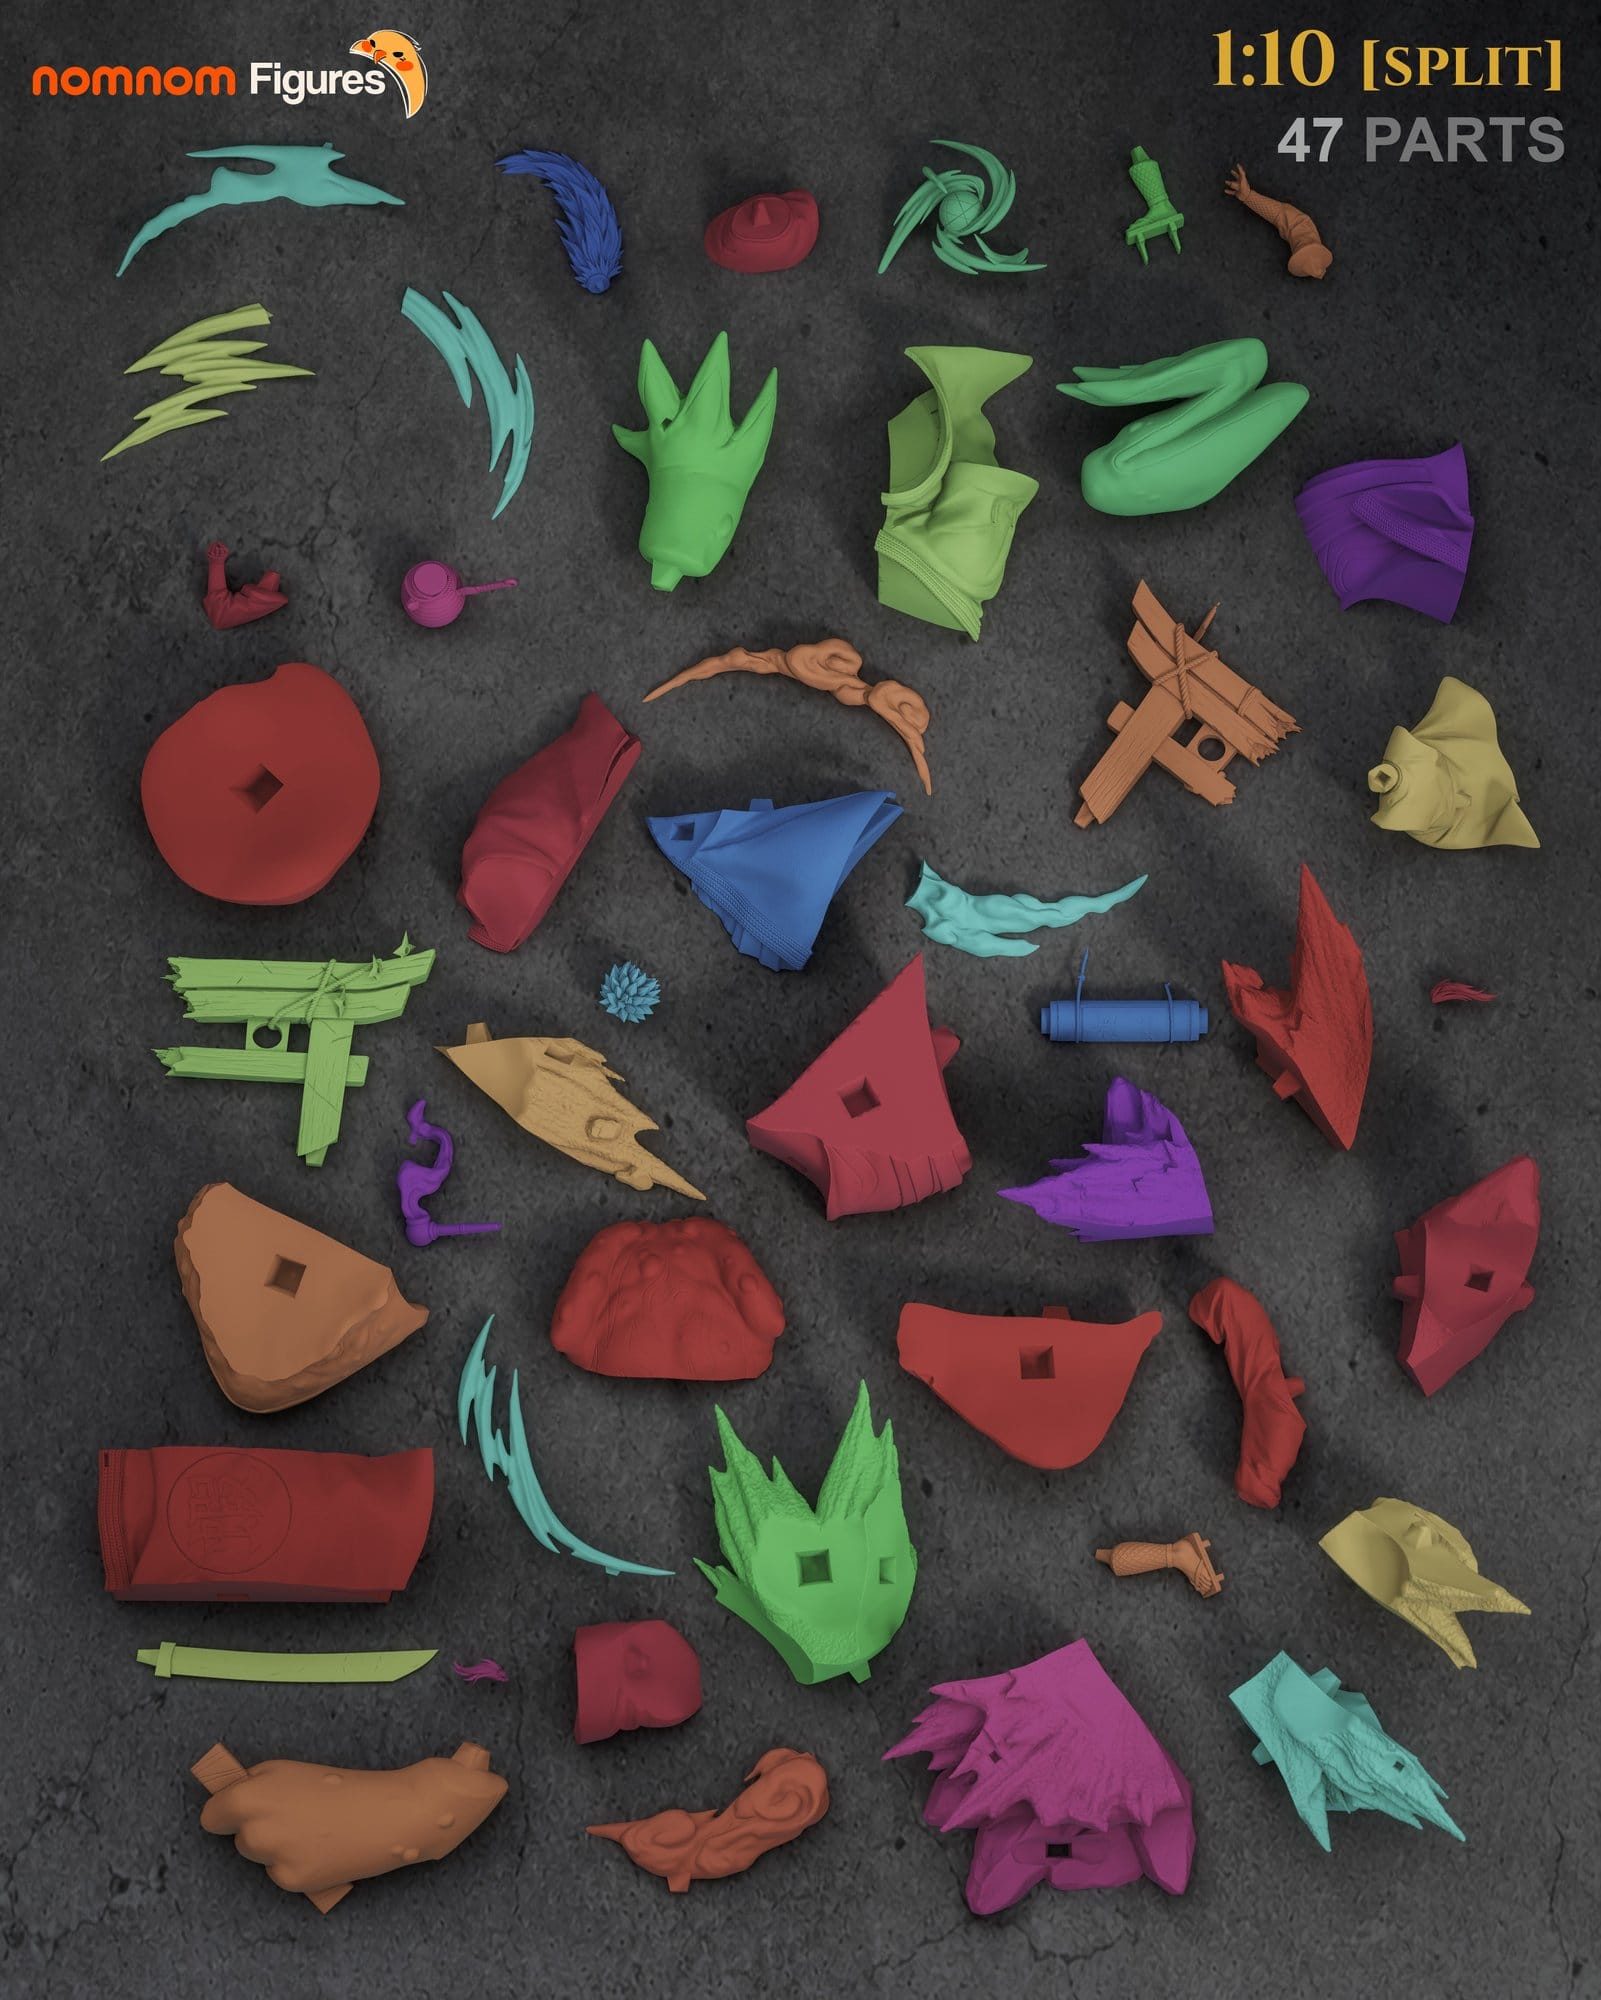
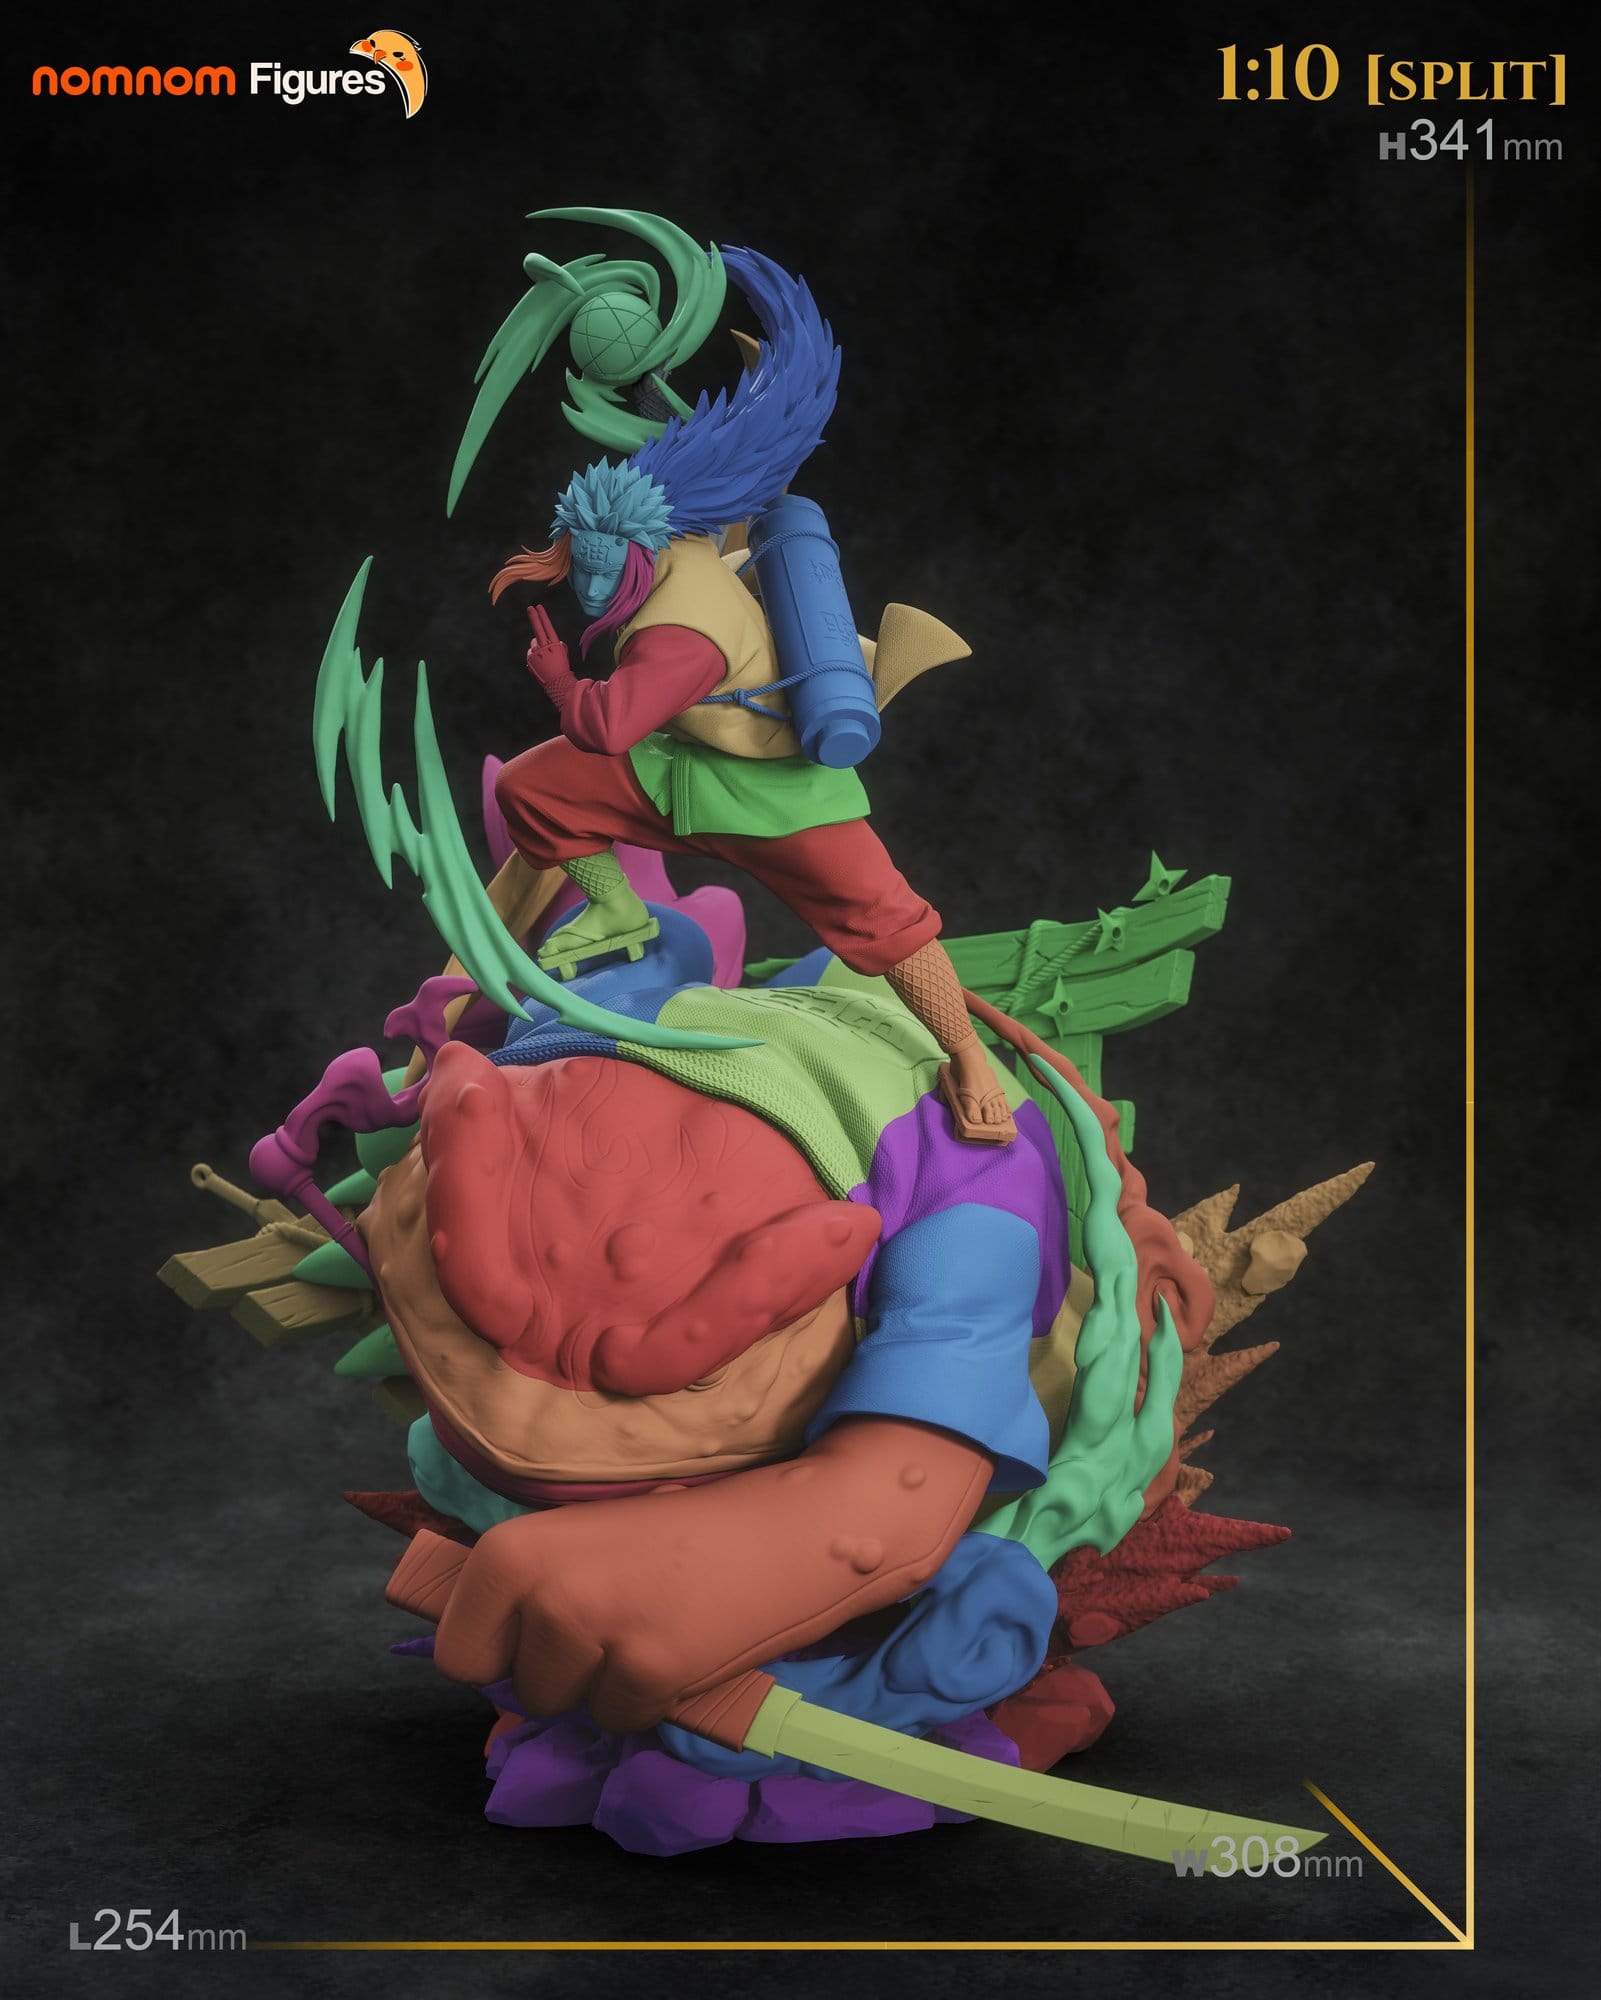
A 341 mm Jiraiya standing on a toad the size of a loaf of bread, with a Rasengan, a smashed torii gate and 47 split parts.
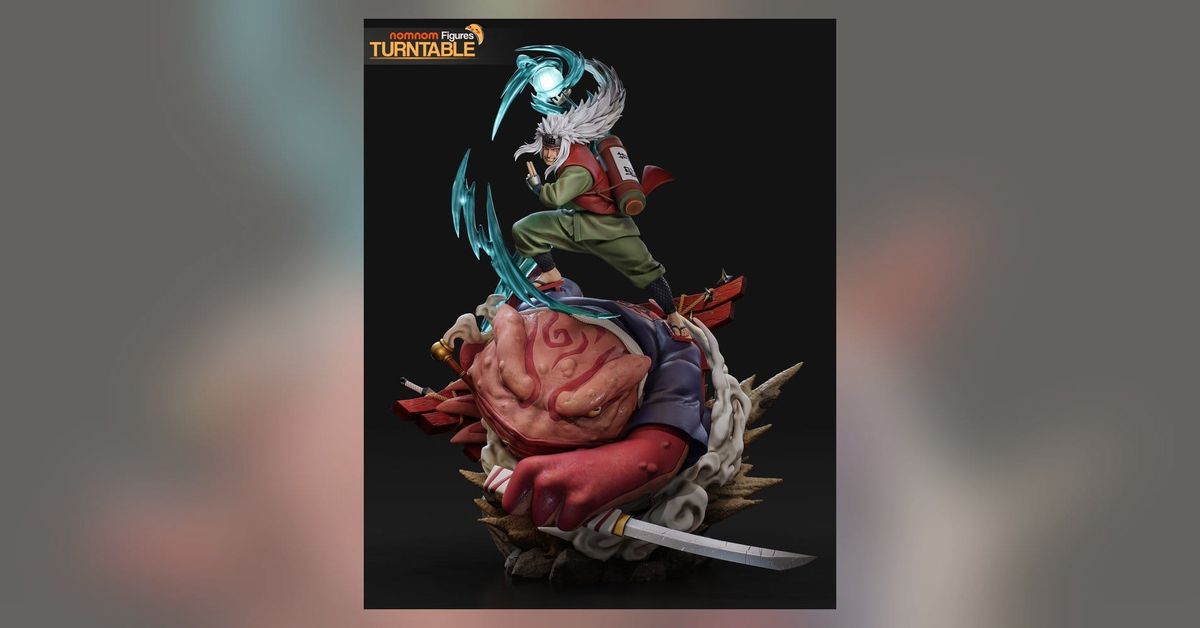
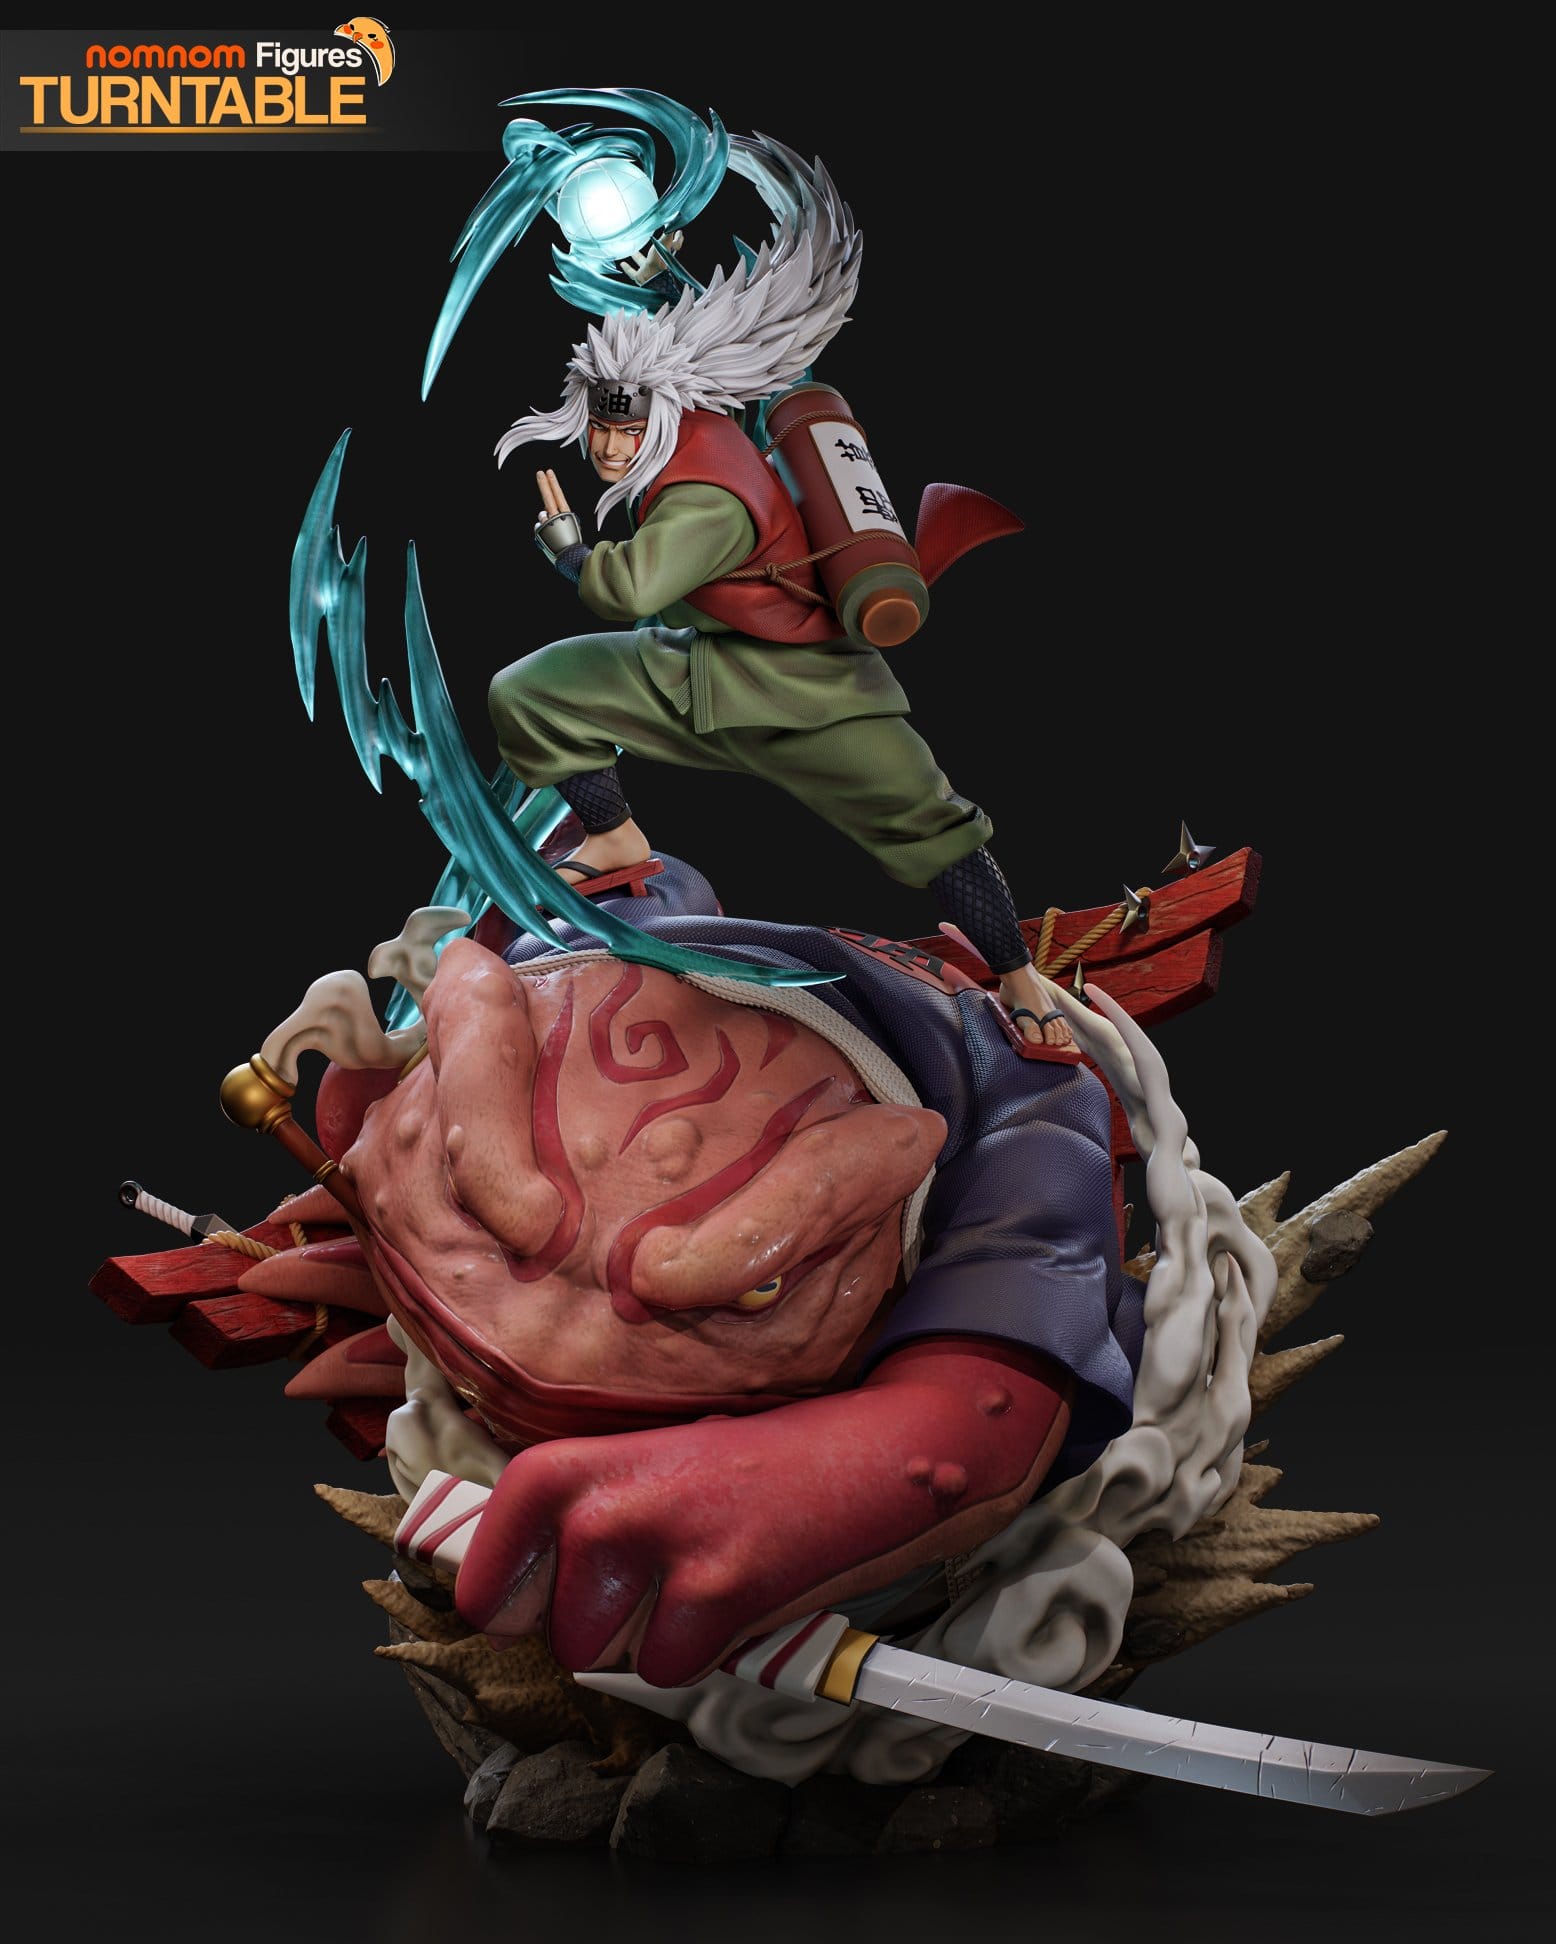
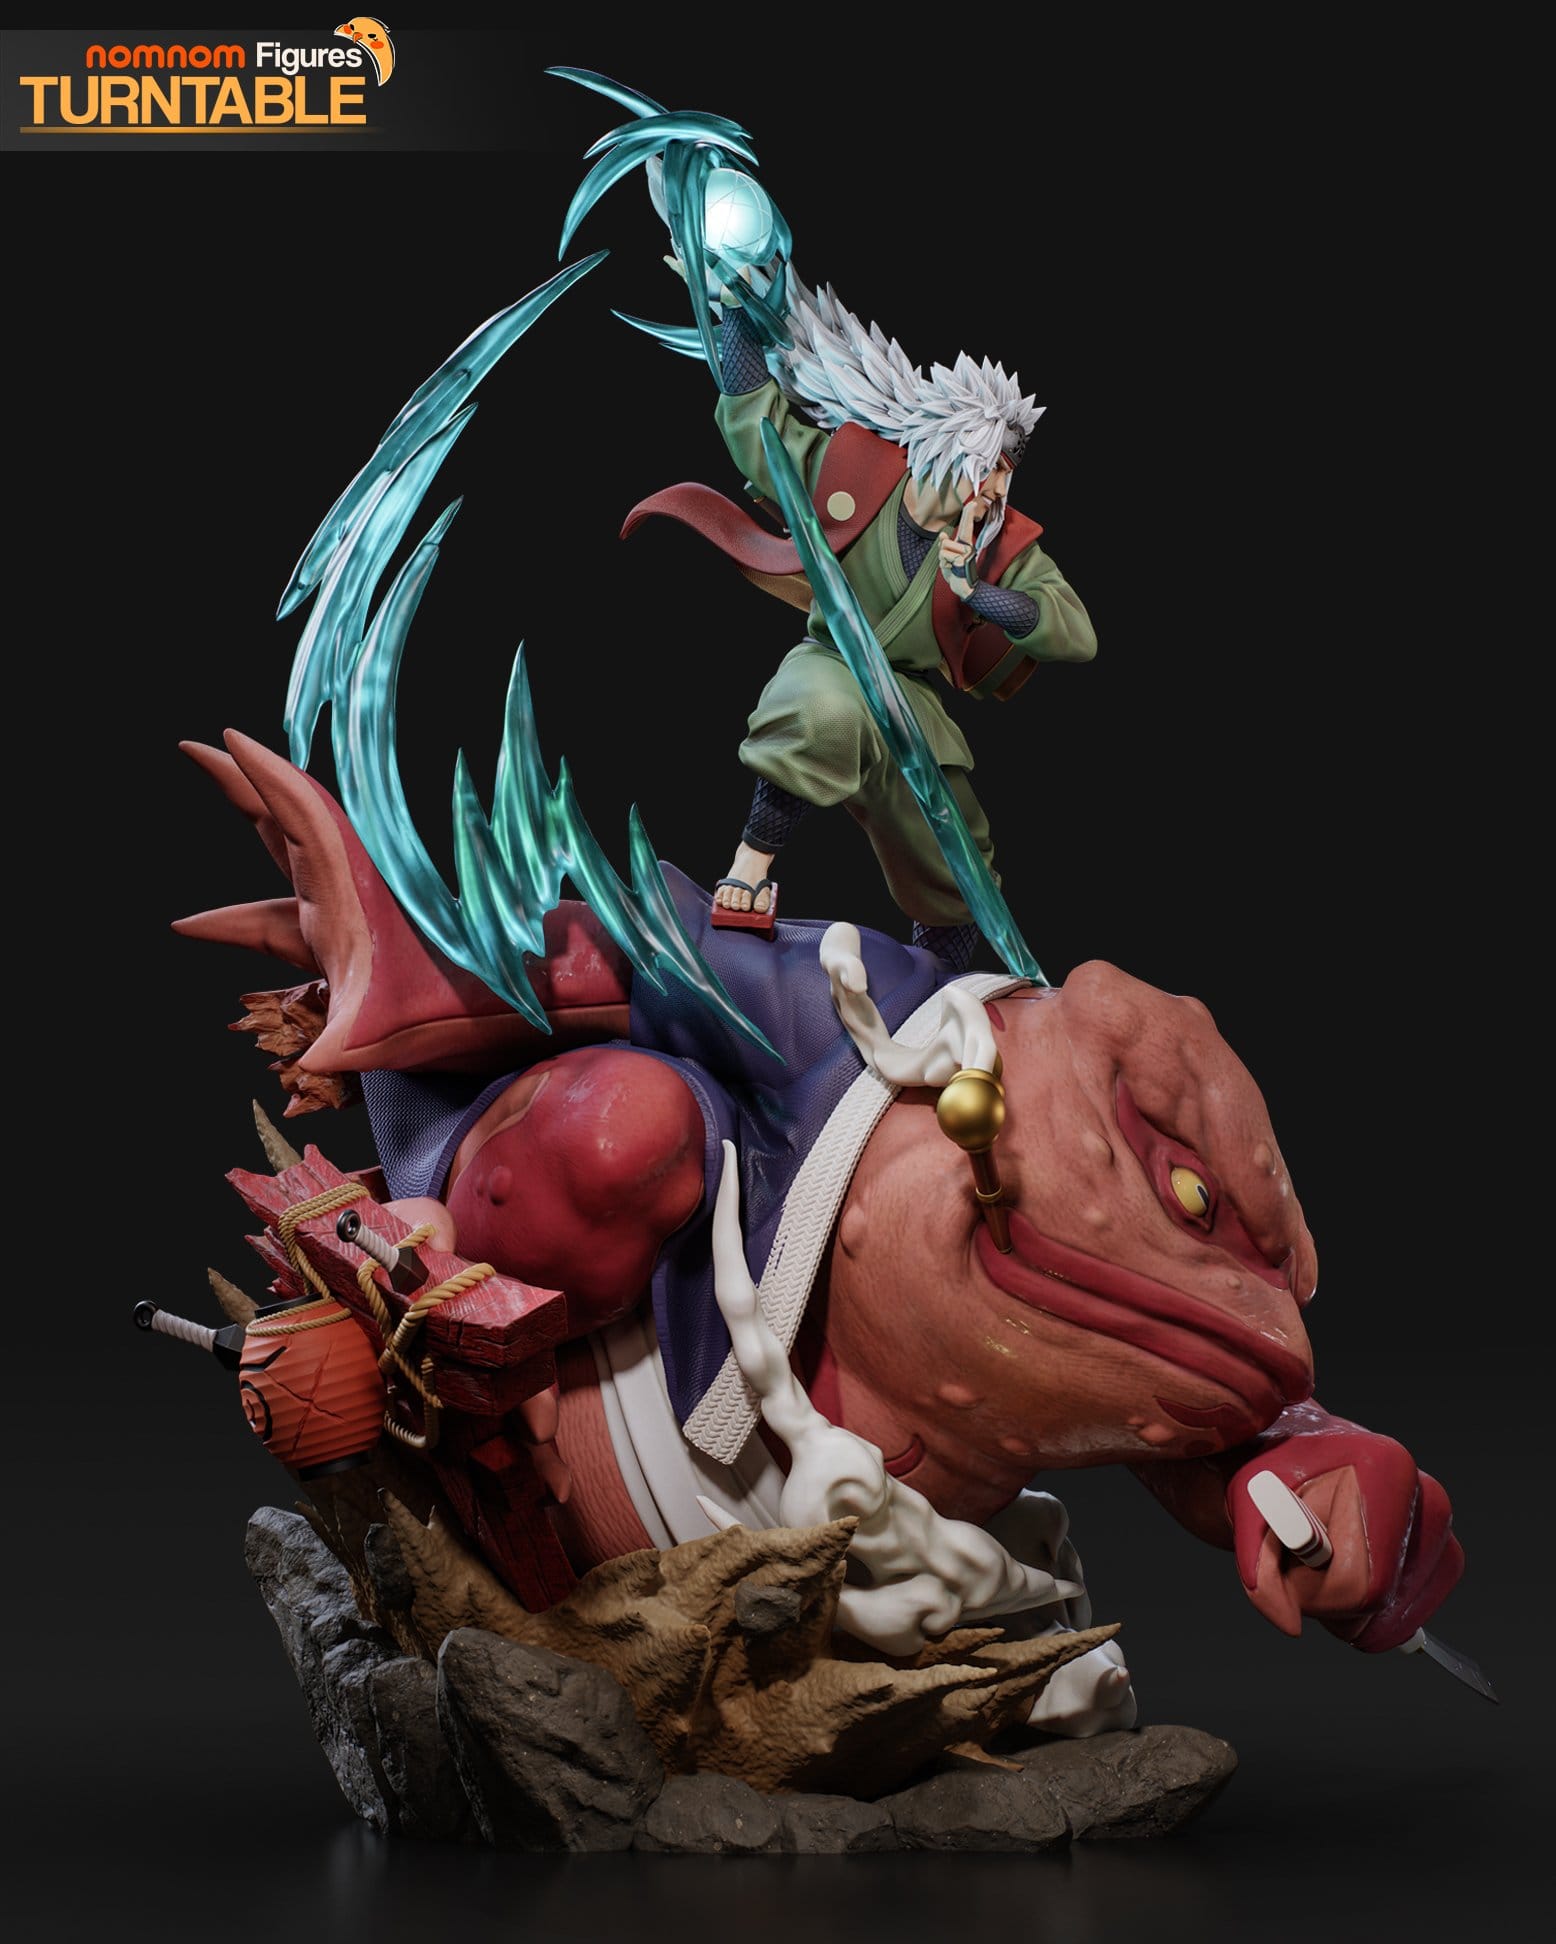
Jiraiya, from Naruto, by NomNom Figures. He stands on the back of a large red toad, Rasengan raised, over a base of rock spikes and a broken torii gate. What is notable is the sheer size: 341 mm tall and 47 parts in the split version.
This post is written from the studio's files and renders. Nothing here has been printed yet.
At a glance
- Studio: NomNom Figures
- Character and source: Jiraiya, Naruto, with the toad (the files only call it "gama"); I haven't confirmed which toad it is
- Section: Anime
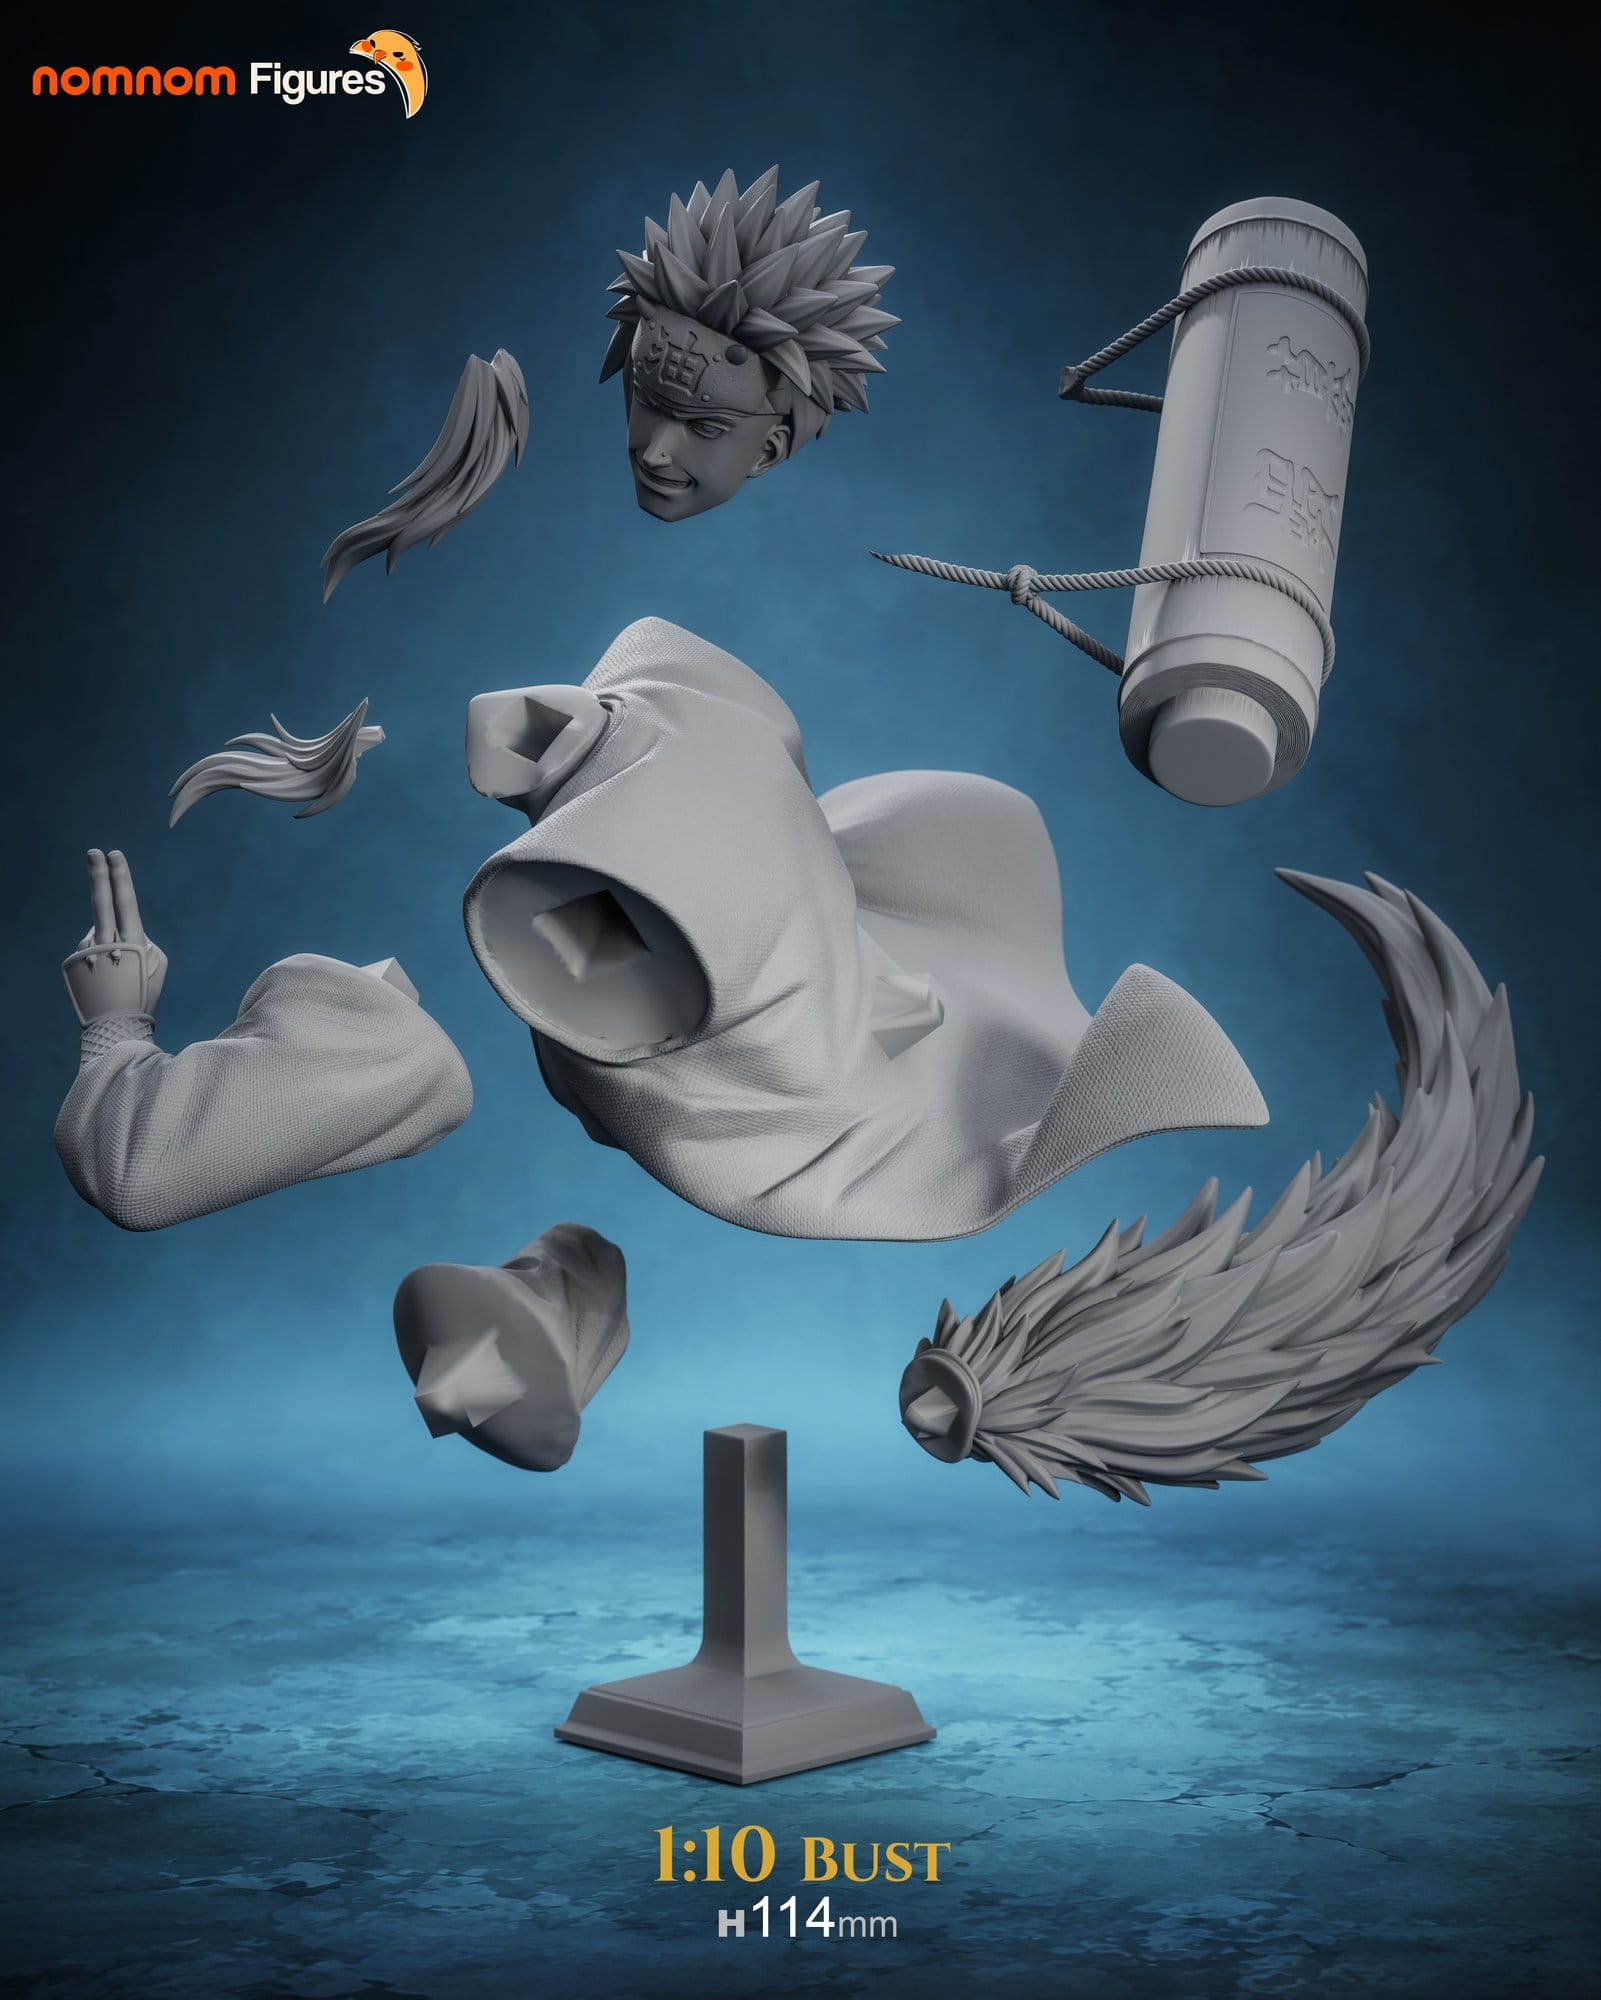
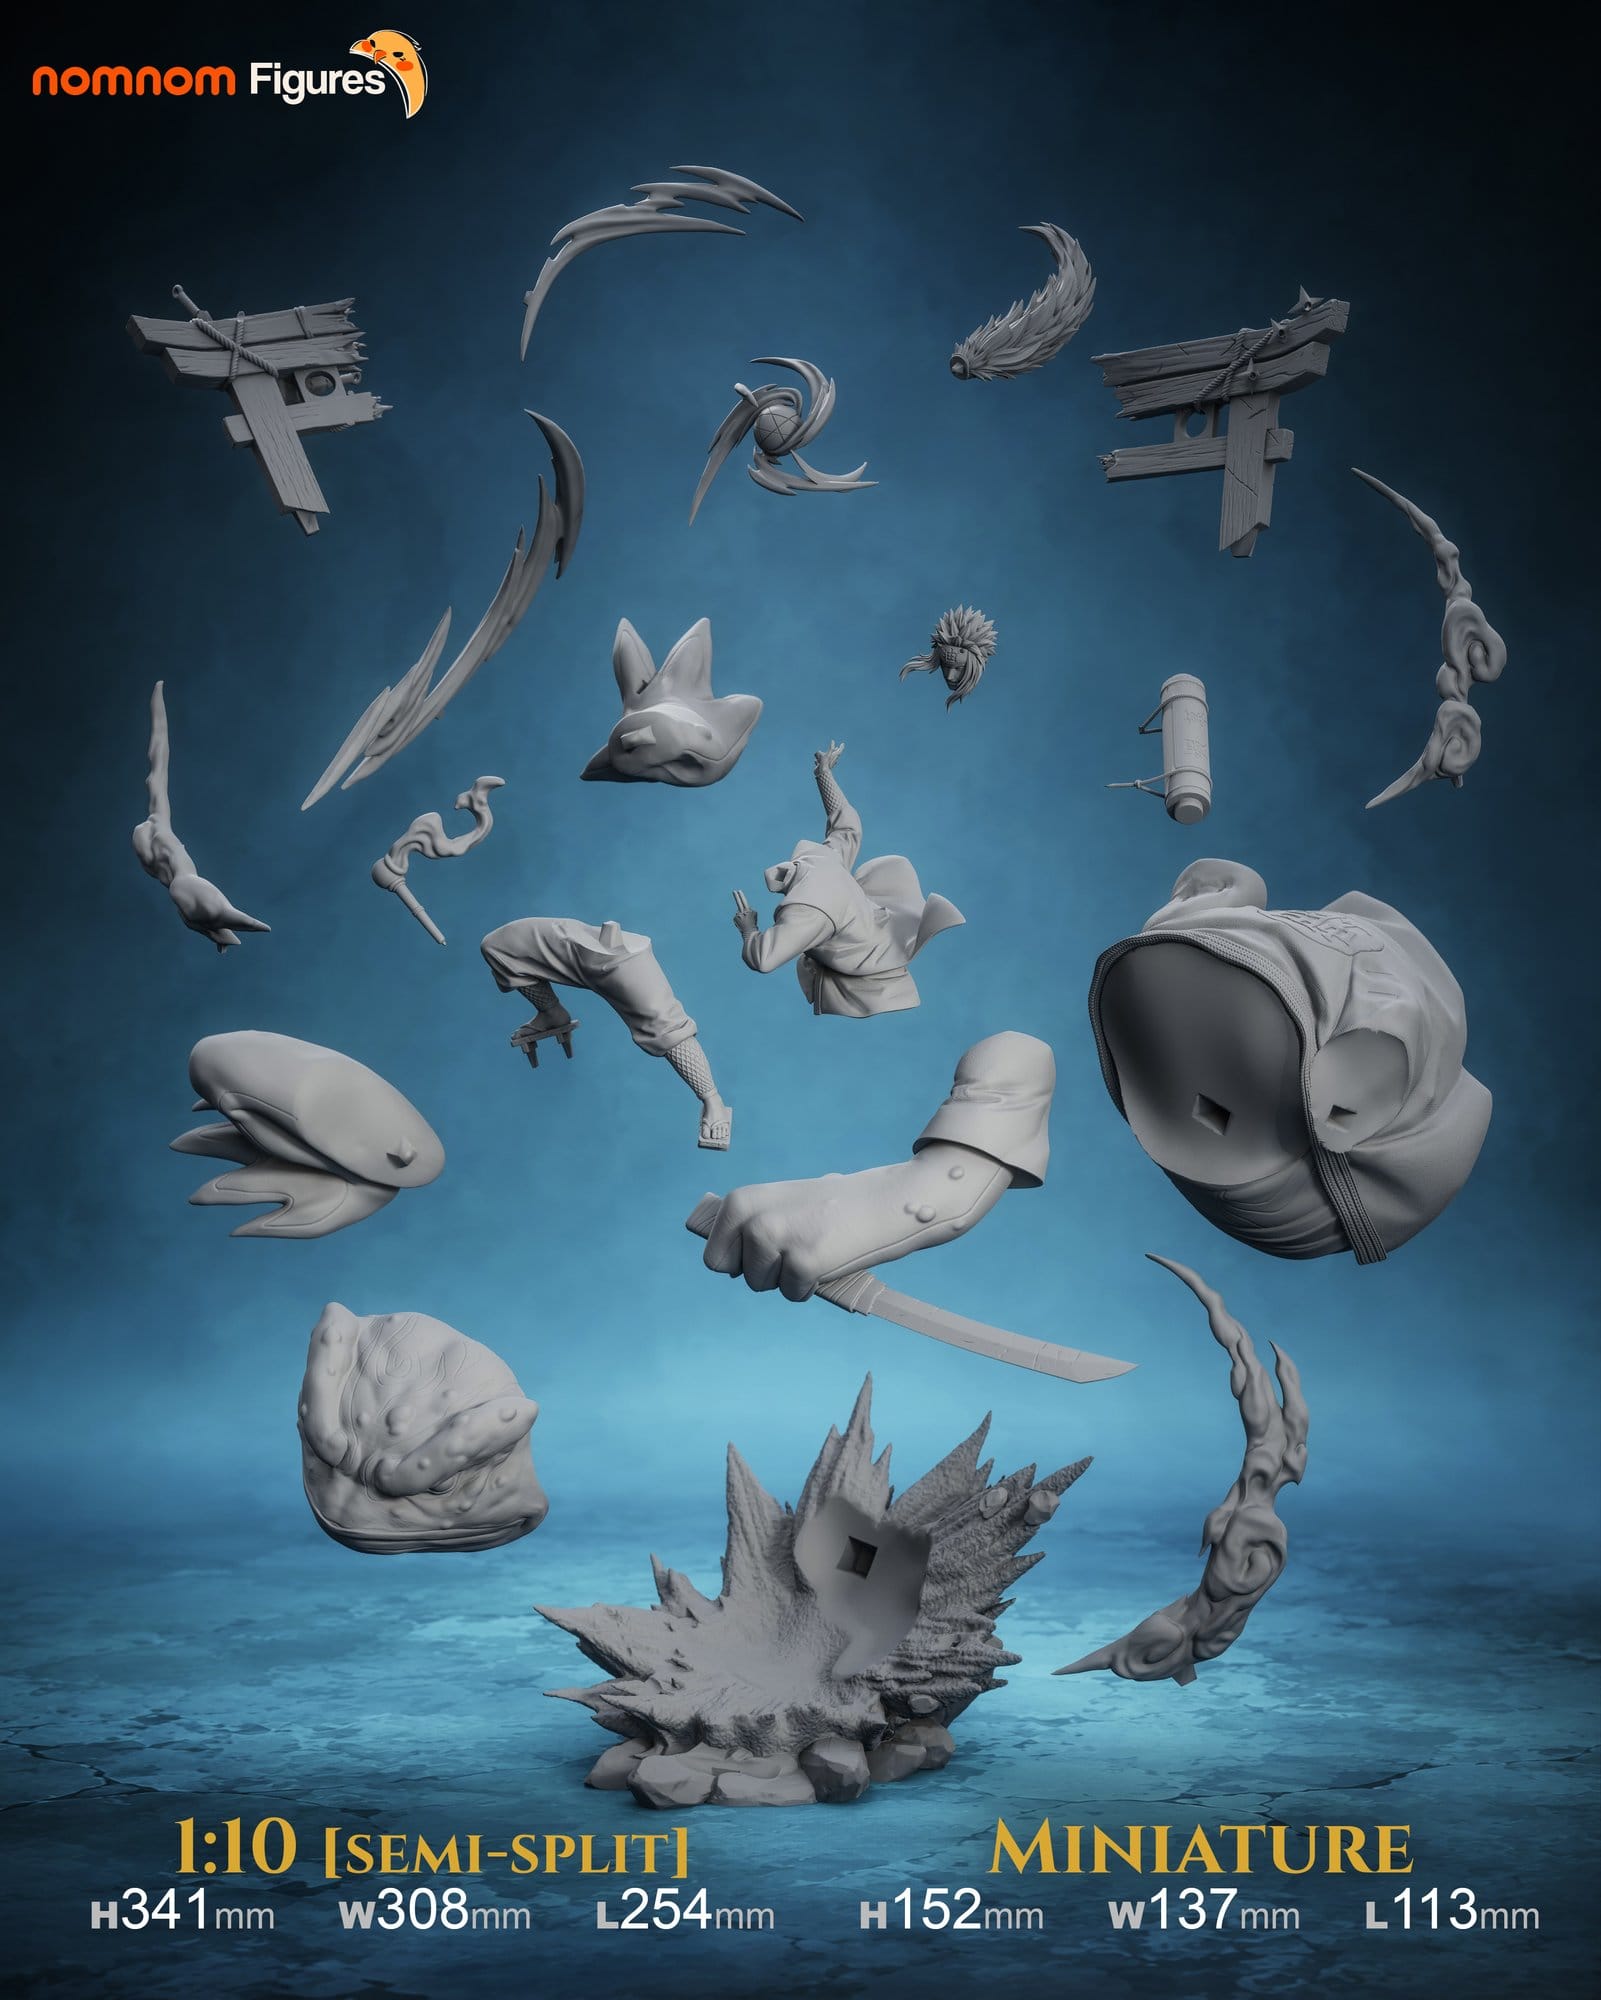
- Versions and sizes (H×W×L): 1:10 semi-split 341×308×254 mm; 1:10 split 341×308×254 mm; 75mm miniature 152×137×113 mm; 1:10 bust 114 mm tall (width and length not on the sheet)
- Parts per version: semi-split 20; split 47; 75mm 20; bust 10
- Presupports: split, 75mm and bust, as
NOM_*_Supported.stlwith a matching.lysfor each; none for the semi-split - Largest part and plate fit: semi-split
178mm_base.stl225.2×144.1×198.7 mm and178mm_gama_body.stl161.2×157.3×158.8 mm fit neither Mars-class nor Saturn-class; splitNOM_baseG_Supported.stl81.5×73.6×147.8 mm, all 47 fit Mars-class; 75mmNOM_75mm_base_Supported.stl98.3×72.4×108.1 mm, all fit Mars-class; bustNOM_backHair_Supported.stl54.7×28.3×90.0 mm, all fit Mars-class - Ratings (estimated): Print 3/5 for the split, 75mm and bust presupported sets, 5/5 for the raw semi-split; Assembly 5/5 for the split, 4/5 for the semi-split and 75mm, 3/5 for the bust; Paint 5/5 for the full scene, 4/5 for the bust
- Skill tag: advanced
- Status: files reviewed, not printed
- Where to get the files: NomNom Figures' Patreon and Cults3D store, linked at the bottom.
The model
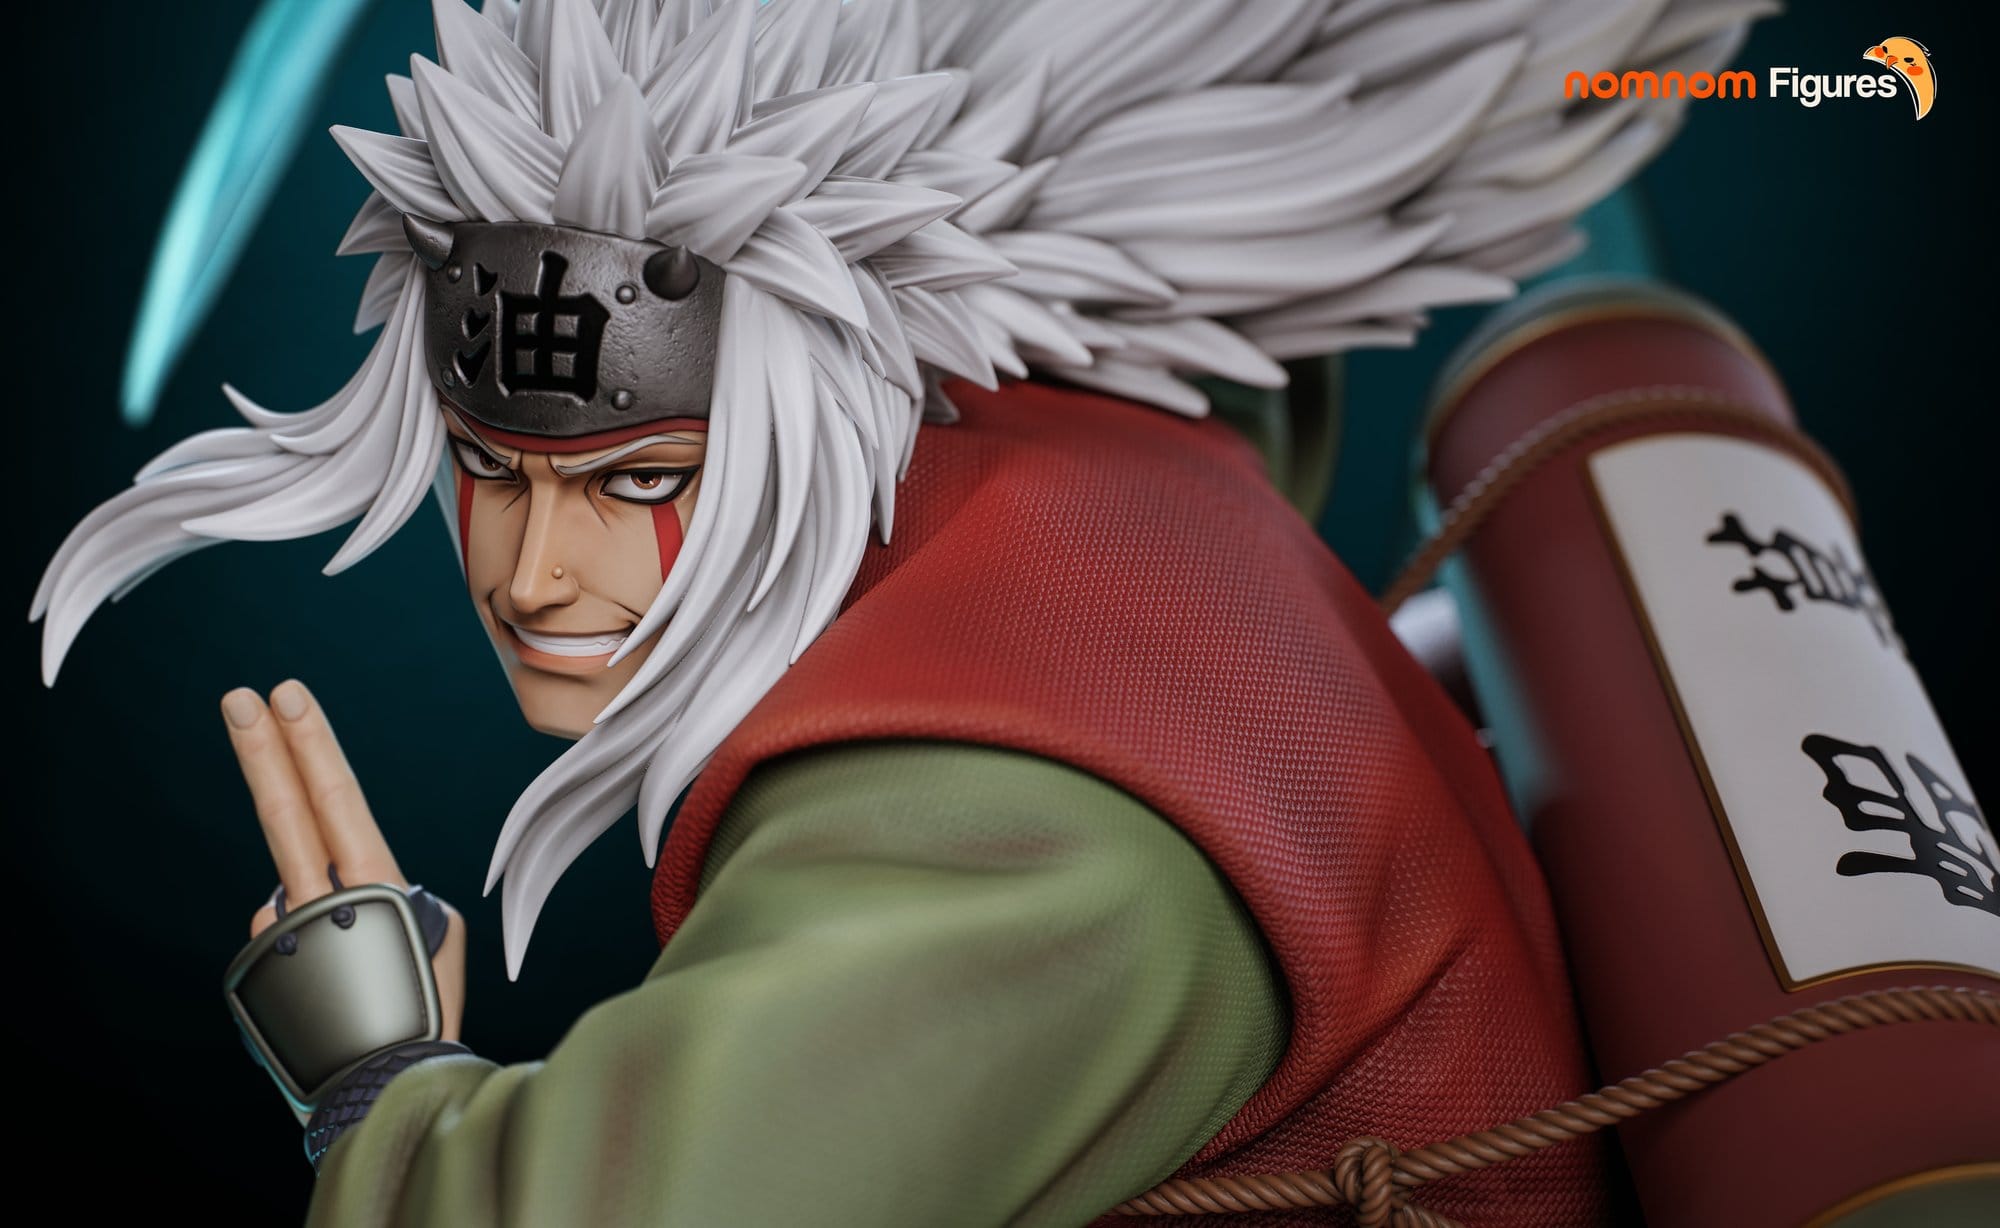
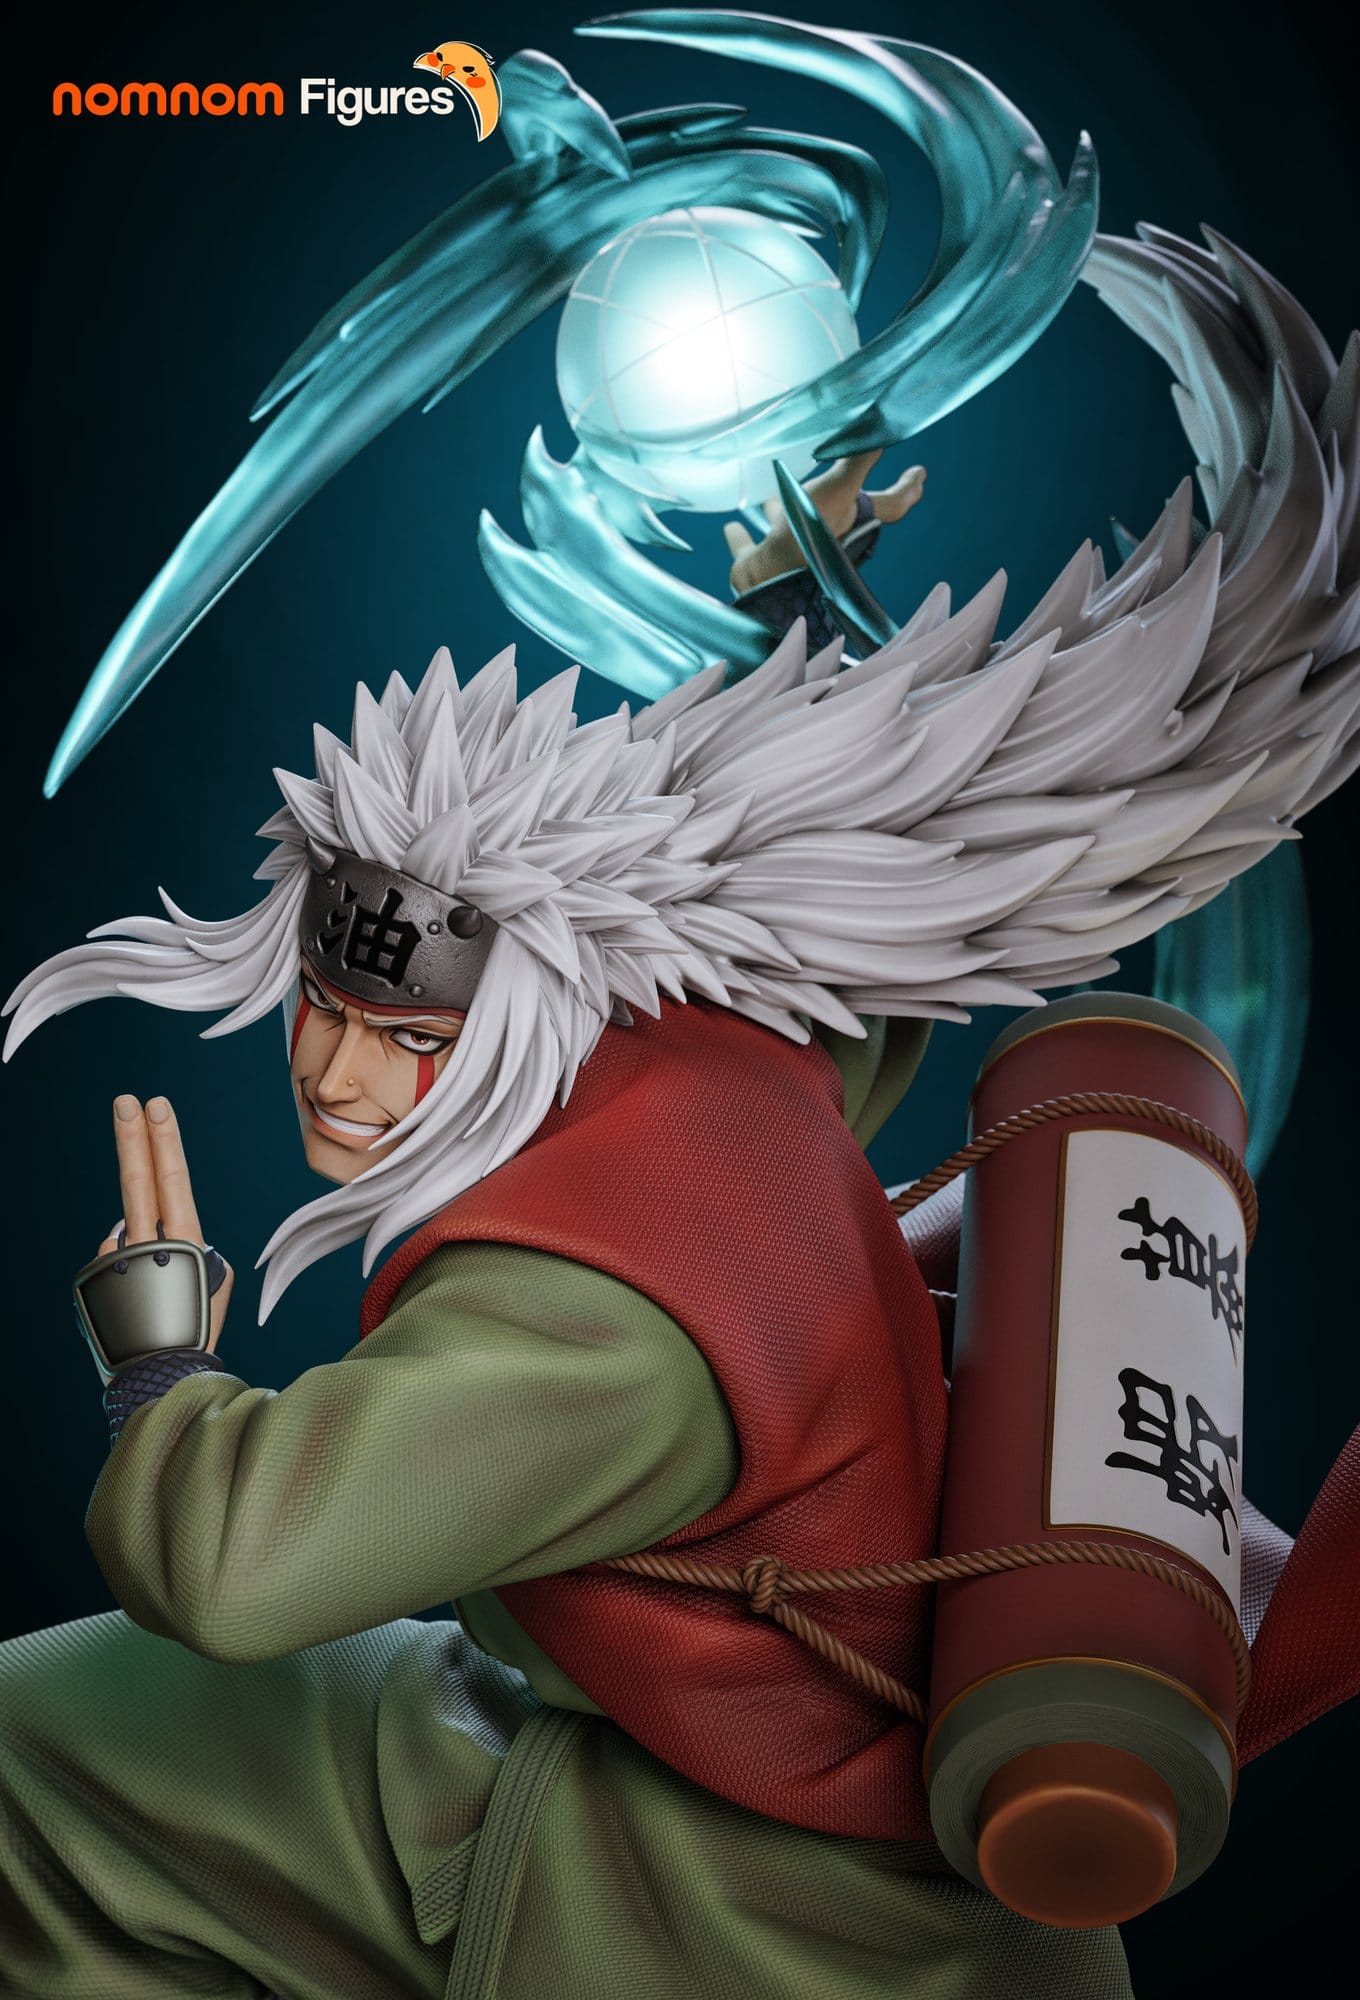
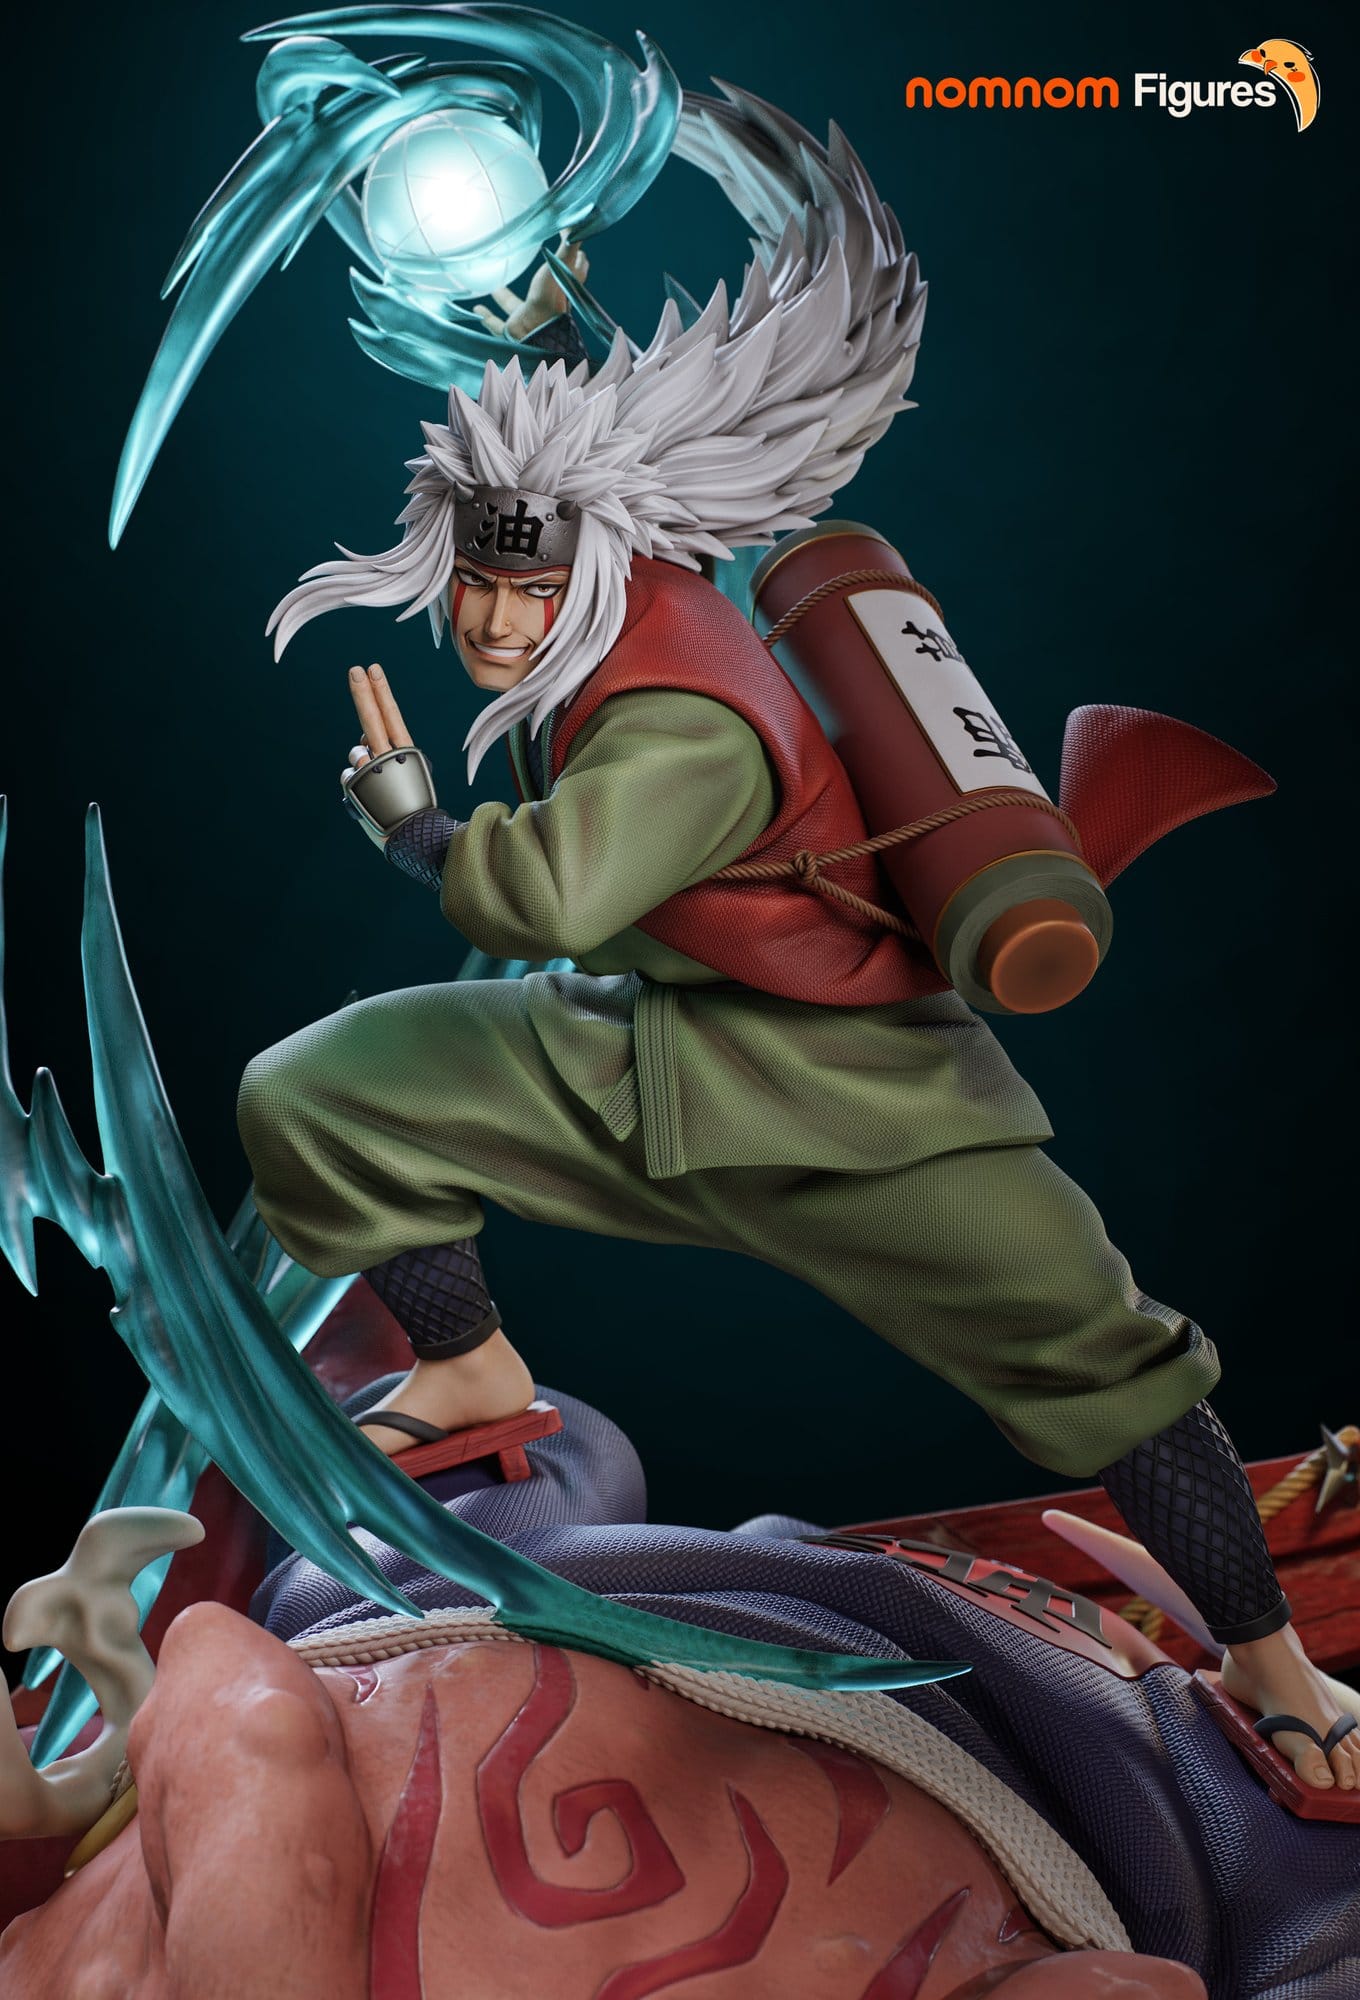
Jiraiya stands in a wide, low stance on the toad's back, weight on his front foot, body turned so his back and the big scroll face the viewer while he looks back over his shoulder. His left hand is raised in front of his face with two fingers up. His right arm is thrown up and behind him holding a Rasengan, a glowing pale blue sphere with a lattice pattern on it. From the sphere, ribbons of teal chakra spiral out and sweep down in long arcs, one of them curving past the toad's head to the ground. Two smaller bolts of the same teal sit off his left side.
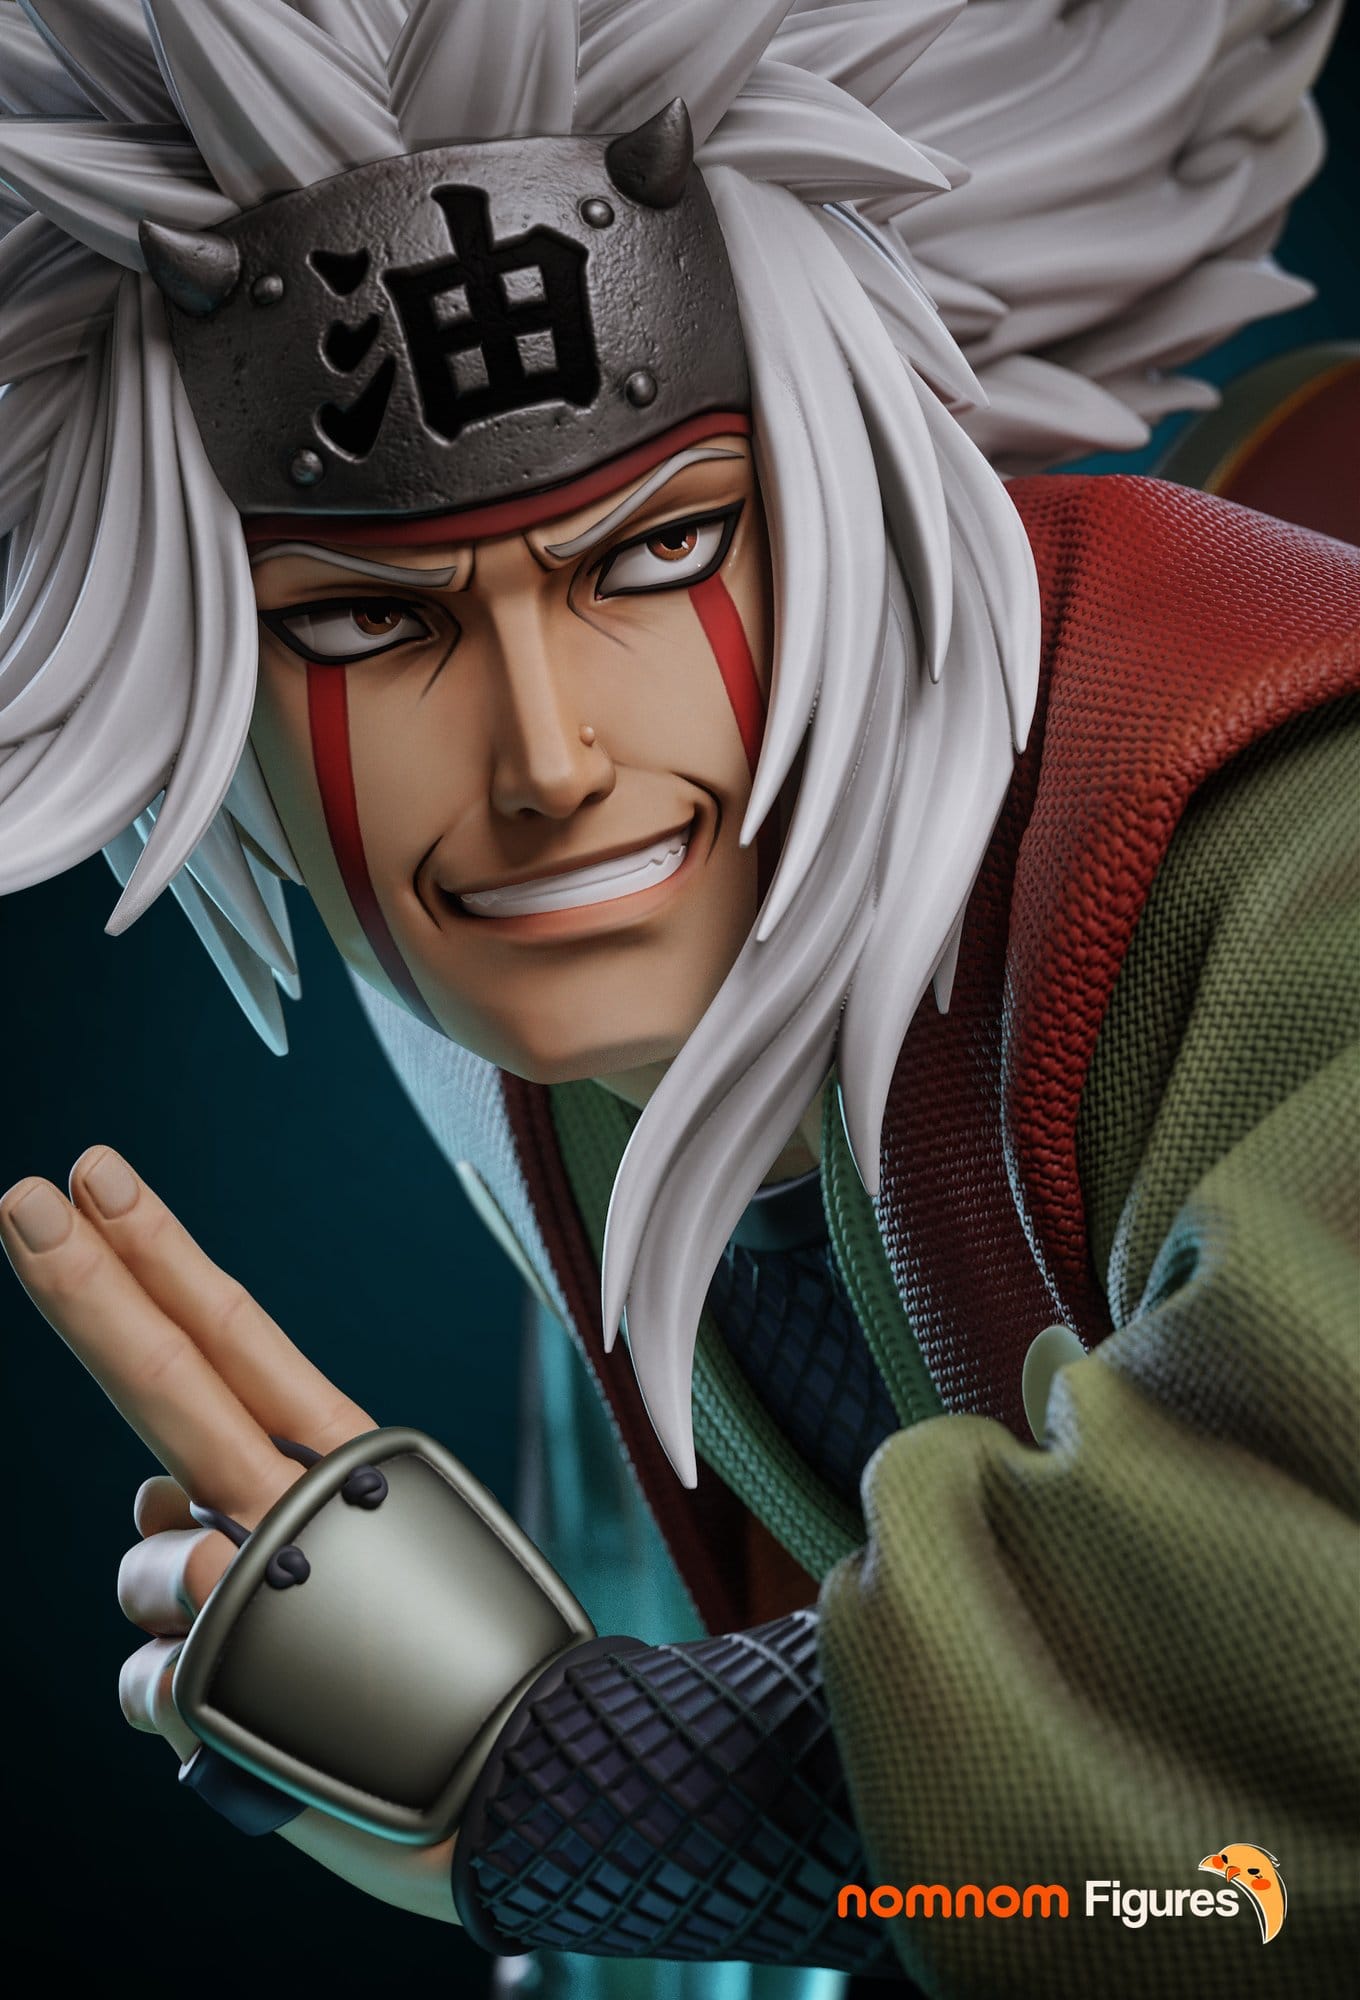
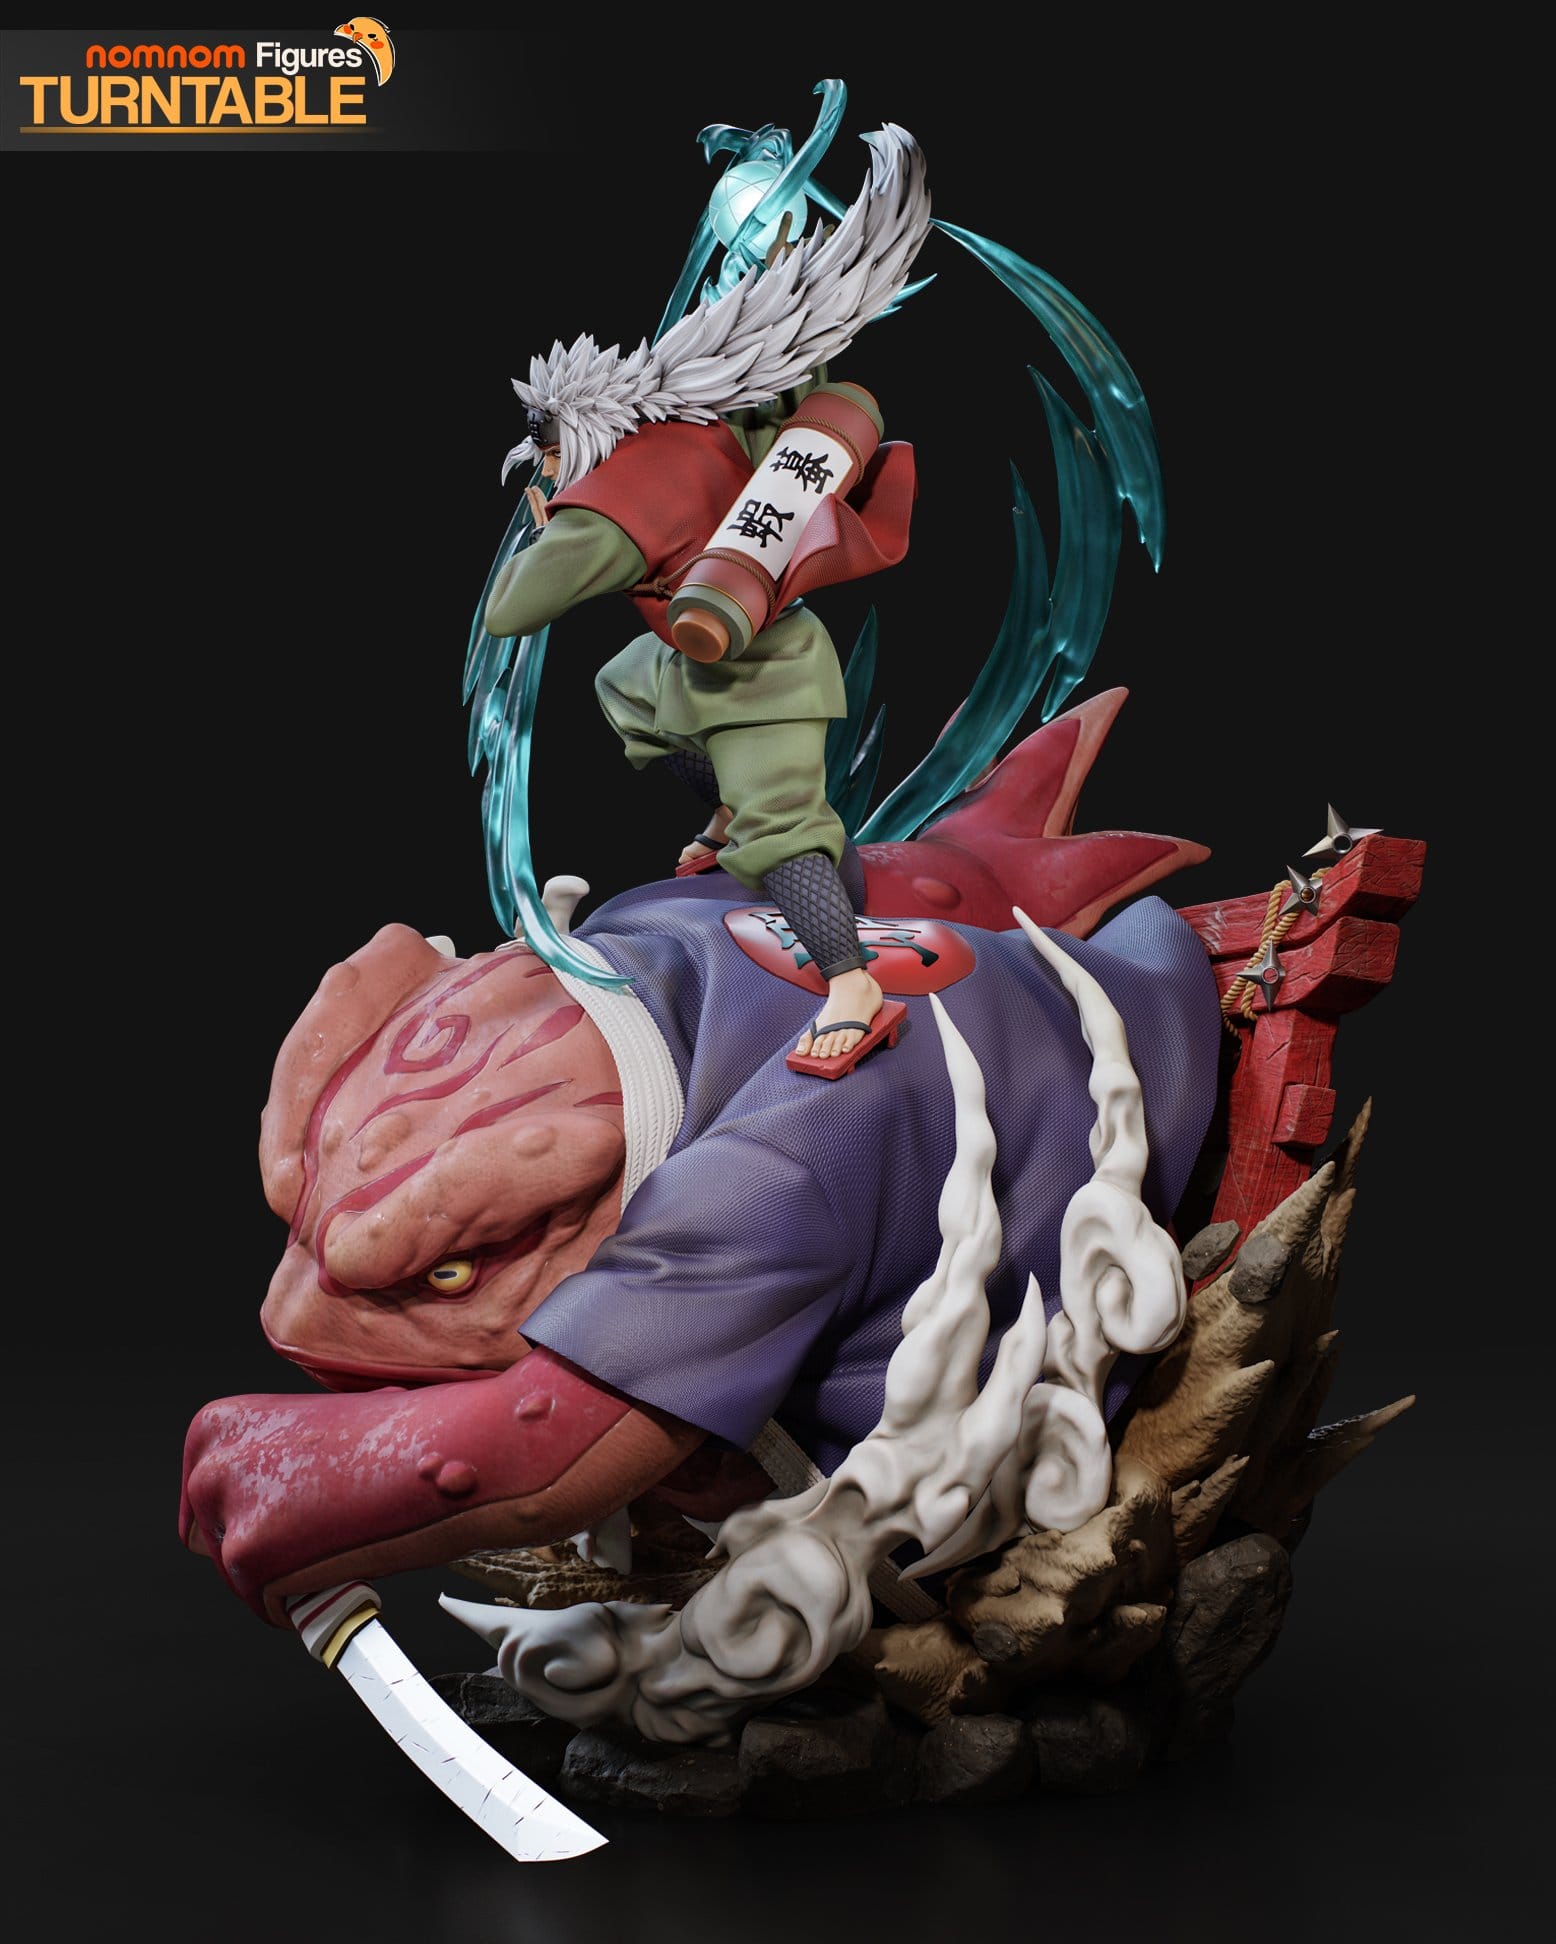
The identifying details are all here. The hair is white, spiked up over the forehead and running back into a long mane that reaches past his waist, with two loose locks hanging in front of the ears. The headband is a horned metal plate with the 油 kanji, riveted, on a red cloth band. Red lines run from under each eye down the cheeks, there is a mole beside the nose, the eyes are brown, and the expression is a wide grin with teeth showing. The scroll on his back is a large red cylinder with a white label carrying black kanji, brown rope lashings, and copper-coloured end caps. A red cloth tail hangs off the back of the vest.
Costume, item by item: an olive green kimono top and loose green trousers; a red sleeveless vest over the top with a yellow disc on the left shoulder; a green sash; dark blue mesh underarmour showing at the wrist and at the ankle; a grey-green metal hand guard on the raised hand; red wooden geta sandals with black straps. The renders show the cloth with a woven texture.
The toad is red-orange and covered in warts, with darker red swirl markings on the face and eyelids and a yellow eye with a black slit. It wears an indigo blue vest with a white rope sash and a red circular crest with kanji on the back. A long pipe with a gold bowl and a red stem is tucked under the sash on its left flank. Its right hand rests on a short sword whose blade is bare steel, with a white-and-red wrapped hilt and gold fittings; the left hand has a white bandage around the palm. Cream-coloured smoke wisps curl around the toad on three sides.
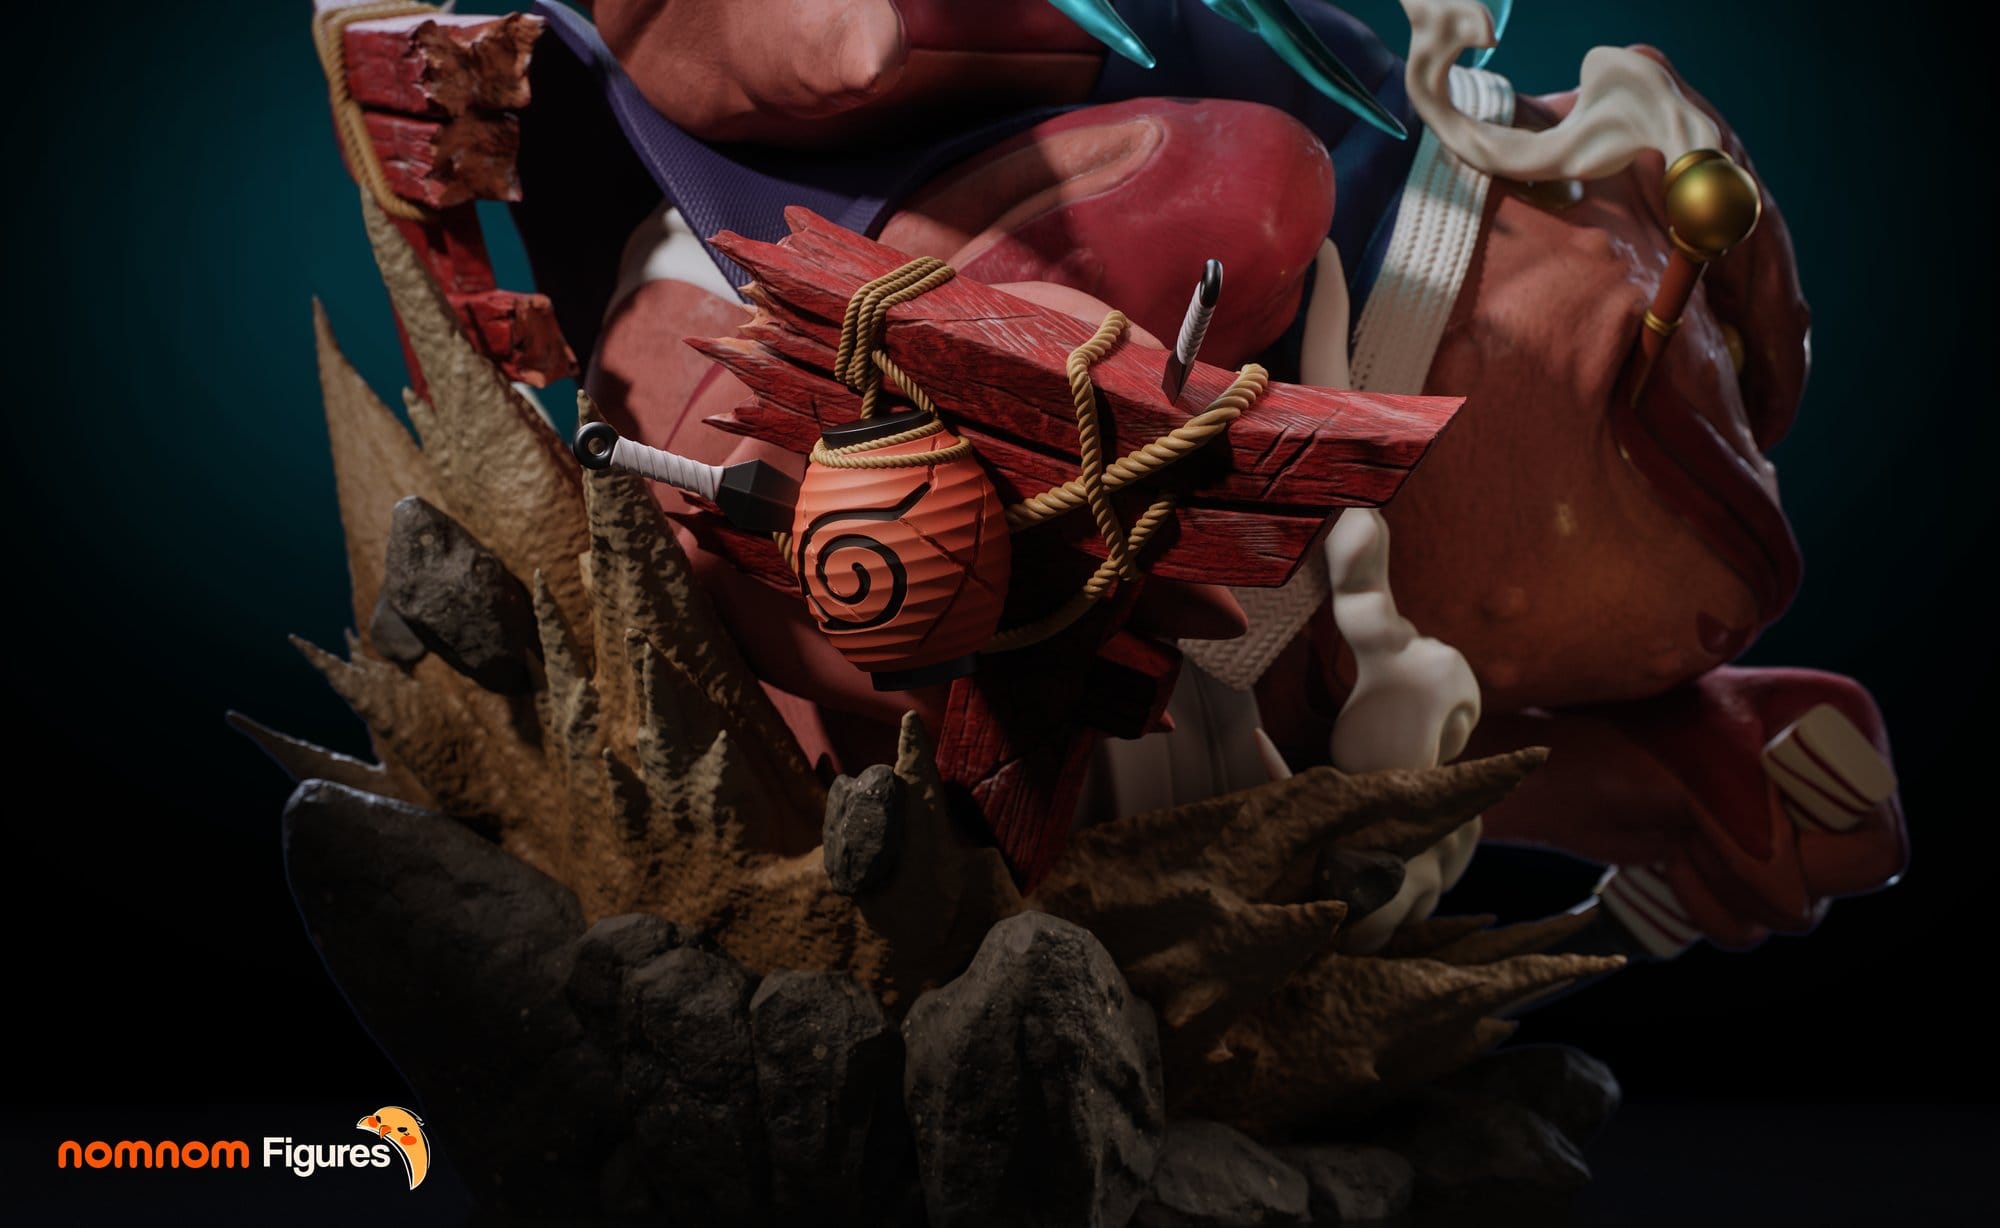
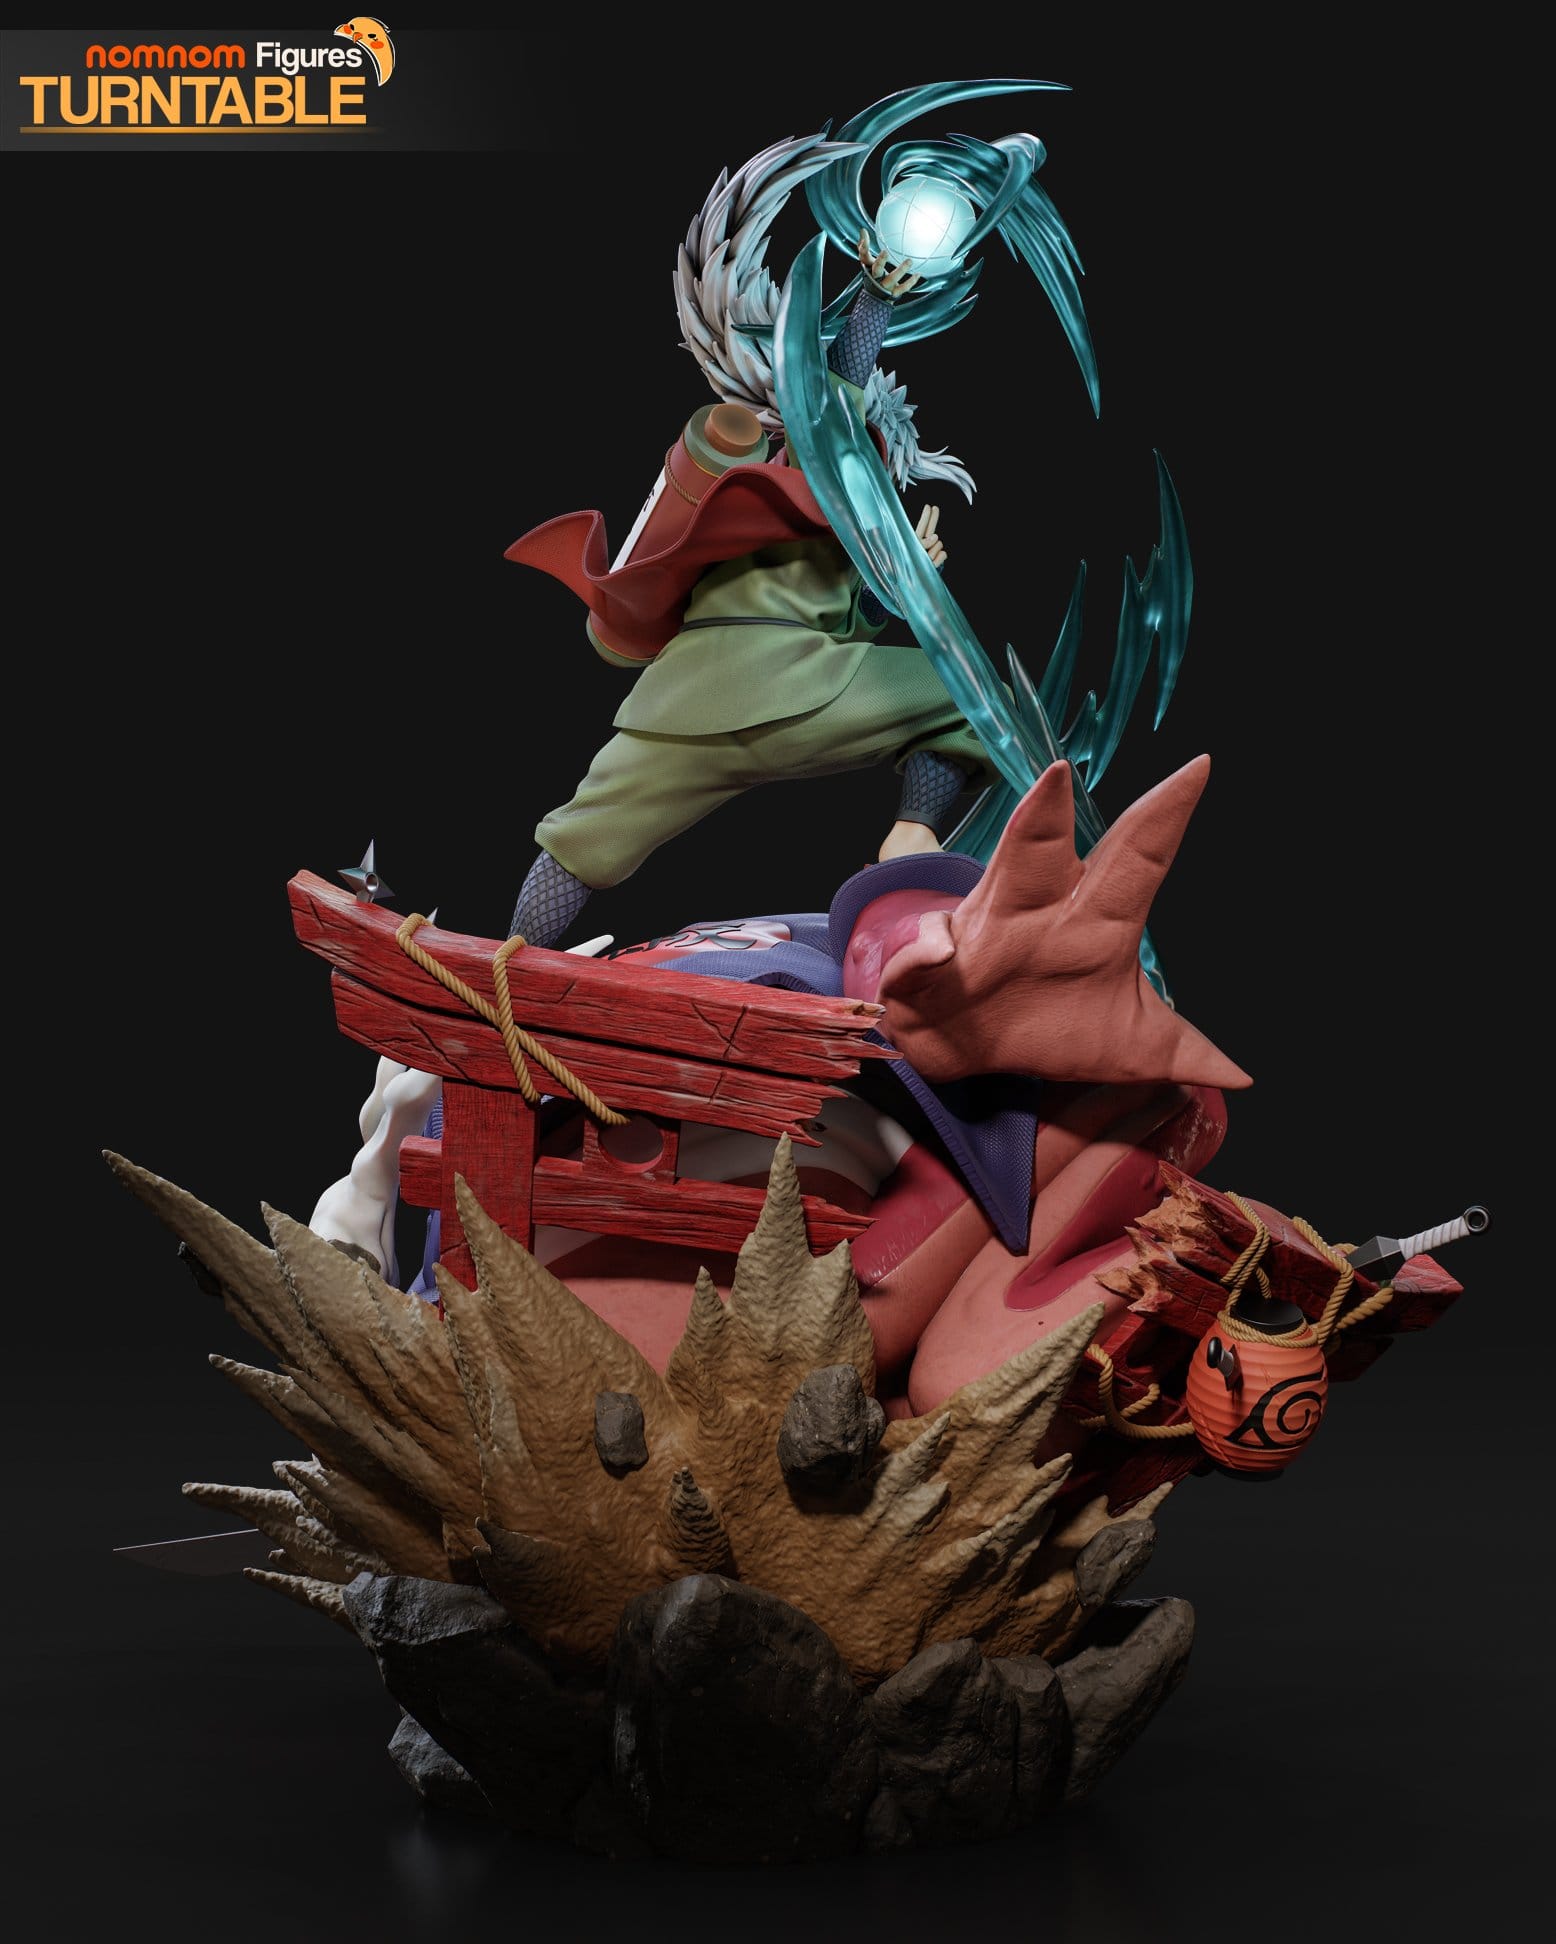
The base is a mound of tan rock spikes over dark grey rubble. Broken pieces of a red torii gate lean against it, bound with rope, with a kunai stabbed into one beam and two shuriken embedded in another. An orange paper lantern with the leaf spiral hangs off the gate wreckage. The silhouette is tall and narrow at the top, carried by the chakra arcs and the hair mane, and wide at the bottom, carried by the toad and the rock. The blade sticks out past the front edge of the base, so the 254 mm length is partly that blade.
Versions and sizes
- 1:10 semi-split
- H×W×L (mm): 341×308×254
- Pieces: 20
- Presupported: No
- 1:10 split
- H×W×L (mm): 341×308×254
- Pieces: 47
- Presupported: Yes,
NOM_*_Supported.stl+.lys
- 75mm miniature
- H×W×L (mm): 152×137×113
- Pieces: 20
- Presupported: Yes,
NOM_75mm_*_Supported.stl+.lys
- 1:10 bust
- H×W×L (mm): 114 tall
- Pieces: 10
- Presupported: Yes,
NOM_*_Supported.stl+.lys
The 1:10 dimensions come from Scale.jpg and Split Scale.jpg; the 75mm from Scale.jpg; the bust height from Bust.jpg. The bust sheet gives no width or length. The 178mm_ prefix on the semi-split files is NomNom's 1:10 label, not this kit's height.
The split version is the one to print on a Mars-class or Saturn-class machine. It is the same 341 mm figure cut into 47 supported, hollowed pieces, none of which exceeds 147.8 mm in any direction. The semi-split is for someone with a large-format printer: two of its 20 parts do not fit a Saturn-class plate in any orientation, and there are no presupports. The 75mm miniature is the whole scene at 152 mm tall in 20 supported parts, for someone who wants the diorama on a shelf without the footprint. The bust is Jiraiya alone from the chest up, with the scroll and mane, on a small plinth, and is the only version that is a weekend job.
About the sizes. Every measurement in this post comes from the sculptor's files or the studio's published size information for the unprinted model. A printed kit can differ slightly: resin shrinks a little as it cures, removing supports and sanding takes off some material, and the assembled height depends on how the parts are fitted. Treat the numbers as a close guide, not an exact guarantee.
What's in the download
1:10 split — STL/1-10 Scale Split (raw) and Presupports/1-10 Scale split/STL (supported)
Sizes below are for the raw STL. The supported file for each part is NOM_<name>_Supported.stl.
Figure
head.stl: Jiraiya's head and headband- Size mm: 26.8×33.9×29.5
- Notes: Face detail; side hair separate
L_sideHair.stl: Left front hair lock- Size mm: 15.5×26.9×10.8
- Notes: Thin, fragile
R_sideHair.stl: Right front hair lock- Size mm: 18.2×17.1×12.7
- Notes: Thin, fragile
backHair.stl: Long hair mane- Size mm: 58.0×61.2×54.0
- Notes: Spiked edges
torso.stl: Torso with vest- Size mm: 78.9×50.7×79.0
L_arm.stl: Left forearm and two-finger hand with guard- Size mm: 40.0×30.1×34.5
- Notes: Fingers thin
R_arm.stl: Right arm raised for the Rasengan- Size mm: 25.6×59.1×45.2
pants.stl: Trousers- Size mm: 87.4×50.6×68.5
L_foot.stl: Left foot, mesh wrap and geta- Size mm: 27.9×49.3×25.6
- Notes: Geta straps thin
R_foot.stl: Right foot, mesh wrap and geta- Size mm: 27.8×47.3×24.3
- Notes: Geta straps thin
Cloth
skirt.stl: Kimono skirt / vest tail- Size mm: 49.0×35.0×48.2
- Notes: I can't tell from the renders whether this is the green kimono flap or the red vest tail
Accessories
giantScroll.stl: Scroll on his back- Size mm: 42.8×55.0×61.9
- Notes: Rope detail
Companion
gamaHeadA.stl: Toad head, section A- Size mm: 93.6×68.0×74.8
gamaHeadB.stl: Toad head, section B- Size mm: 101.4×80.7×91.4
gamaHeadC.stl: Toad head, section C- Size mm: 100.8×66.2×90.8
gamaBodyA.stl: Toad body, section A- Size mm: 82.2×86.1×76.8
- Notes: Supported file is spelled
NOM_gamaBodyA_Suppported.stl
gamaBodyB.stl: Toad body, section B- Size mm: 109.1×88.4×109.9
gamaBodyC.stl: Toad body, section C- Size mm: 85.4×81.9×97.5
gamaBodyD.stl: Toad body, section D- Size mm: 77.9×58.7×109.6
gamaBodyE.stl: Toad body, section E- Size mm: 117.4×68.3×142.4
- Notes: Largest raw part
gamaBodyF.stl: Toad body, section F- Size mm: 114.4×76.1×127.8
gamaBodyG.stl: Toad body, section G- Size mm: 56.0×62.0×51.3
gamaBottom.stl: Toad underside- Size mm: 97.5×98.1×88.0
gamaFeet.stl: Toad hind feet- Size mm: 113.6×87.1×69.6
gama_L_hand.stl: Toad left hand, bandaged- Size mm: 129.9×69.0×56.6
gama_R_hand.stl: Toad right hand on the sword- Size mm: 75.6×66.2×107.1
Accessories
gama_blade.stl: Short sword- Size mm: 111.5×30.6×60.6
- Notes: Very thin, long
gamaPipe.stl: Pipe- Size mm: 52.4×64.6×33.8
- Notes: Thin stem
Base and scene
baseA.stl: Rock base, section A- Size mm: 131.2×53.4×115.0
- Notes: Square socket visible on
Split Parts.jpg
baseB.stl: Rock base, section B- Size mm: 94.0×61.8×85.5
baseC.stl: Rock base, section C- Size mm: 82.3×93.1×83.9
baseD.stl: Rock base, section D- Size mm: 85.9×97.6×78.2
baseE.stl: Rock base, section E- Size mm: 88.0×122.7×78.1
baseF.stl: Rock base, section F- Size mm: 62.5×60.7×93.5
baseG.stl: Rock base, section G- Size mm: 65.7×110.4×103.1
baseH.stl: Rock base, section H- Size mm: 91.3×64.1×75.5
toriGateA.stl: Broken torii, piece A- Size mm: 111.6×95.4×68.6
- Notes: Rope, kunai
toriGateB.stl: Broken torii, piece B- Size mm: 101.5×108.9×81.3
- Notes: Rope, shuriken
lantern.stl: Paper lantern with rope- Size mm: 43.9×36.8×45.3
Effects
ballFX.stl: Rasengan with inner spiral- Size mm: 75.7×66.8×55.8
- Notes: Hangs off the raised hand
fxA.stl: Chakra ribbon A- Size mm: 84.6×102.1×74.9
- Notes: Thin, long
fxB01.stl: Chakra ribbon B, part 1- Size mm: 60.5×82.8×76.6
- Notes: Thin, long
fxB02.stl: Chakra ribbon B, part 2- Size mm: 50.5×117.9×69.2
- Notes: Thin, long
smokeA.stl: Smoke wisp A- Size mm: 60.2×103.8×90.5
smokeB01.stl: Smoke wisp B, part 1- Size mm: 109.3×60.3×23.0
smokeB02.stl: Smoke wisp B, part 2- Size mm: 51.6×114.1×28.5
smokeC.stl: Smoke wisp C- Size mm: 59.2×130.9×49.5
All 47 have a supported counterpart in Presupports/1-10 Scale split/STL, and each of those has a .lys in Presupports/1-10 Scale split/Lychee. The studio hollowed the big pieces in the supported set. Two oddities in the folder: NOM_gamaBodyA_Suppported.stl has three p's, and the pipe is gamaPipe.stl here but 178mm_pipe.stl in the semi-split. Square peg sockets are visible on the base and toad sections in Split Parts.jpg. The A–H letters on the toad and base sections are the studio's, and the renders do not say which letter goes where.
1:10 semi-split — STL/1-10 Scale (raw only)
Figure
178mm_head.stl: Head with side hair attached- Size mm: 38.8×43.0×29.5
178mm_backHair.stl: Hair mane- Size mm: 58.0×61.2×54.0
- Notes: Same mesh as the split
178mm_torso.stl: Torso with both arms and skirt- Size mm: 91.4×105.2×86.2
- Notes: Arms not separate
178mm_pants.stl: Trousers with feet- Size mm: 100.9×86.3×81.4
Accessories
178mm_giantScroll.stl: Scroll- Size mm: 42.8×55.0×61.9
Companion
178mm_gama_head.stl: Toad head, one piece- Size mm: 101.4×99.9×106.9
- Notes: Misses Mars-class, fits Saturn-class
178mm_gama_body.stl: Toad body, one piece- Size mm: 161.2×157.3×158.8
- Notes: Fits neither plate class
178mm_game_L_arm.stl: Toad left arm (studio's spelling)- Size mm: 172.1×120.0×119.7
- Notes: Misses Mars-class, fits Saturn-class
178mm_gama_R_hand.stl: Toad right hand- Size mm: 75.6×66.2×107.1
178mm_gama_feet.stl: Toad hind feet- Size mm: 113.6×87.1×69.6
Accessories
178mm_pipe.stl: Pipe- Size mm: 52.4×64.6×33.8
- Notes: Thin
Base and scene
178mm_base.stl: Rock base, one piece- Size mm: 225.2×144.1×198.7
- Notes: Fits neither plate class
178mm_toriGateA.stl: Broken torii A- Size mm: 111.6×95.4×85.3
178mm_toriGateB.stl: Broken torii B- Size mm: 101.5×108.9×81.3
Effects
178mm_ballFX.stl: Rasengan- Size mm: 75.7×66.8×55.8
178mm_fxA.stl: Chakra ribbon A- Size mm: 84.6×102.1×74.9
- Notes: Thin
178mm_fxB.stl: Chakra ribbon B, one piece- Size mm: 102.9×165.1×86.8
- Notes: Thin, 165 mm span
178mm_smokeA.stl: Smoke A- Size mm: 60.2×103.8×90.5
178mm_smokeB.stl: Smoke B, one piece- Size mm: 142.2×157.4×36.1
178mm_smokeC.stl: Smoke C- Size mm: 59.2×130.9×49.5
No presupports for this version. The sword and lantern have no separate file here; they are merged into the toad arm and base. 178mm_game_L_arm.stl is the studio's spelling.
75mm miniature — STL/75mm Miniature (raw) and Presupports/75mm Miniature/STL (supported)
Figure
75mm_head.stl: Head- Size mm: 17.3×19.2×13.1
- Notes: Tiny
75mm_backHair.stl: Hair mane- Size mm: 25.9×27.3×24.1
75mm_torso.stl: Torso with arms- Size mm: 40.8×46.9×38.4
75mm_pants.stl: Trousers with feet- Size mm: 45.0×38.5×36.3
Accessories
75mm_giantScroll.stl: Scroll- Size mm: 19.1×24.5×27.6
Companion
75mm_gamaHead.stl: Toad head- Size mm: 45.2×44.6×47.7
75mm_gamaBody.stl: Toad body- Size mm: 71.9×70.1×70.8
- Notes: Heaviest part
75mm_gama_L_hand.stl: Toad left hand- Size mm: 76.8×53.5×53.4
75mm_gama_R_hand.stl: Toad right hand- Size mm: 33.7×29.5×47.7
75mm_gamaFeet.stl: Toad feet- Size mm: 50.7×38.9×31.0
Accessories
75mm_pipe.stl: Pipe- Size mm: 23.4×28.8×15.1
- Notes: Very thin
Base and scene
75mm_base.stl: Rock base- Size mm: 100.4×64.3×88.6
75mm_toriGateA.stl: Torii A- Size mm: 49.8×42.5×38.0
75mm_toriGateB.stl: Torii B- Size mm: 45.3×48.6×36.3
Effects
75mm_ballfx.stl: Rasengan- Size mm: 33.8×29.8×24.9
75mm_fxA.stl: Chakra ribbon A- Size mm: 37.8×45.5×33.4
- Notes: Very thin
75mm_fxB.stl: Chakra ribbon B- Size mm: 45.9×73.7×38.7
- Notes: Very thin
75mm_smokeA.stl: Smoke A- Size mm: 26.9×46.3×40.4
75mm_smokeB.stl: Smoke B- Size mm: 63.4×70.2×16.1
75mm_smokeC.stl: Smoke C- Size mm: 26.4×58.4×22.1
All 20 have a NOM_75mm_<name>_Supported.stl and a .lys. The studio hollowed the toad body and base here too. 75mm_ballfx.stl is lowercase where the 1:10 files say ballFX.
1:10 bust — STL/Bust (raw) and Presupports/Bust/STL (supported)
Figure
bust_head.stl: Head- Size mm: 27.8×32.4×29.4
- Notes: Same mesh as the split head
bust_L_hair.stl: Left hair lock- Size mm: 19.5×23.6×10.1
- Notes: Thin
bust_R_sideHair.stl: Right hair lock- Size mm: 20.7×13.0×12.1
- Notes: Thin
bust_backHair.stl: Hair mane- Size mm: 63.5×55.5×55.9
- Notes: Long overhang on the plinth
bust_torso.stl: Chest, shoulders and vest, cut at the waist- Size mm: 73.4×55.3×79.7
- Notes: Square sockets for arms and hair
bust_L_arm.stl: Left forearm with two-finger hand- Size mm: 38.9×31.8×34.3
bust_R_arm.stl: Right shoulder stub- Size mm: 22.8×23.8×23.3
Accessories
bust_giantScroll.stl: Scroll- Size mm: 47.6×53.5×62.4
Base and scene
Bust_plinth_01.stl: Plinth post- Size mm: 37.5×30.7×37.5
Bust_plinth_02.stl: Plinth foot- Size mm: 66.2×31.6×66.2
The supported folder reuses the split set's files for the shared pieces: NOM_head_Supported.stl, NOM_backHair_Supported.stl, NOM_L_arm_Supported.stl, NOM_L_sideHair_Supported.stl, NOM_R_sideHair_Supported.stl and NOM_giantScroll_Supported.stl are the same files under the same names in both folders. Only NOM_bust_torso_Supported.stl, NOM_bust_R_arm_Supported.stl, NOM_Bust_plinth_01_Supported.stl and NOM_Bust_Plinth_02_Supported.stl are bust-specific. Note the capital P on Plinth_02 and lowercase on plinth_01; and the raw files say bust_L_hair.stl where the supported file says L_sideHair.
Print difficulty
Split, 75mm and bust: 3/5 (estimated). Semi-split: 5/5 (estimated).
The split set is presupported and every one of its 47 parts fits a Mars-class plate; the biggest is NOM_baseG_Supported.stl at 81.5×73.6×147.8 mm. That alone would be a 2. It is a 3 because of the thin freestanding parts and the number of hollow shells. NOM_gama_blade_Supported.stl is a 125.4 mm blade 9.2 mm thick at its widest, NOM_fxA_Supported.stl is 141.3 mm tall and 20.1 mm thick, and NOM_fxB02_Supported.stl is 138.3 mm tall. The two side hair locks are tiny. The studio hollowed the toad and base sections in the presupported files, among them gamaBodyE.stl, gamaBodyB.stl, baseA.stl, gamaBottom.stl, gamaFeet.stl, gamaHeadB.stl, and gama_L_hand.stl. That is a lot of hollow parts, each needing drain holes to work and uncured resin to wash out. The small pieces, such as head.stl, L_foot.stl, and ballFX.stl, go the other way: their supported files are heavier than the raw ones, and the extra is supports. I haven't opened a .lys to see whether the studio's hollowed parts have drain holes.
The 75mm set is the same story at a smaller scale. The studio hollowed 75mm_gamaBody.stl and 75mm_base.stl in their supported files. The chakra ribbons are very thin at this size.
The bust is the easiest print, but the mane is a 90 mm supported overhang (NOM_backHair_Supported.stl 54.7×28.3×90.0 mm) and the studio hollowed the torso, bust_torso.stl, in its supported file.
The semi-split is a 5 on the anchors: 178mm_base.stl at 225.2×144.1×198.7 mm and 178mm_gama_body.stl at 161.2×157.3×158.8 mm exceed a Saturn-class plate in every orientation, there are no presupports, and both are large solid parts until you hollow them yourself. 178mm_gama_head.stl and 178mm_game_L_arm.stl fit Saturn-class but not Mars-class. This version needs a large-format printer.
Assembly difficulty
Split: 5/5 (estimated). Semi-split and 75mm: 4/5. Bust: 3/5.
Forty-seven parts, and the order matters. The toad is fourteen pieces on its own (seven body sections, a bottom, feet, three head sections, two hands) and it has to be true before Jiraiya's feet can land on it. The rock base is eight sections (baseA.stl to baseH.stl) that have to align before the toad sits on them. Square pegs and sockets are visible in Split Parts.jpg and on the exploded bust, so the joins are keyed, but the seams on the toad body cross smooth warty skin and will need filling.
Then the hanging parts. Jiraiya is a 341 mm figure standing on one leg's worth of contact with a sloped surface; the raised right arm carries ballFX.stl plus the chakra ribbons fxA.stl, fxB01.stl and fxB02.stl out to the side, and one ribbon runs all the way down to the toad's head, so it wants pinning at both ends. The mane, backHair.stl, hangs off the back of the head. The sword, gama_blade.stl, is 111.5 mm long and very thin, and it sticks out past the base. The pipe stem, the two side hair locks and the geta straps are the tiny parts. Pinning the figure to the toad, the ribbons to the figure, and the mane to the head is not optional at this size.
The semi-split reduces the count to 20 by merging the toad body, the base and the arms into single pieces, but the FX, mane, sword and figure joins are the same. The 75mm has the same 20 joins at a scale where the chakra ribbons are very thin.
The bust is ten parts with keyed square sockets on the torso for the arms and hair, and a mane that projects 90 mm off the back. It goes on a two-part plinth.
Paint difficulty
Full scene: 5/5 (estimated). Bust: 4/5.
Count the materials: skin on a realistic face with a grin and eye detail; white hair with individual spikes; a riveted metal headband with black kanji; woven green cloth; a red vest; blue mesh; a metal hand guard; painted wood on the geta; a red scroll with a white paper label and black kanji; rope; the toad's warty red-orange skin with darker markings and a wet highlight; an indigo cloth vest; a white rope sash; a gold pipe; bare steel on the blade with wrapped hilt; white bandage; cream smoke; tan rock and grey rubble; weathered red-painted wood on the torii; a paper lantern; and the Rasengan and chakra ribbons, which the studio renders as translucent glowing teal. That last item pushes it to 5. The ribbons are large smooth surfaces where a glow gradient will show every brush mark, and clear or tinted resin is the other route.
The bust is a 4: realistic face and skin, white hair, metal, cloth, the scroll label, but no toad, no FX and no base.
Paint reference. From the studio's colored renders: skin a warm medium tan, red lines under the eyes, brown irises, white teeth. Hair pure white with grey shadows. Headband plate gunmetal with dark rivets and black kanji, on a red band. Kimono top and trousers olive green with a woven texture, sash a slightly darker green. Vest a deep matte red with a yellow disc on the left shoulder. Mesh dark navy. Hand guard grey-green metal. Scroll red with copper-orange end caps, a cream label with black kanji, and brown rope. Geta red wood with black straps. Toad red-orange with a pink cast on the face, darker red swirl markings, raised warts slightly paler, yellow eye with a black slit. Toad vest indigo blue with a white rope sash and a red circle crest with black kanji on the back. Pipe gold bowl on a dark red stem. Blade bare steel with a white-and-red wrapped hilt and gold collar. Bandage white. Smoke cream-white. Base spikes tan sandstone, rubble dark grey. Torii weathered red wood with rope, a black kunai and grey shuriken. Lantern orange with a dark spiral and black cap. Rasengan a white-blue glowing sphere with a lattice; chakra ribbons translucent teal-green.
Gallery
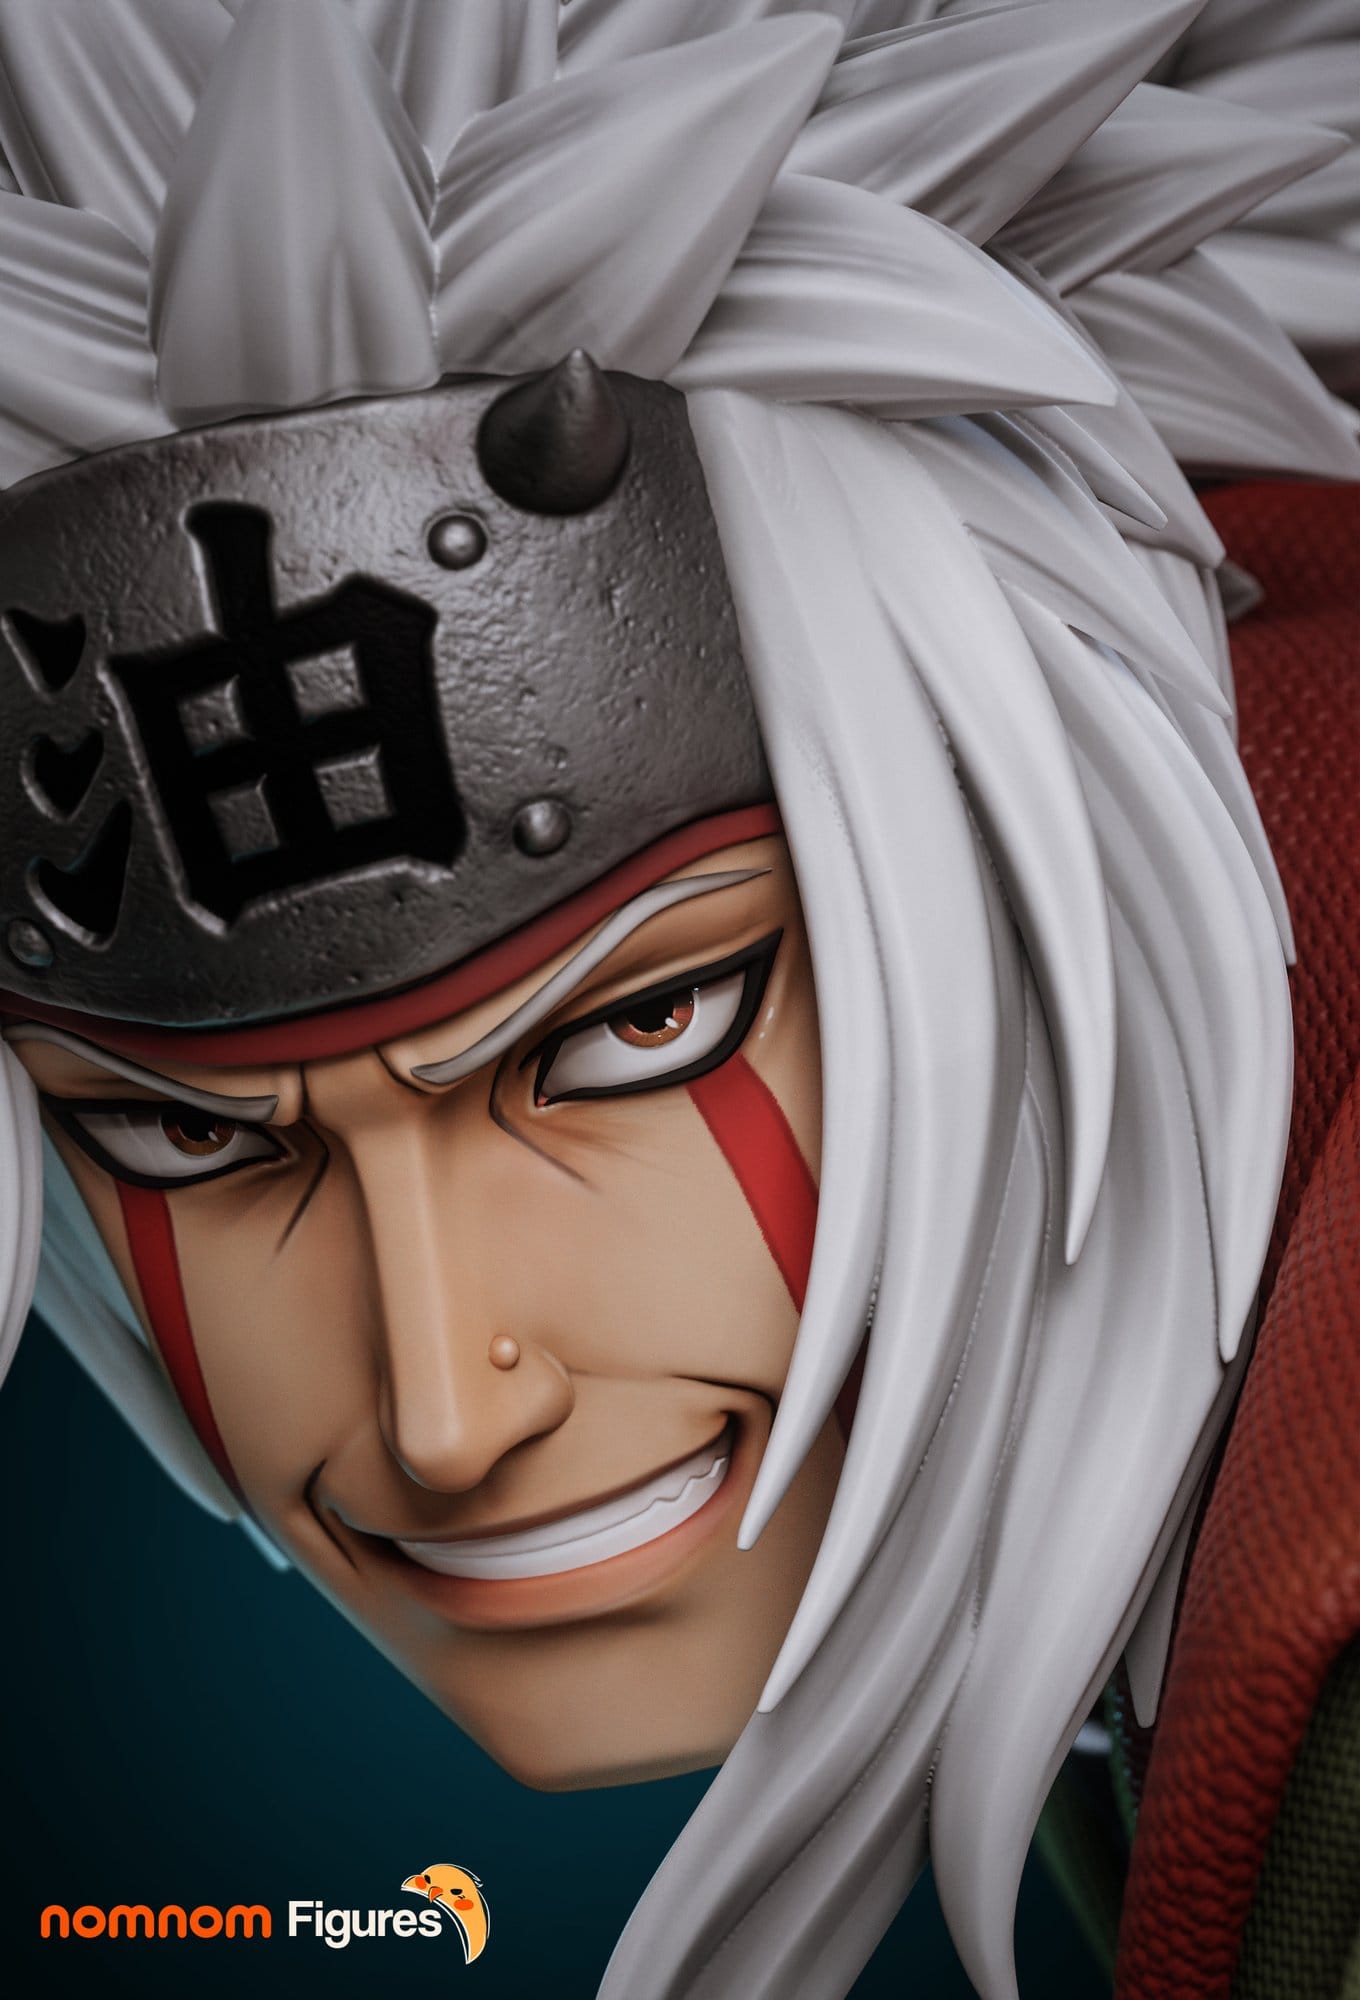
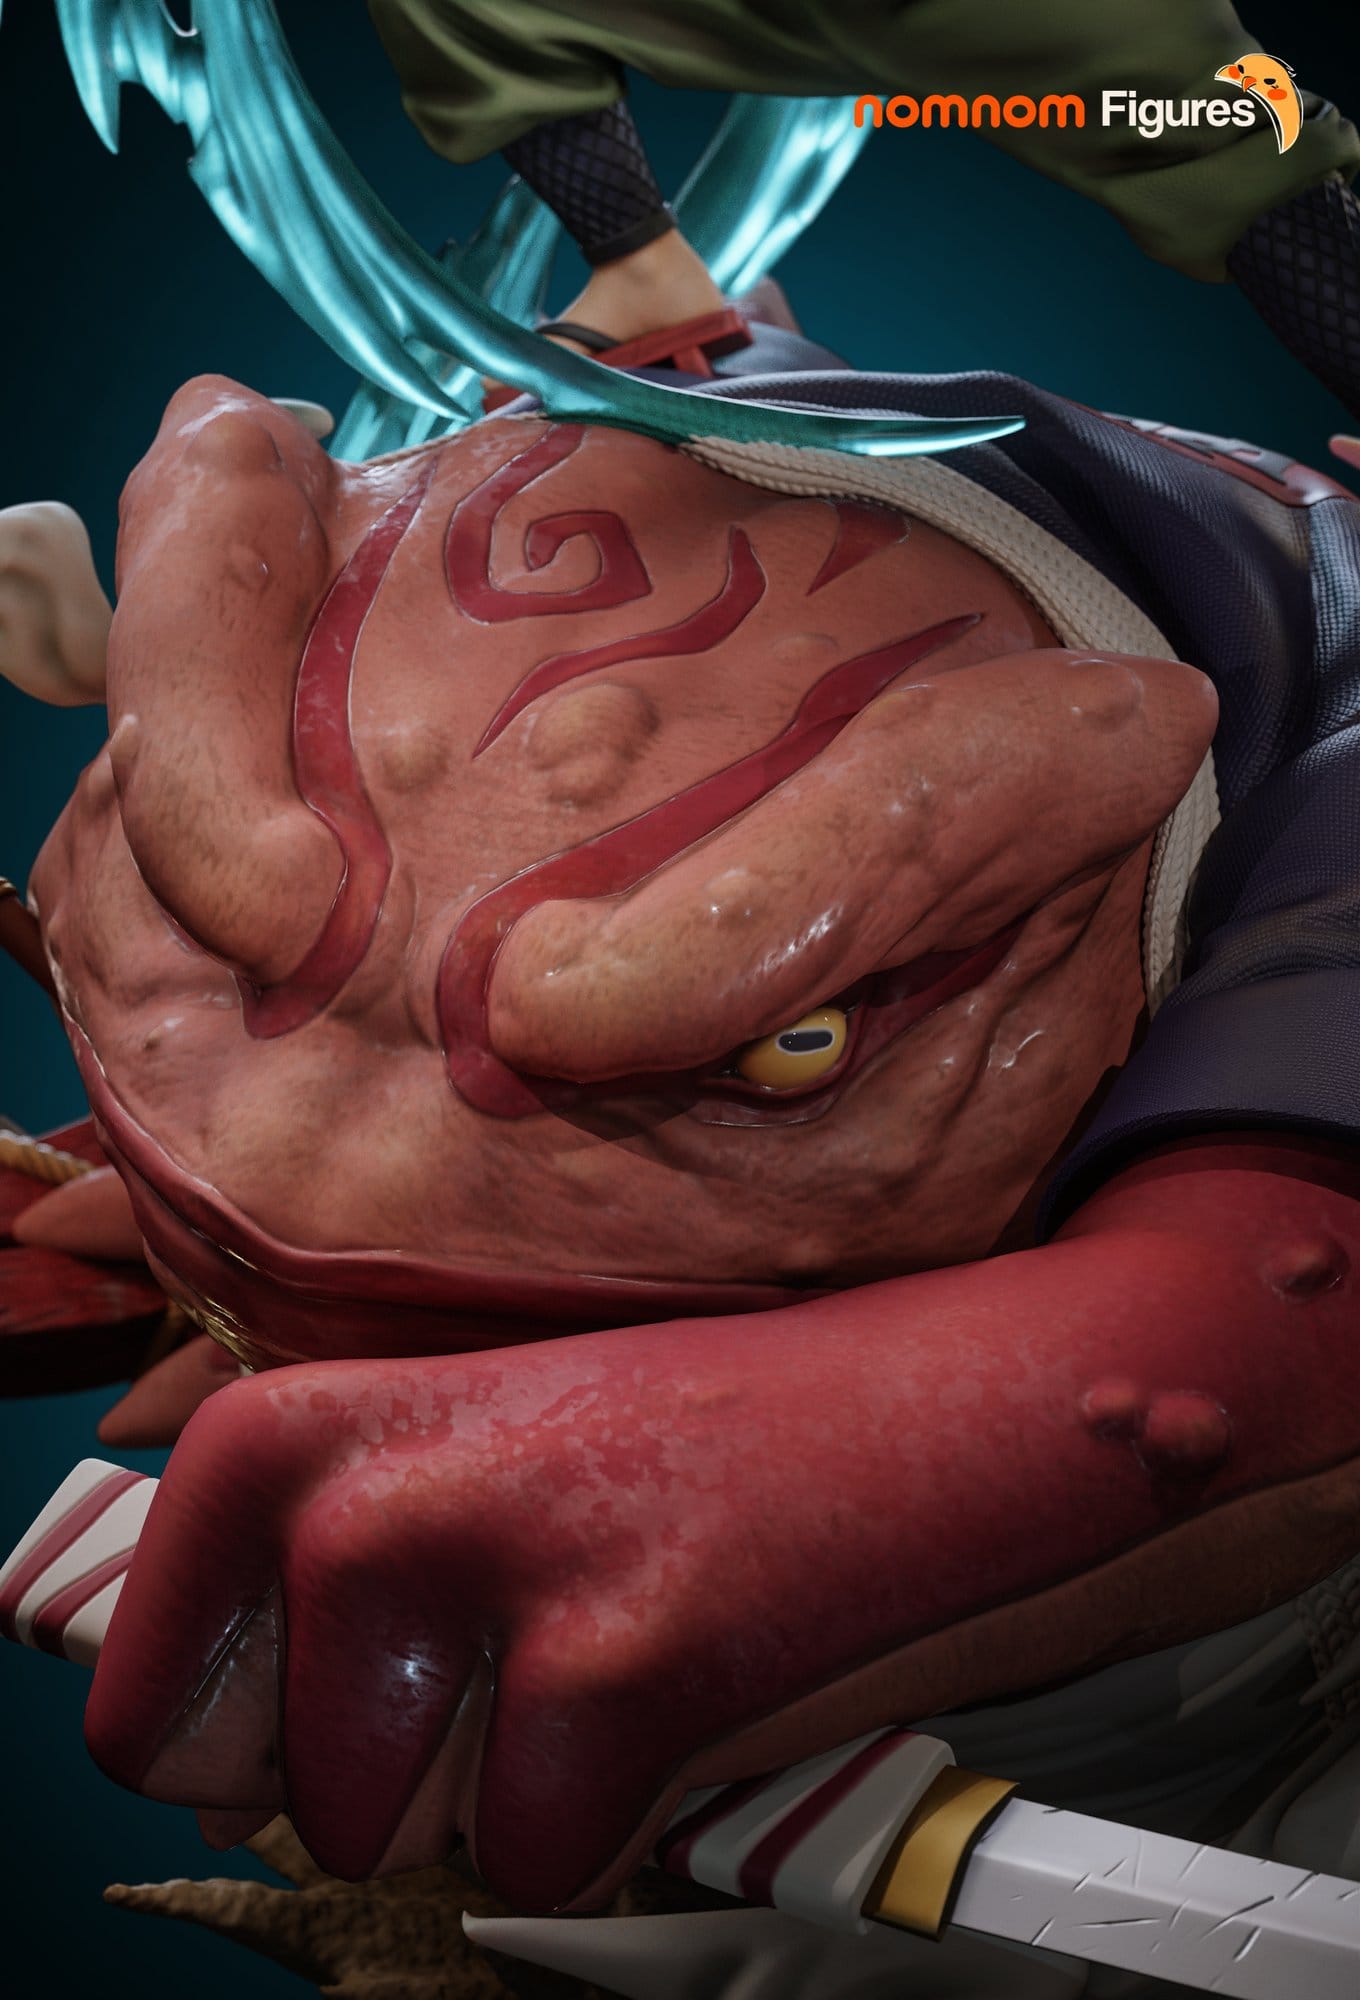
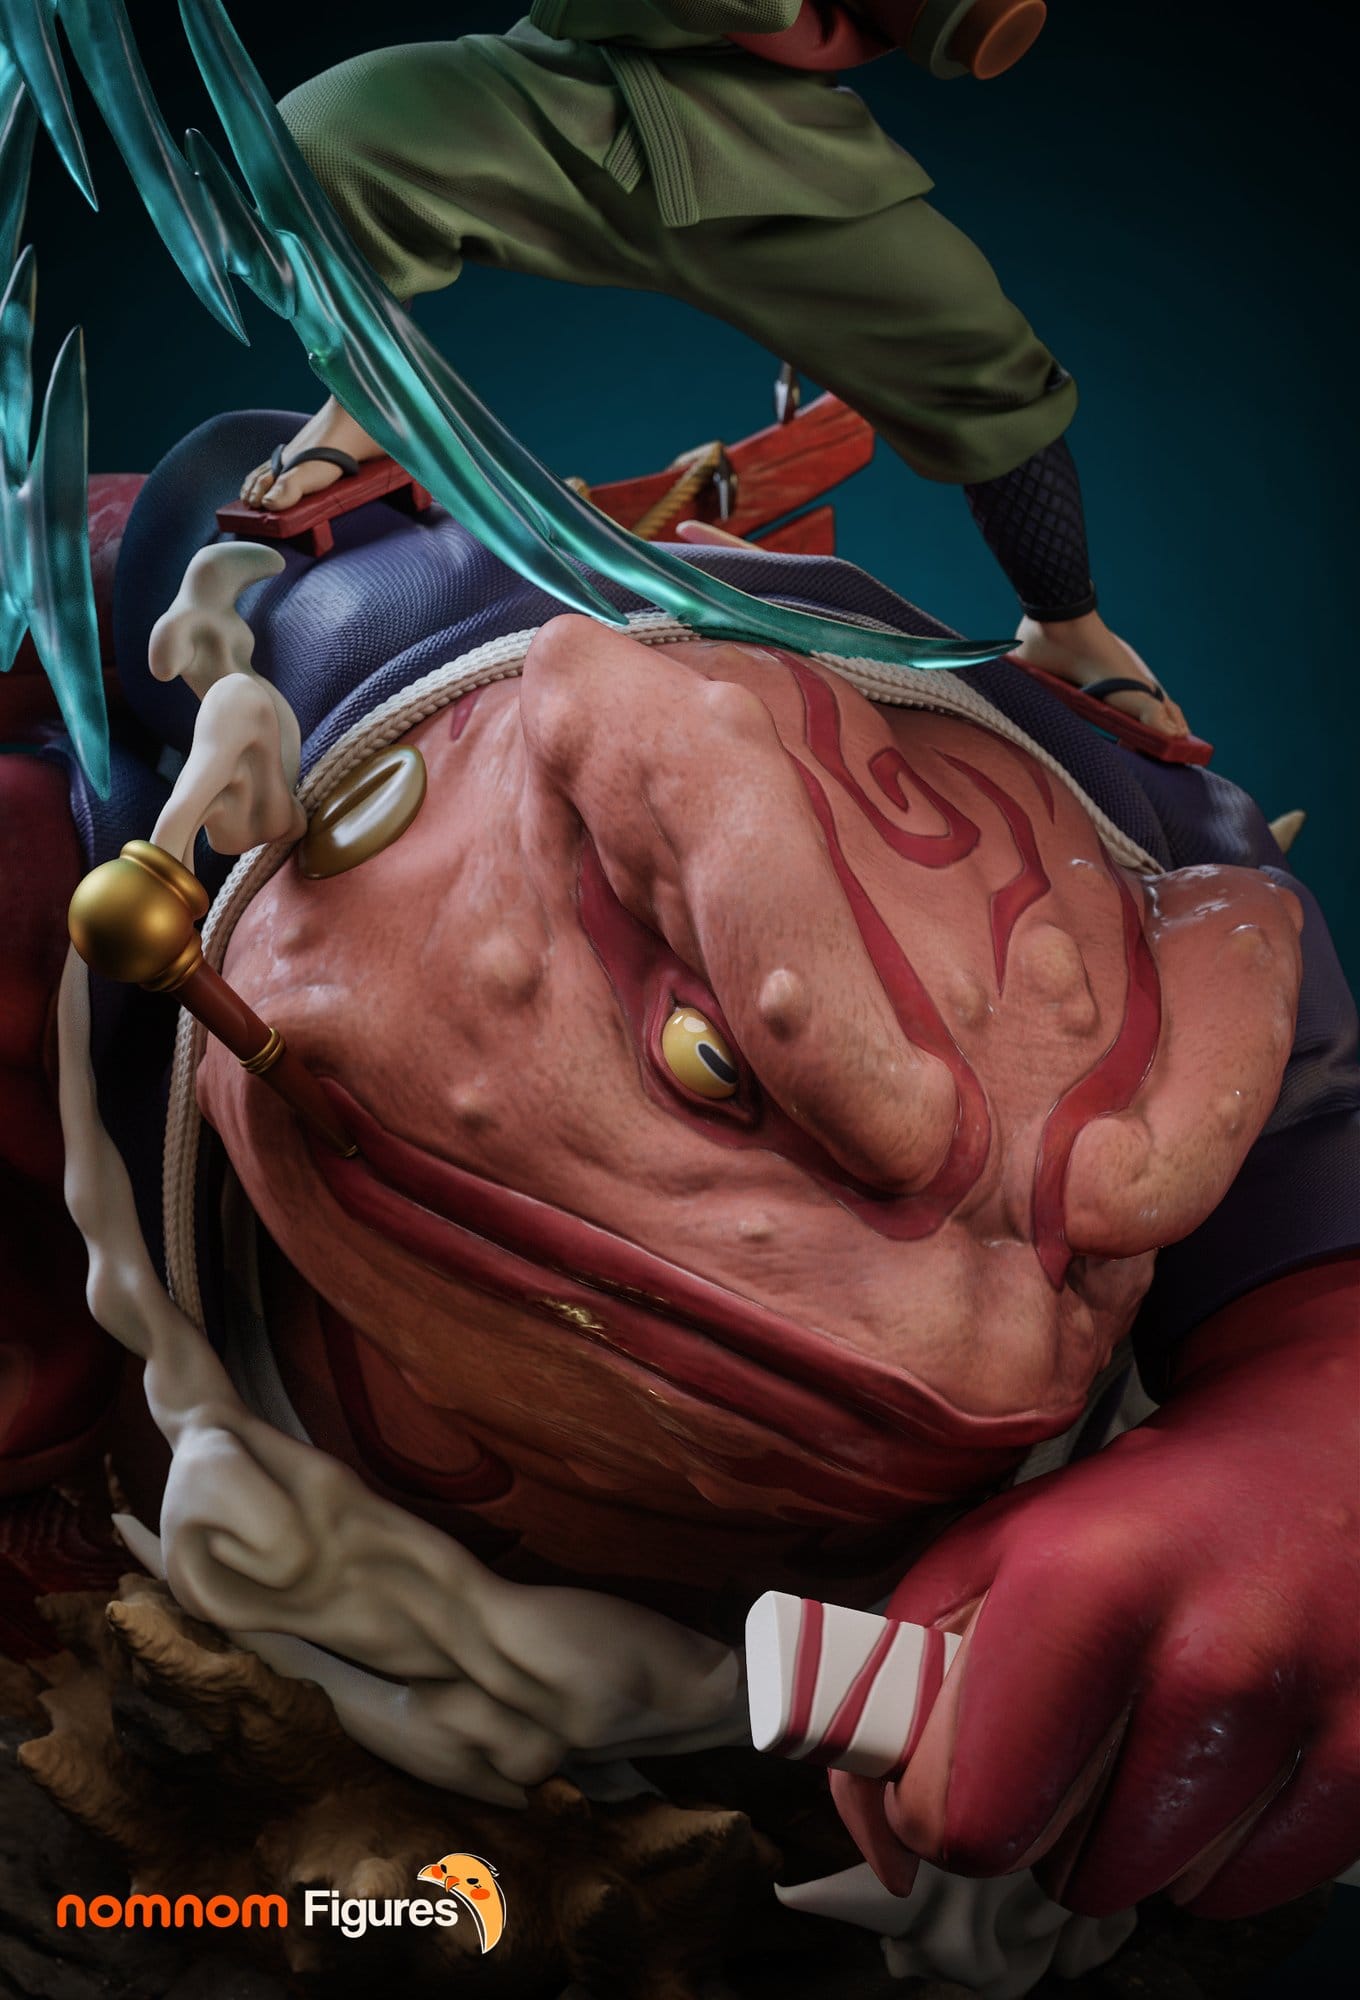
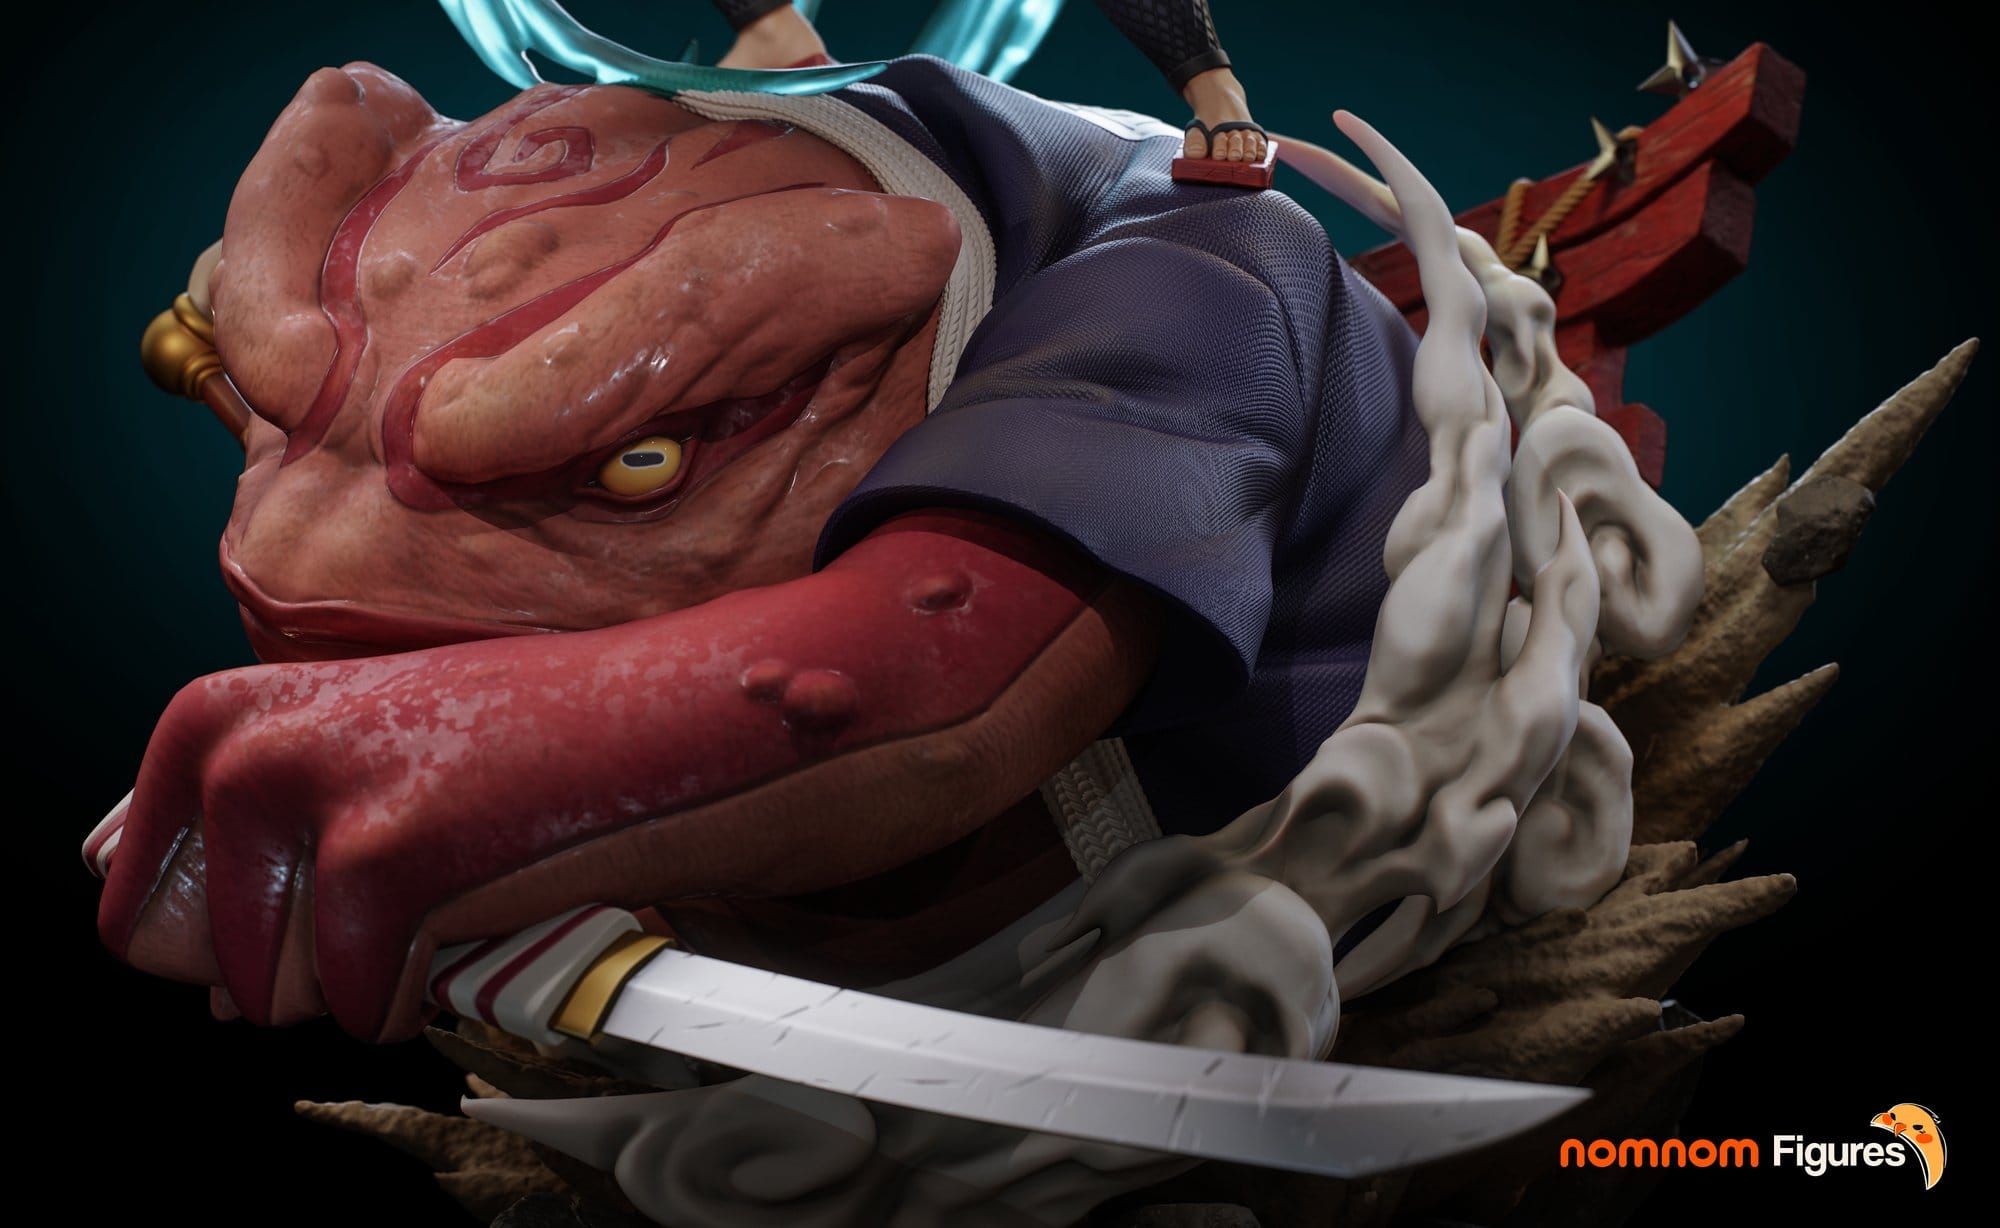
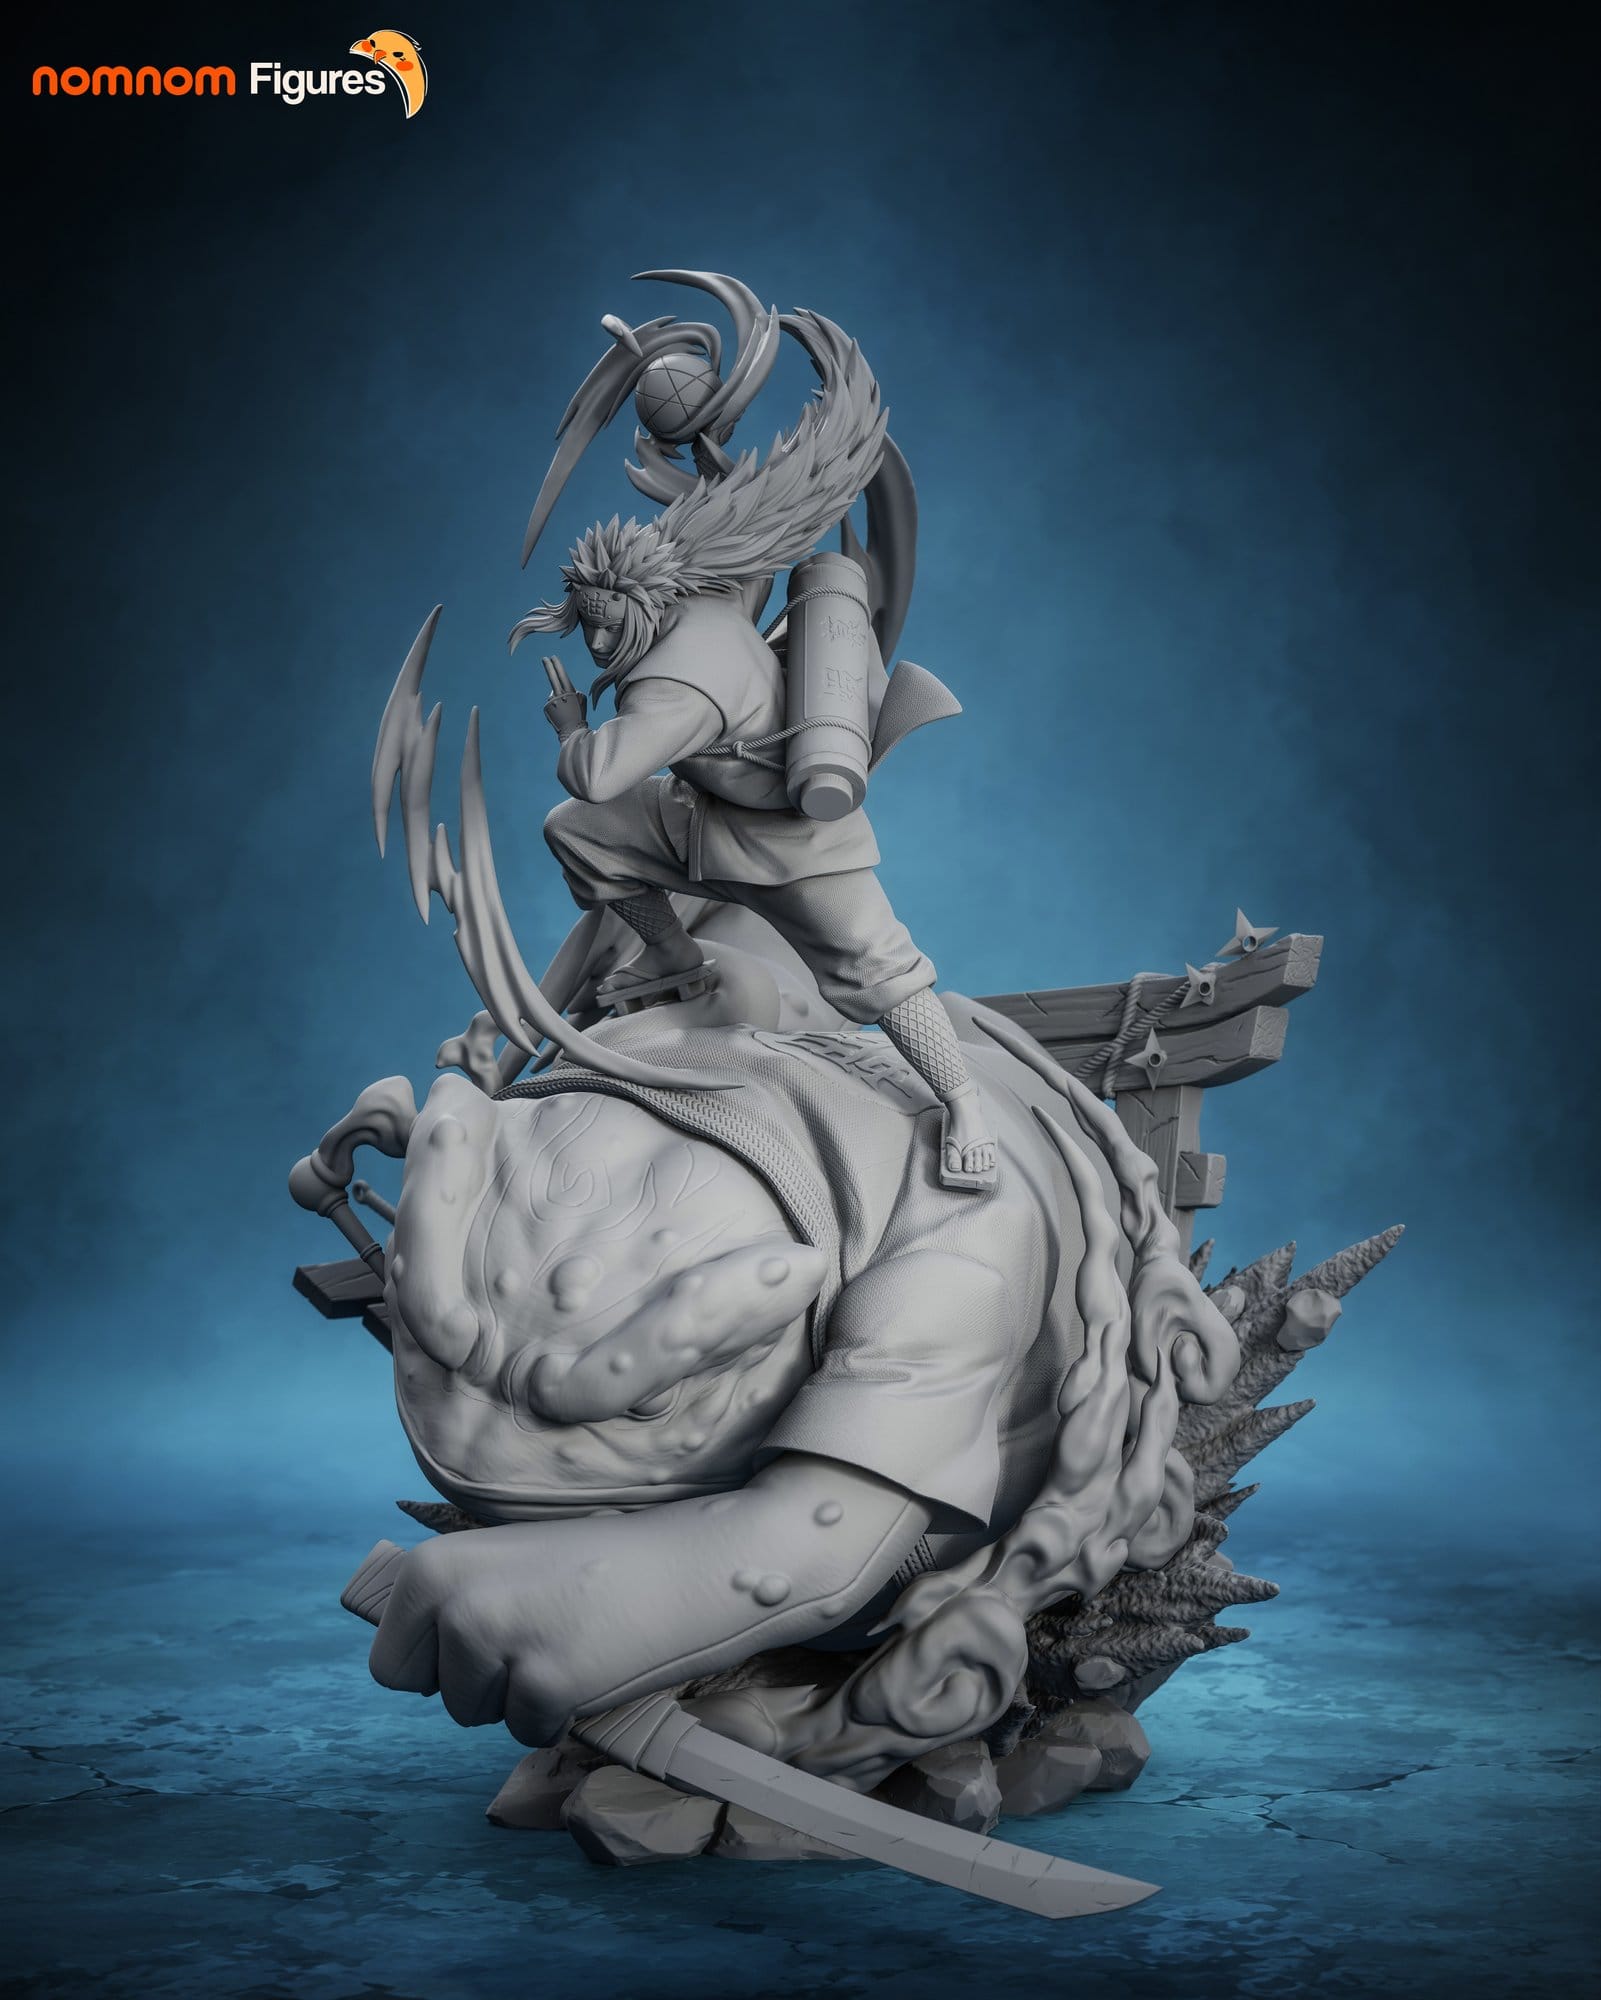
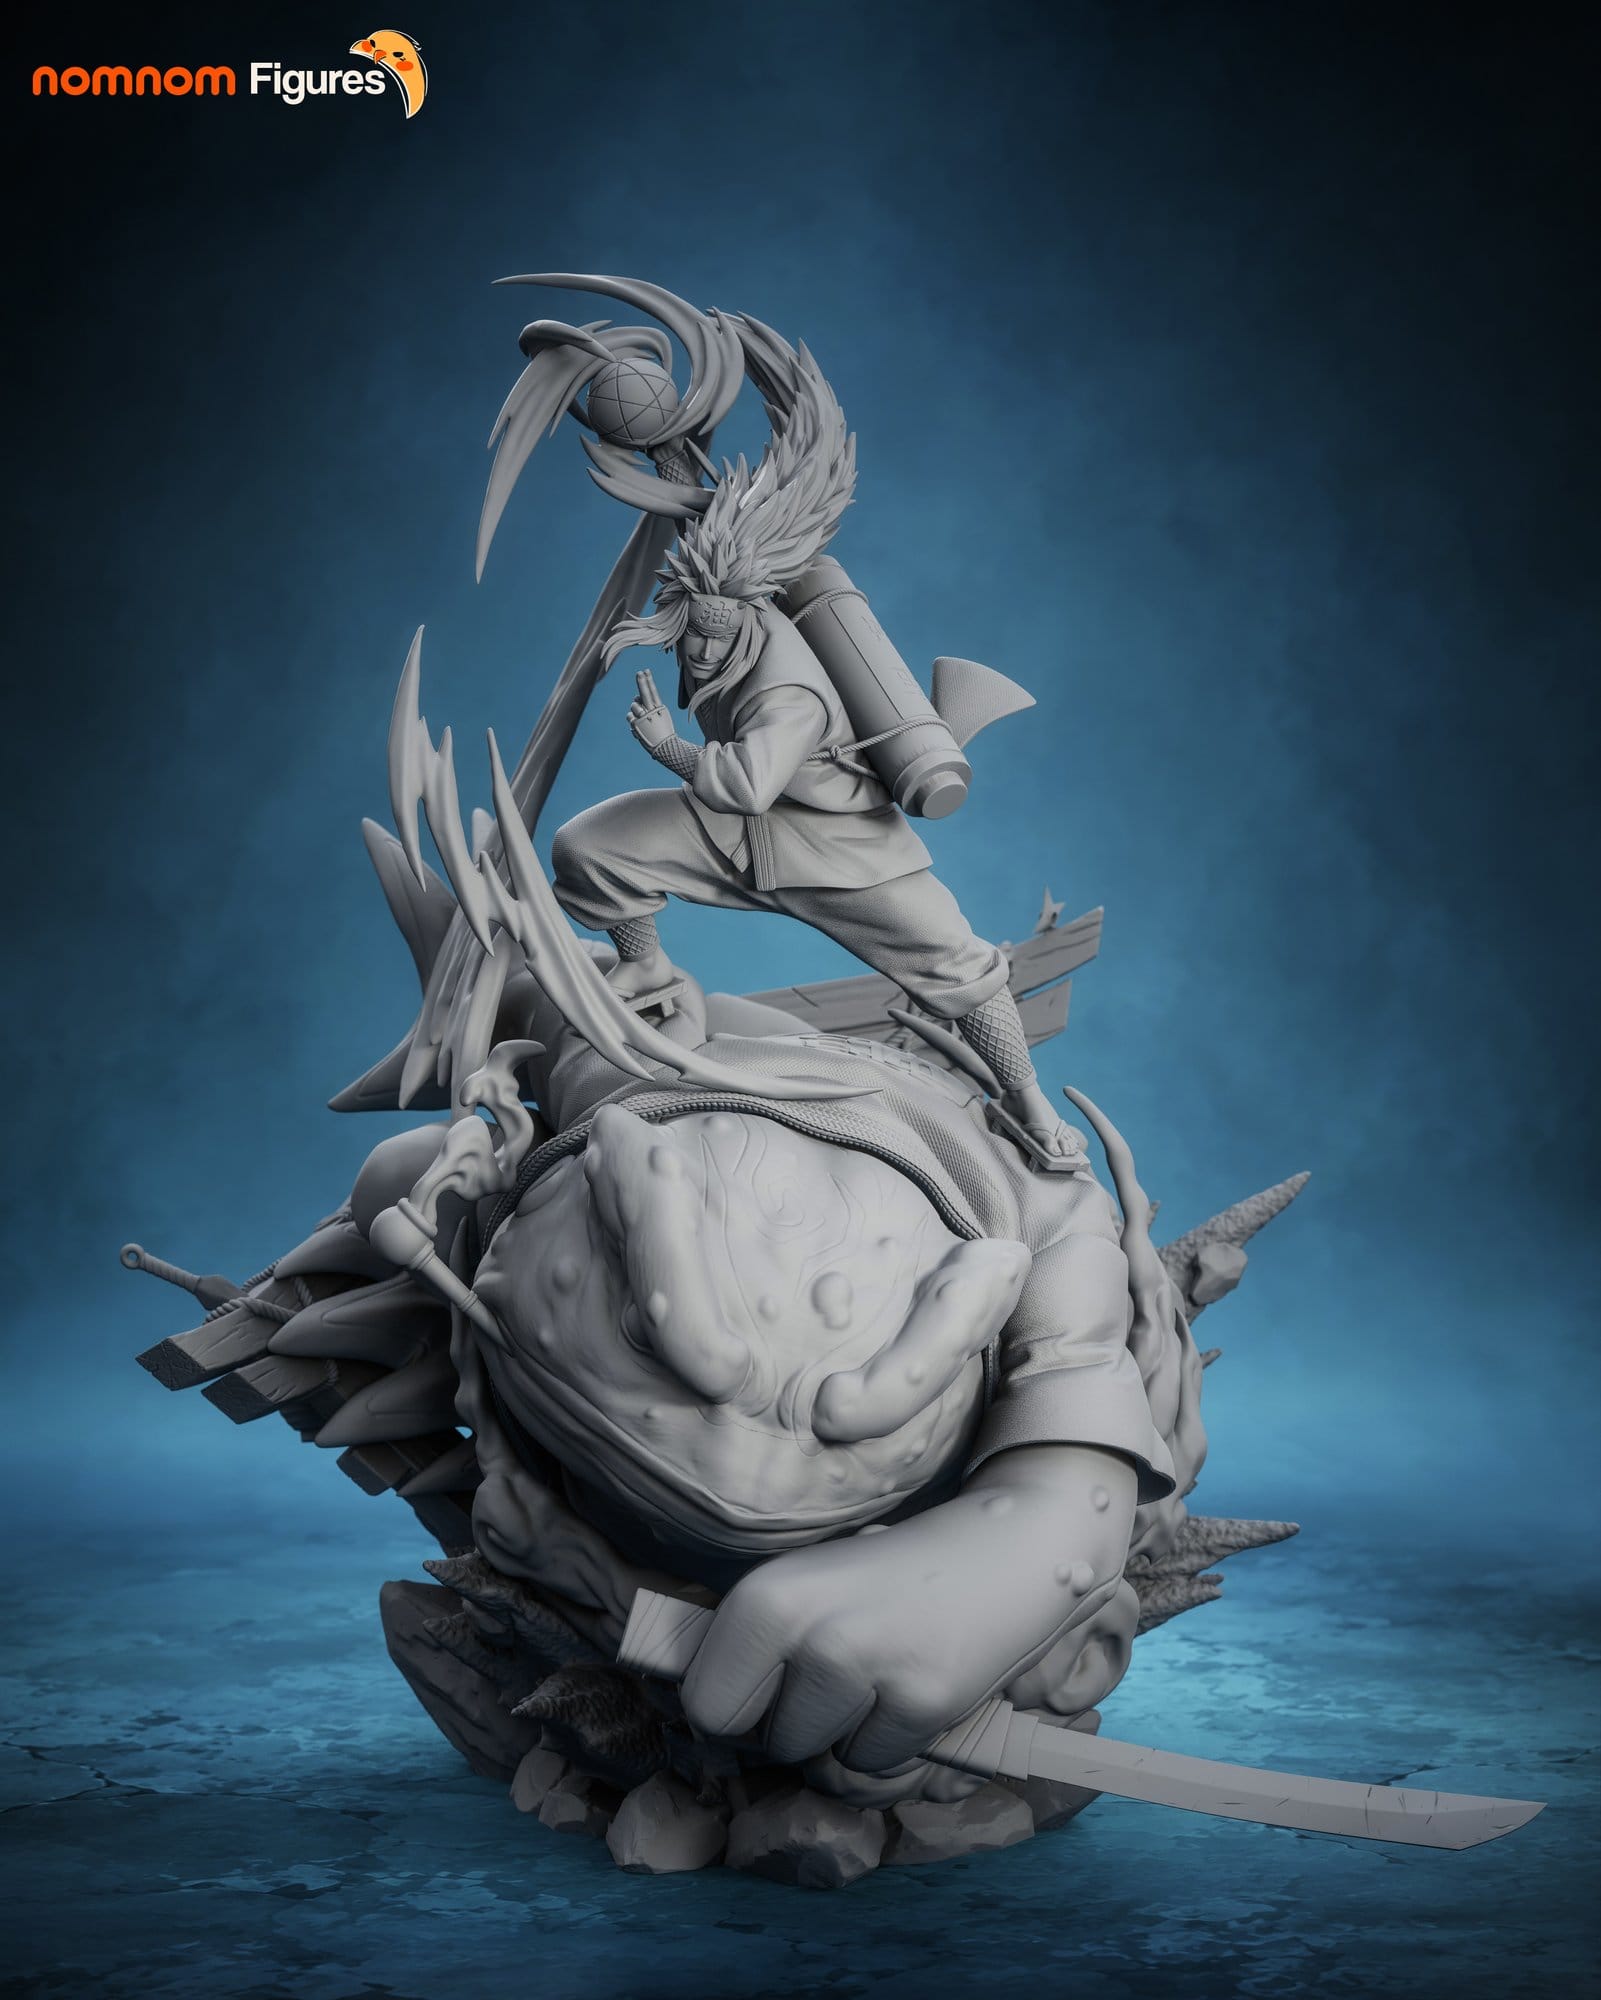
Colored_02.jpg. Shows the toad's warts and cloth folds as pure geometry.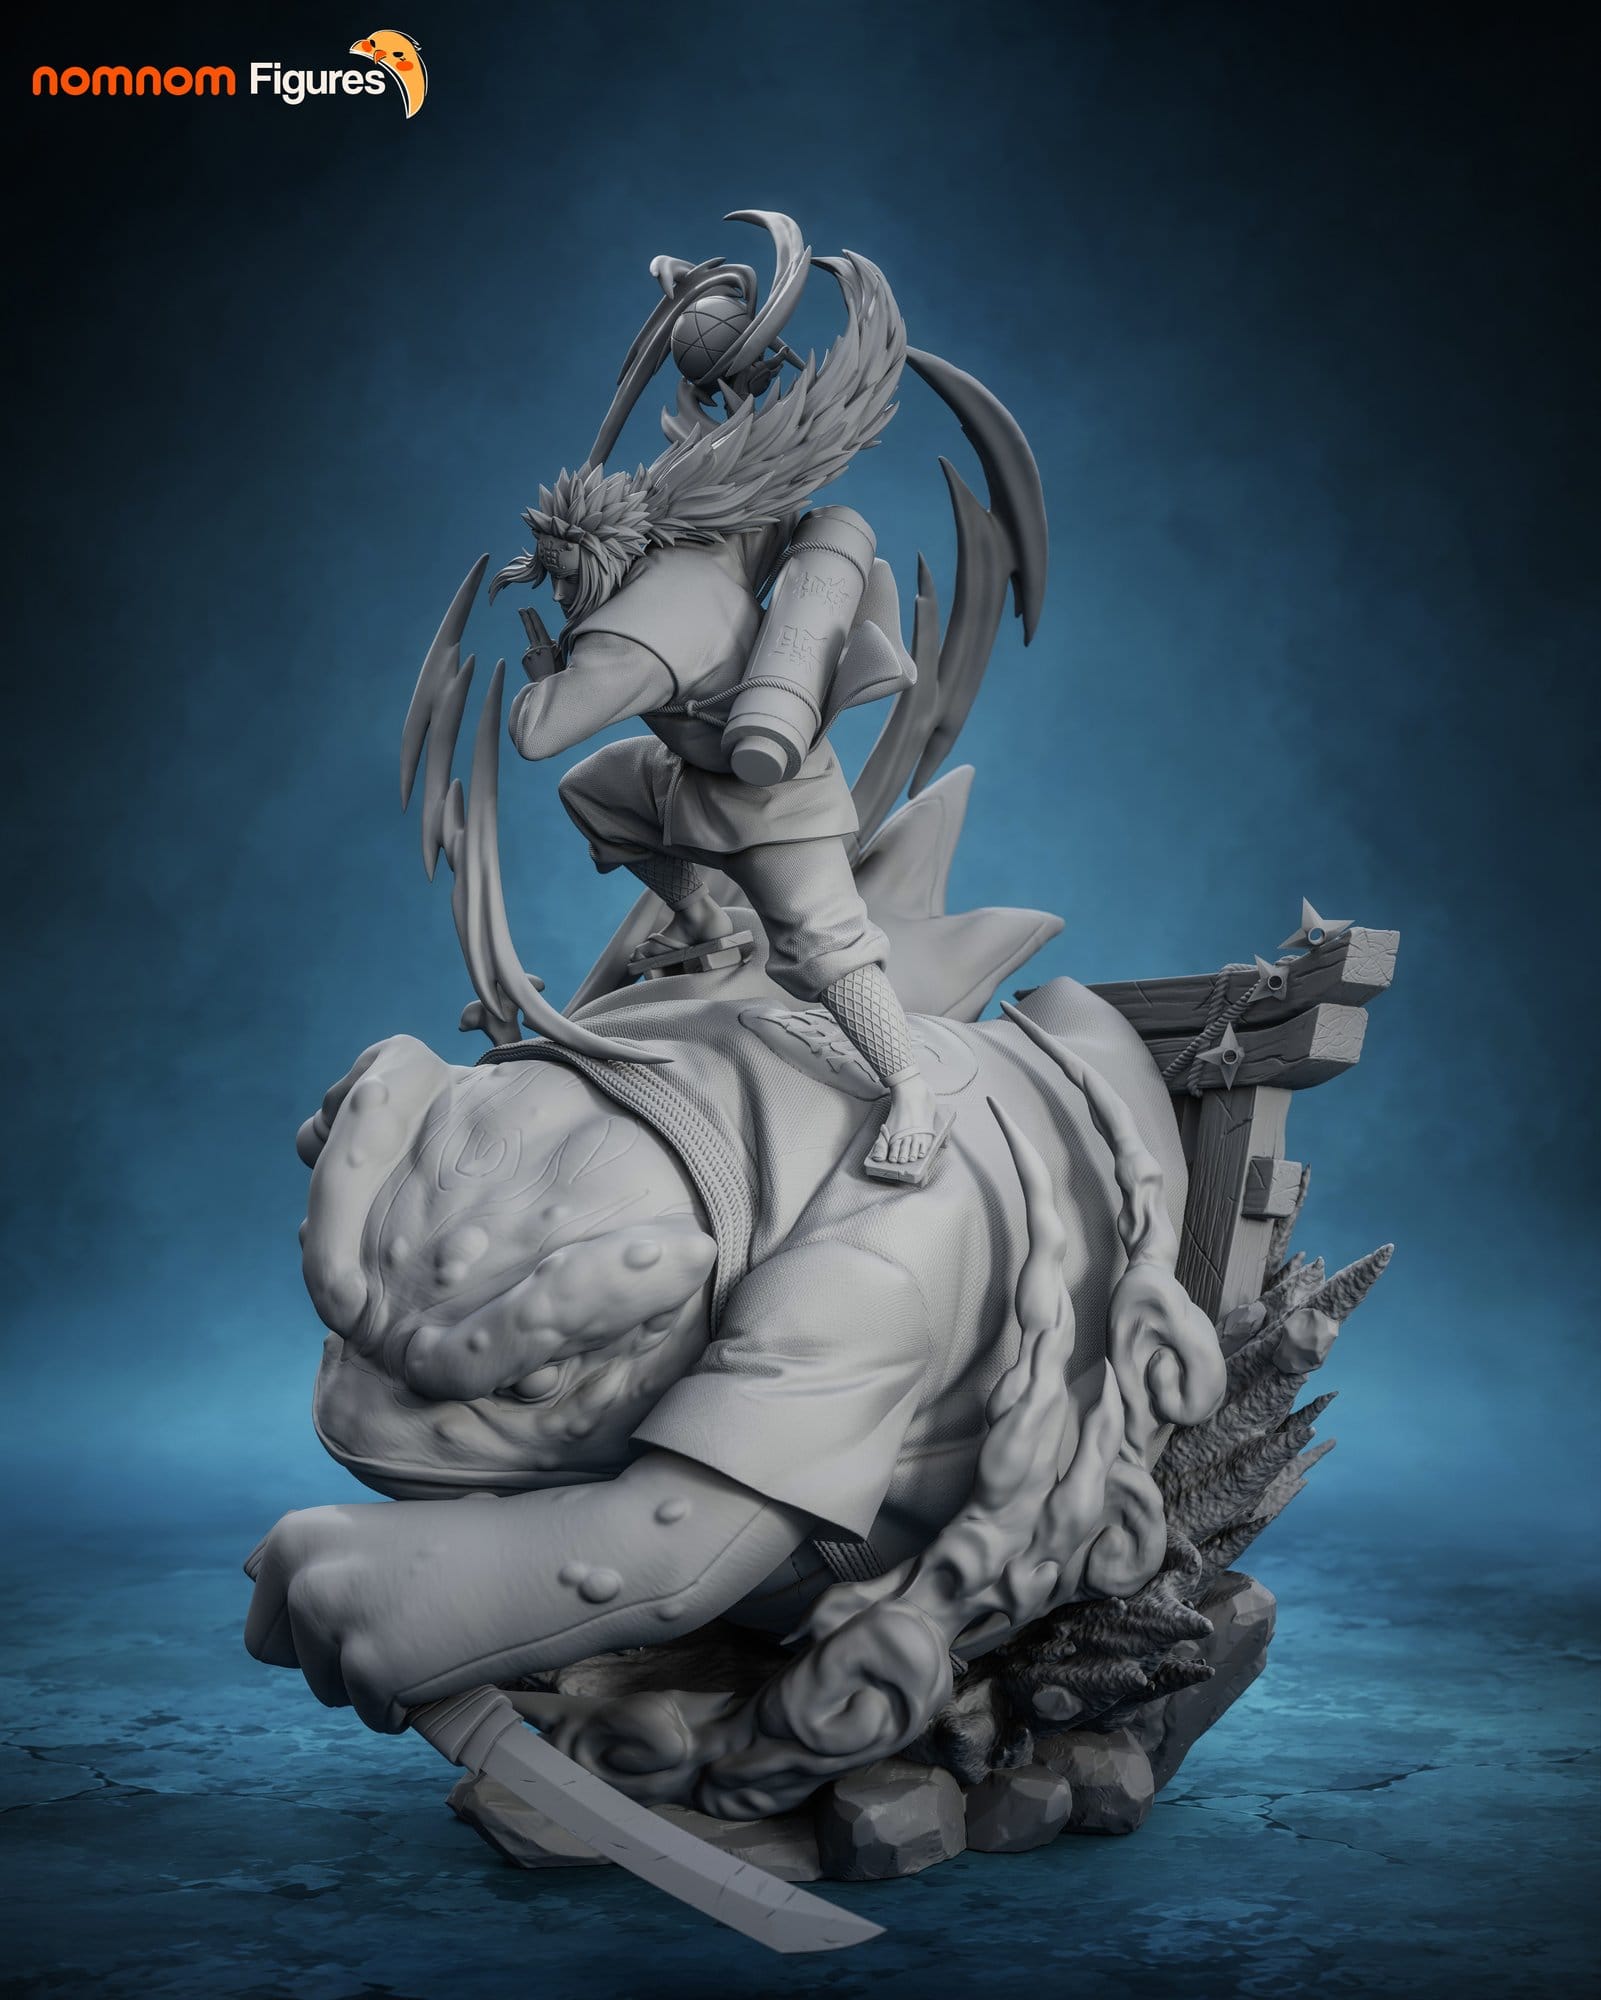
Colored_04.jpg, with the crest and scroll label as raised relief. Shows that the kanji are modelled, not painted.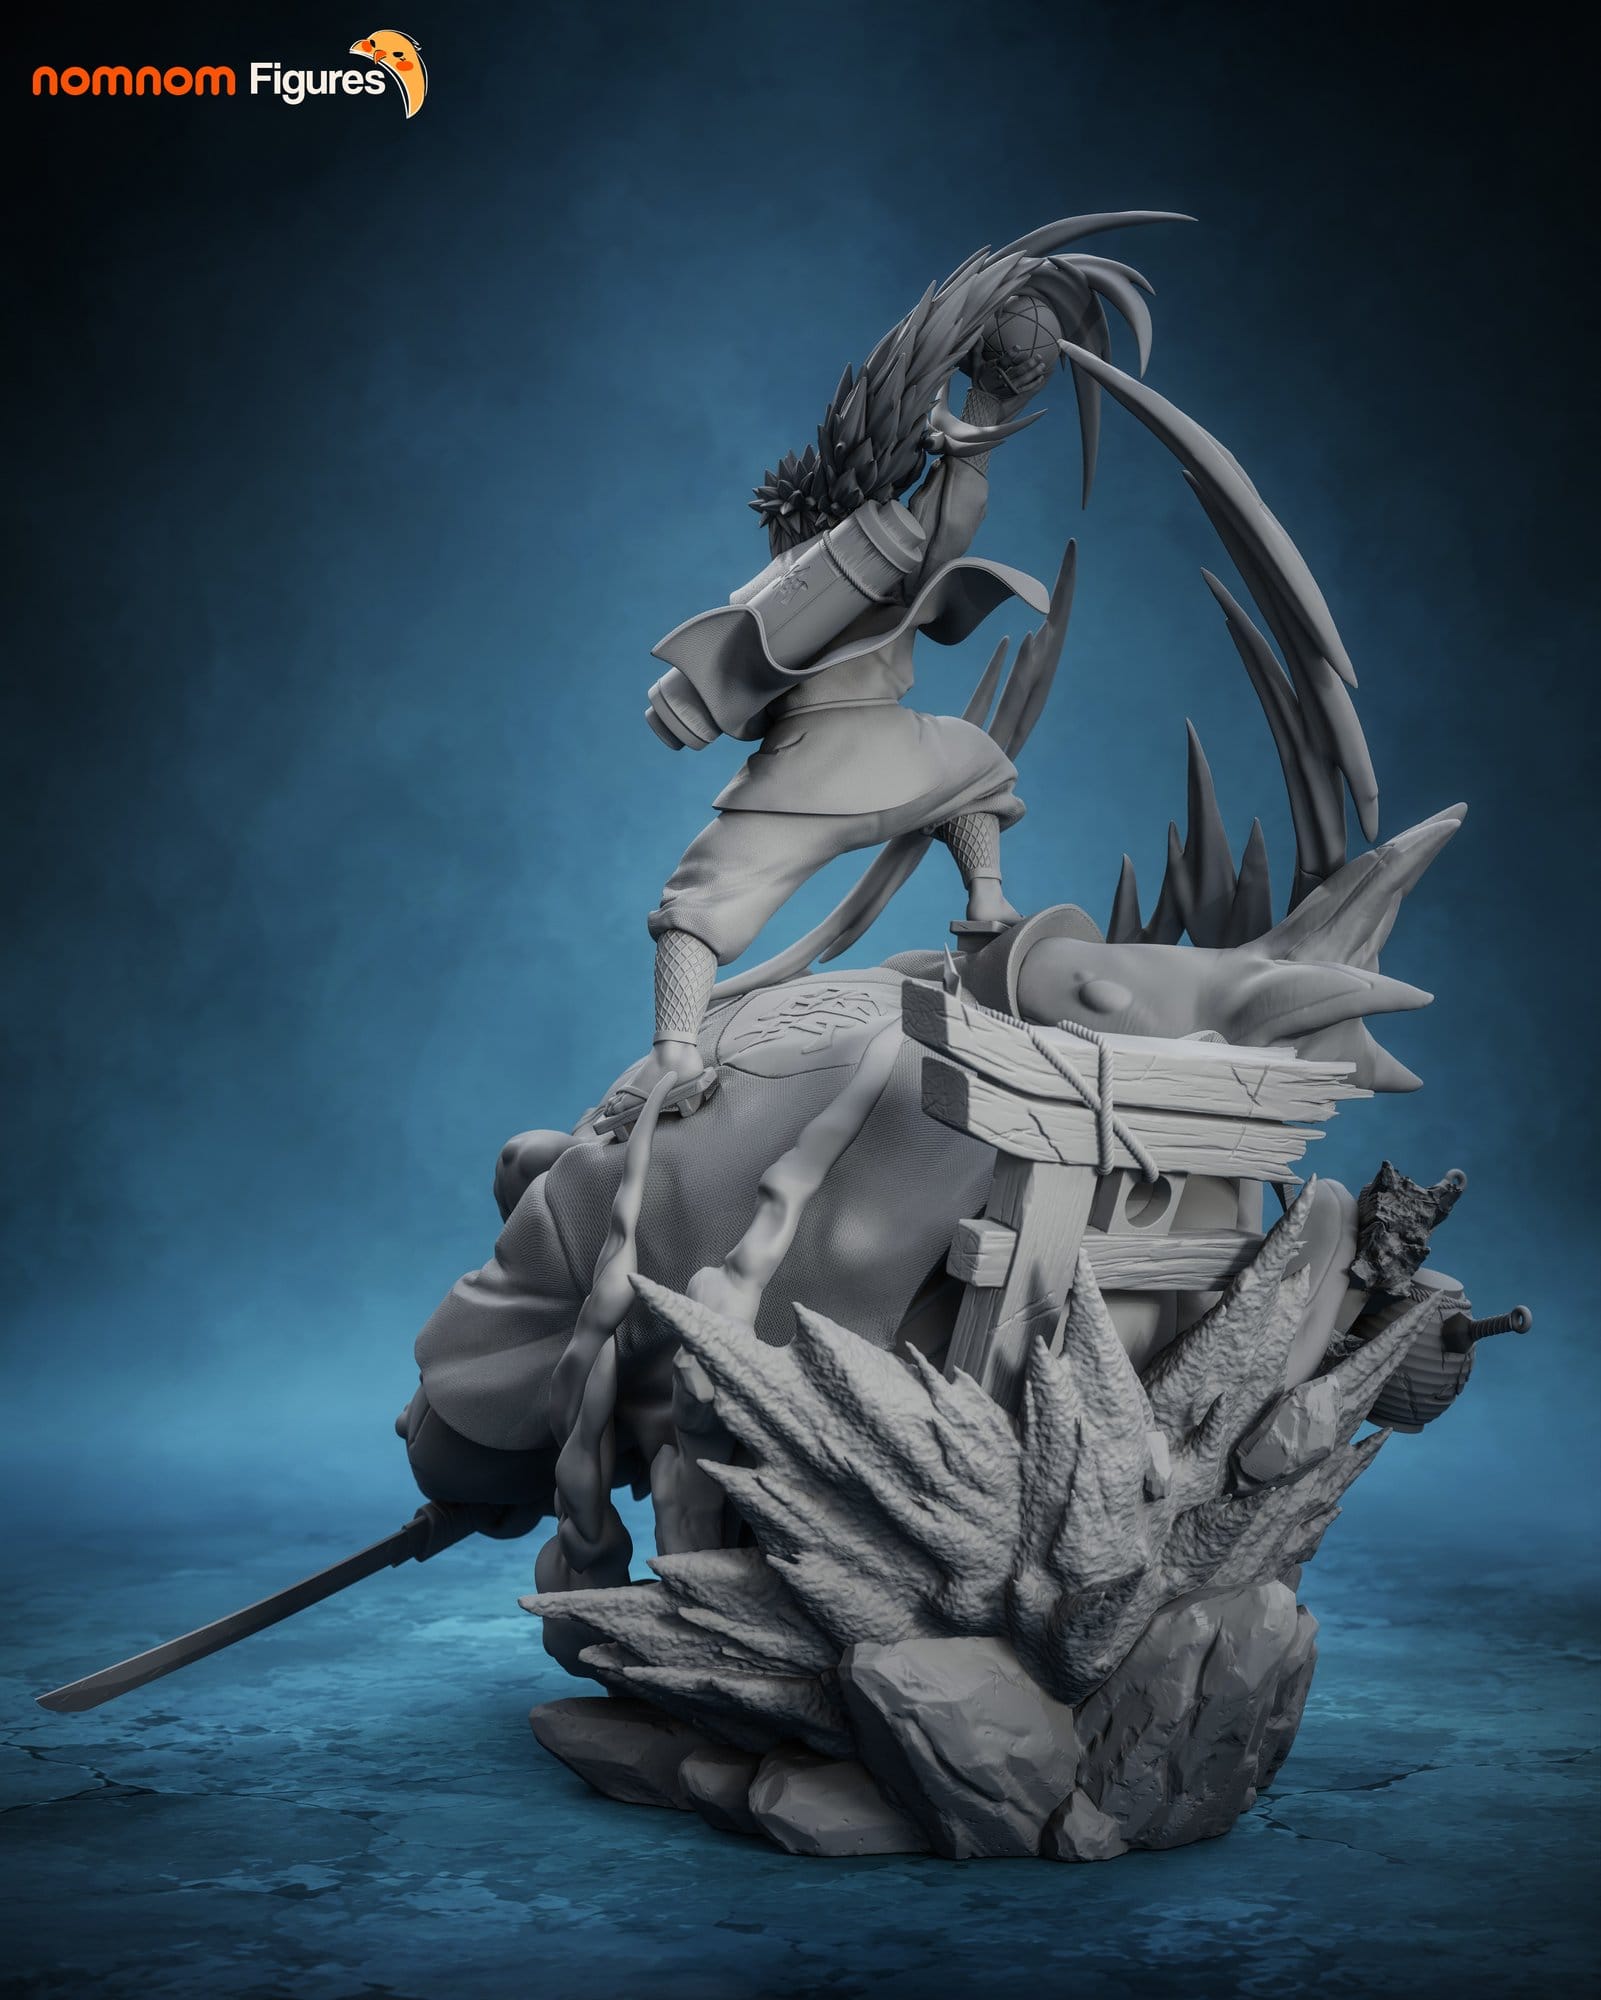
Colored_03.jpg, torii top and rock spikes in front. Shows the base geometry from behind.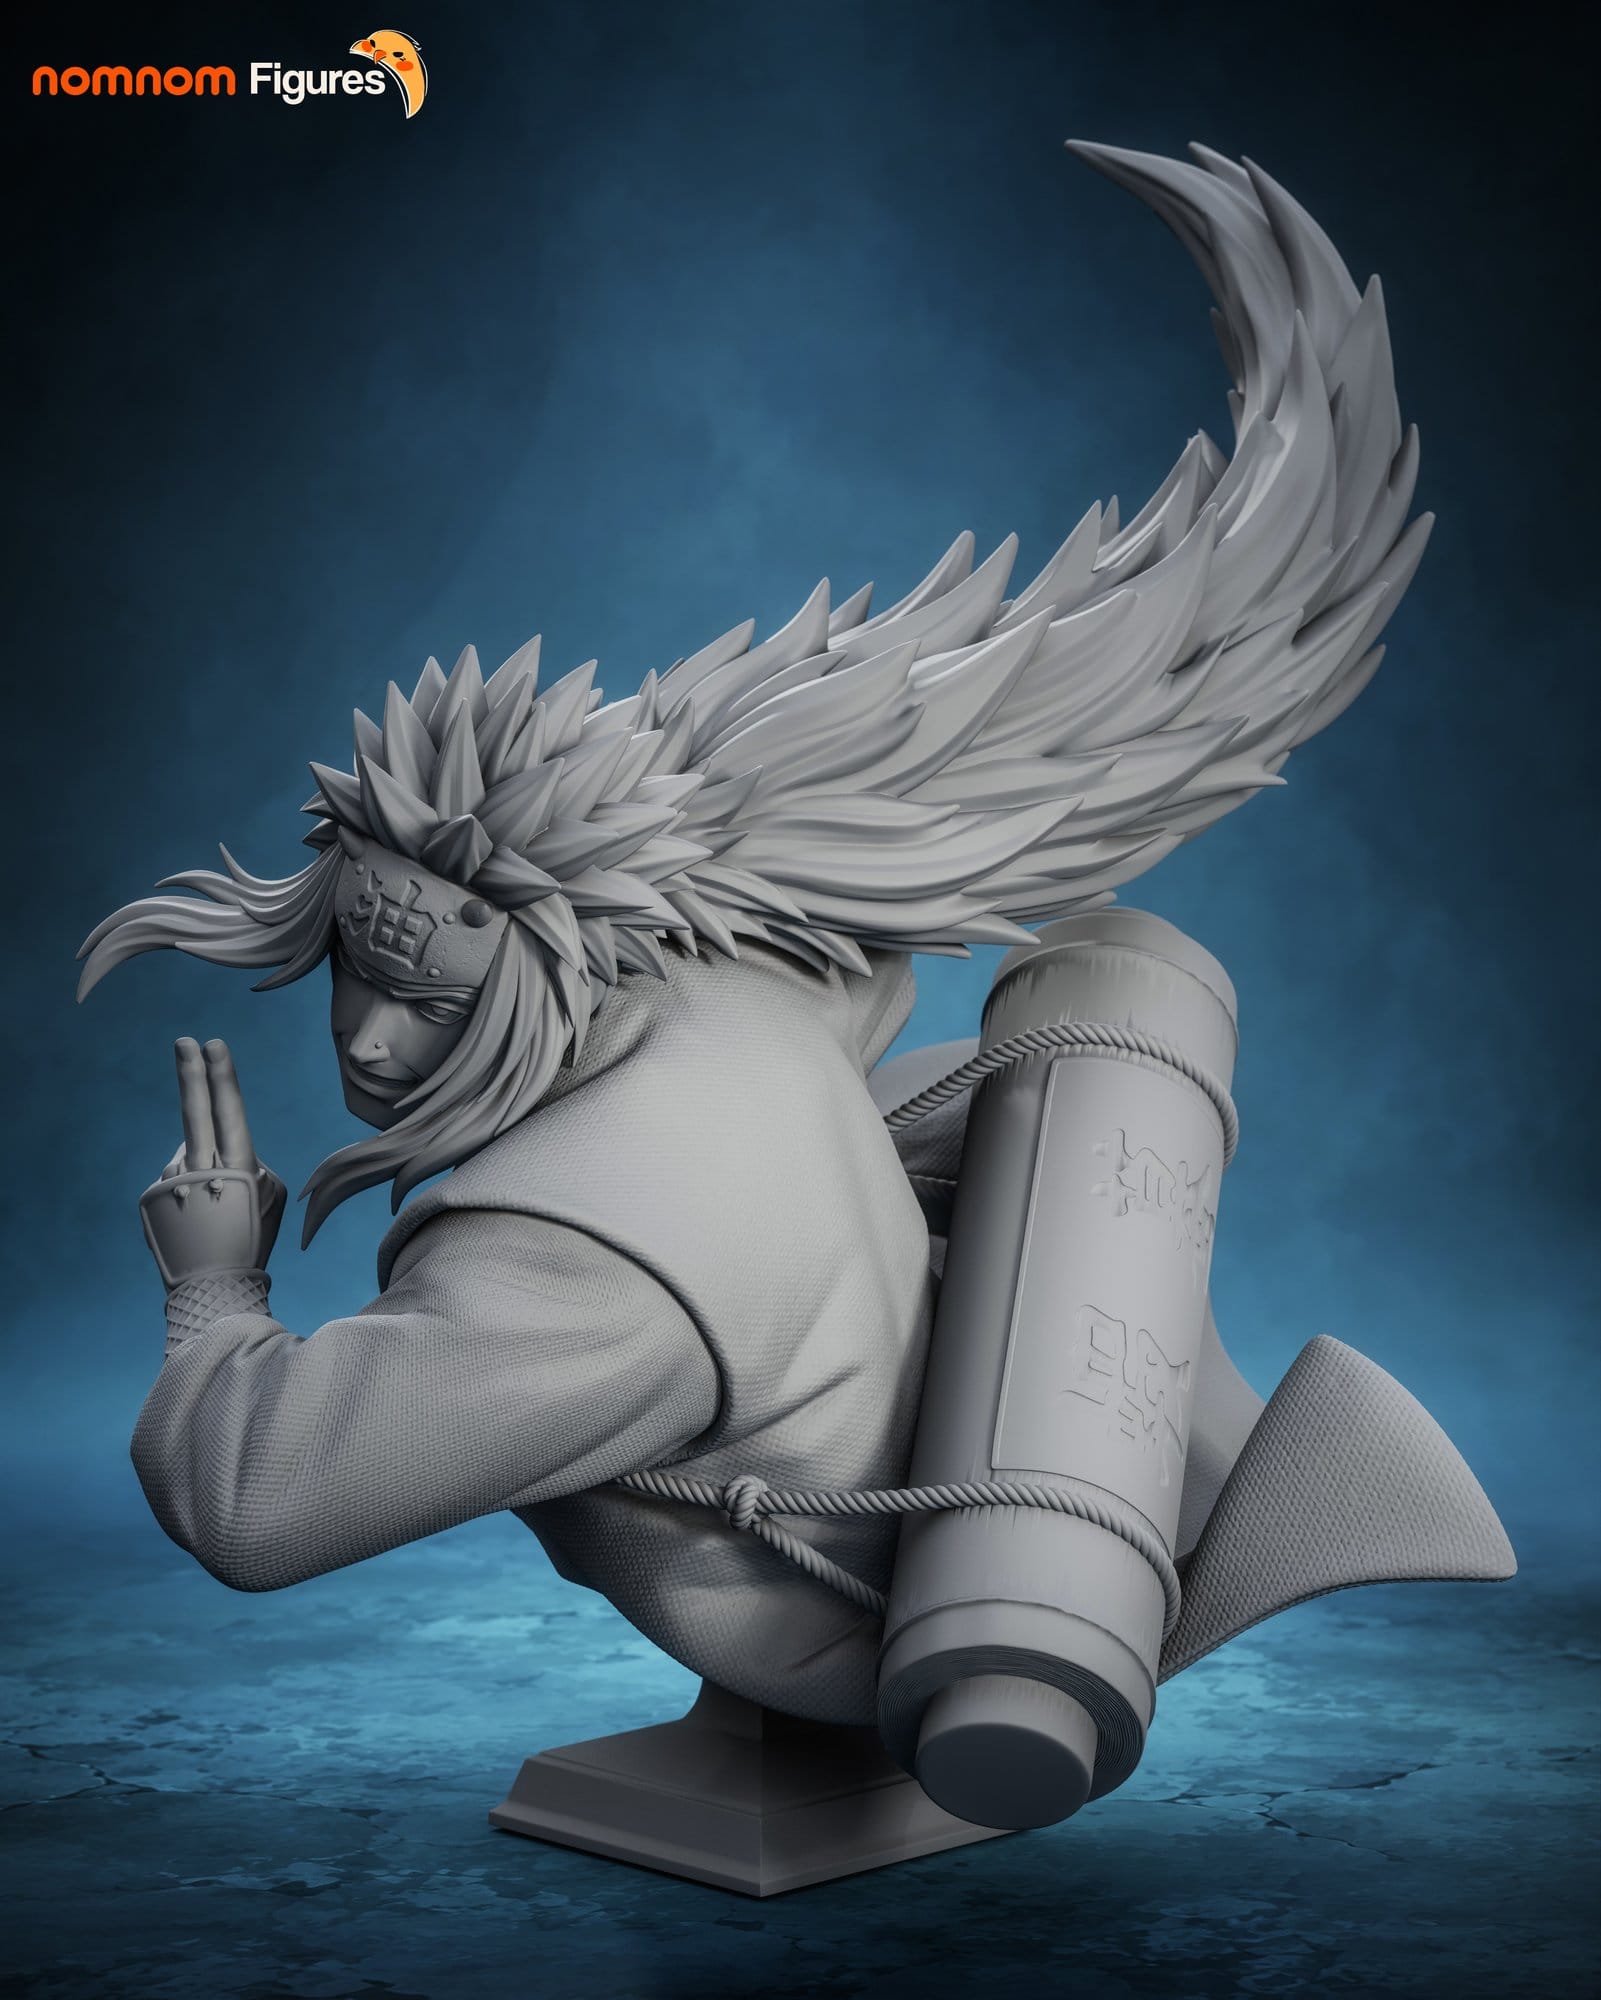
Links
- Want it printed? Get the unpainted kit in the store: full size, bust or miniature.
- Studio Patreon: NomNom Figures on Patreon
- Studio store: NomNom Figures on Cults3D · Jiraiya on the Toad on Cults3D
- CGTrader: NomNom Figures on CGTrader · Jiraiya on the Toad on CGTrader